
Mallory’s 1950s DIY Kitchen Makeover (You Won’t Believe This Before and After)
Welcome to (what used to be) the tiniest, ugliest room in my apartment! When I moved in, I knew the kitchen was less than ideal, but with the apartment price, location, and roommate (hi Jade!) all perfectly aligned, I knew I could make it work. When I first toured my apartment, I knew it had amazing potential, but it was in need of a ton of love. The building is from the 1950s and had a ton of adorable original details still intact, but it was certainly given the “landlord special” a few times over. Every apartment has its pros and cons, and for this place, the pros were that the living, dining, and bedrooms were all decently large, but the major con was that the kitchen was teeny tiny. Well, tiny for LA standards at least…my New York apartment kitchen would be so jealous it would probably block this kitchen on Instagram. BUT considering my roommate and I both love to cook and are often both in the kitchen at the same time, this room is very, very small. Especially because of the initial fridge placement…let me show you.
BEFORE
The Fridge Debacle
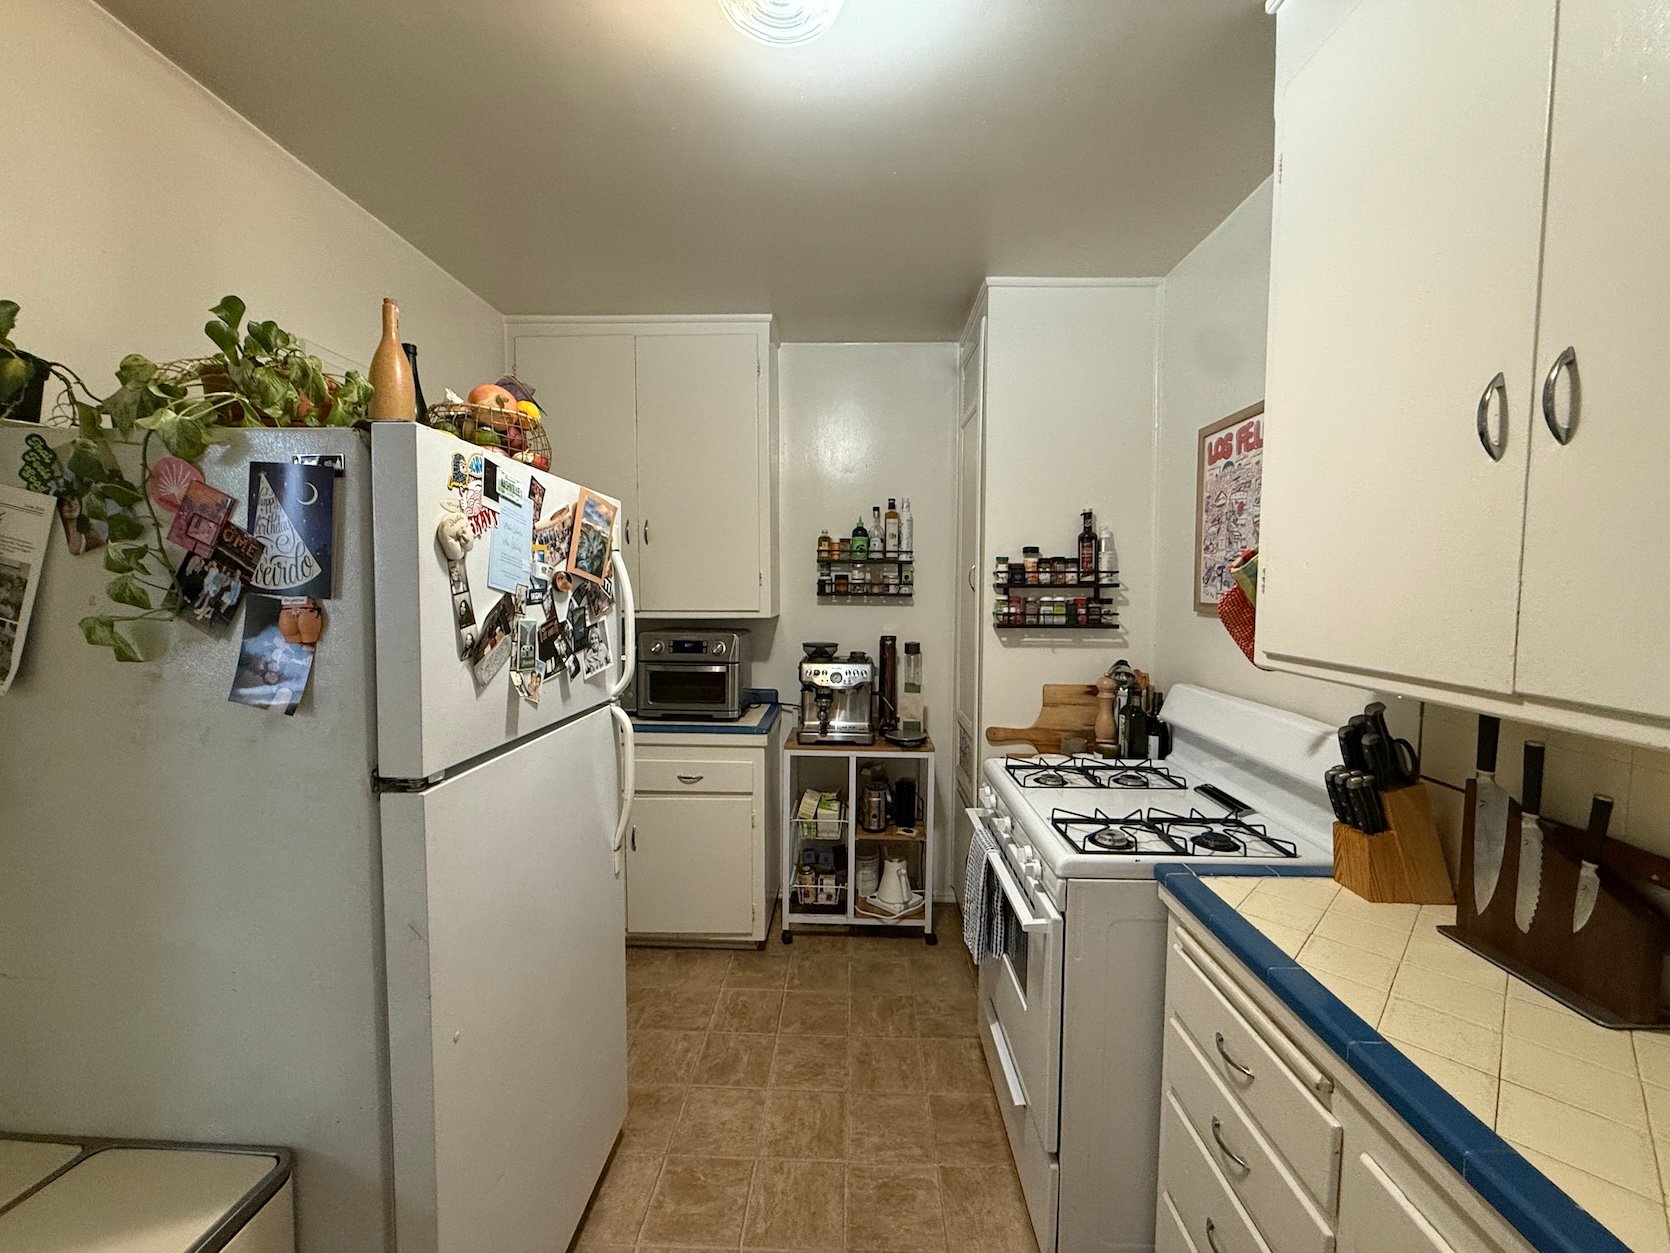
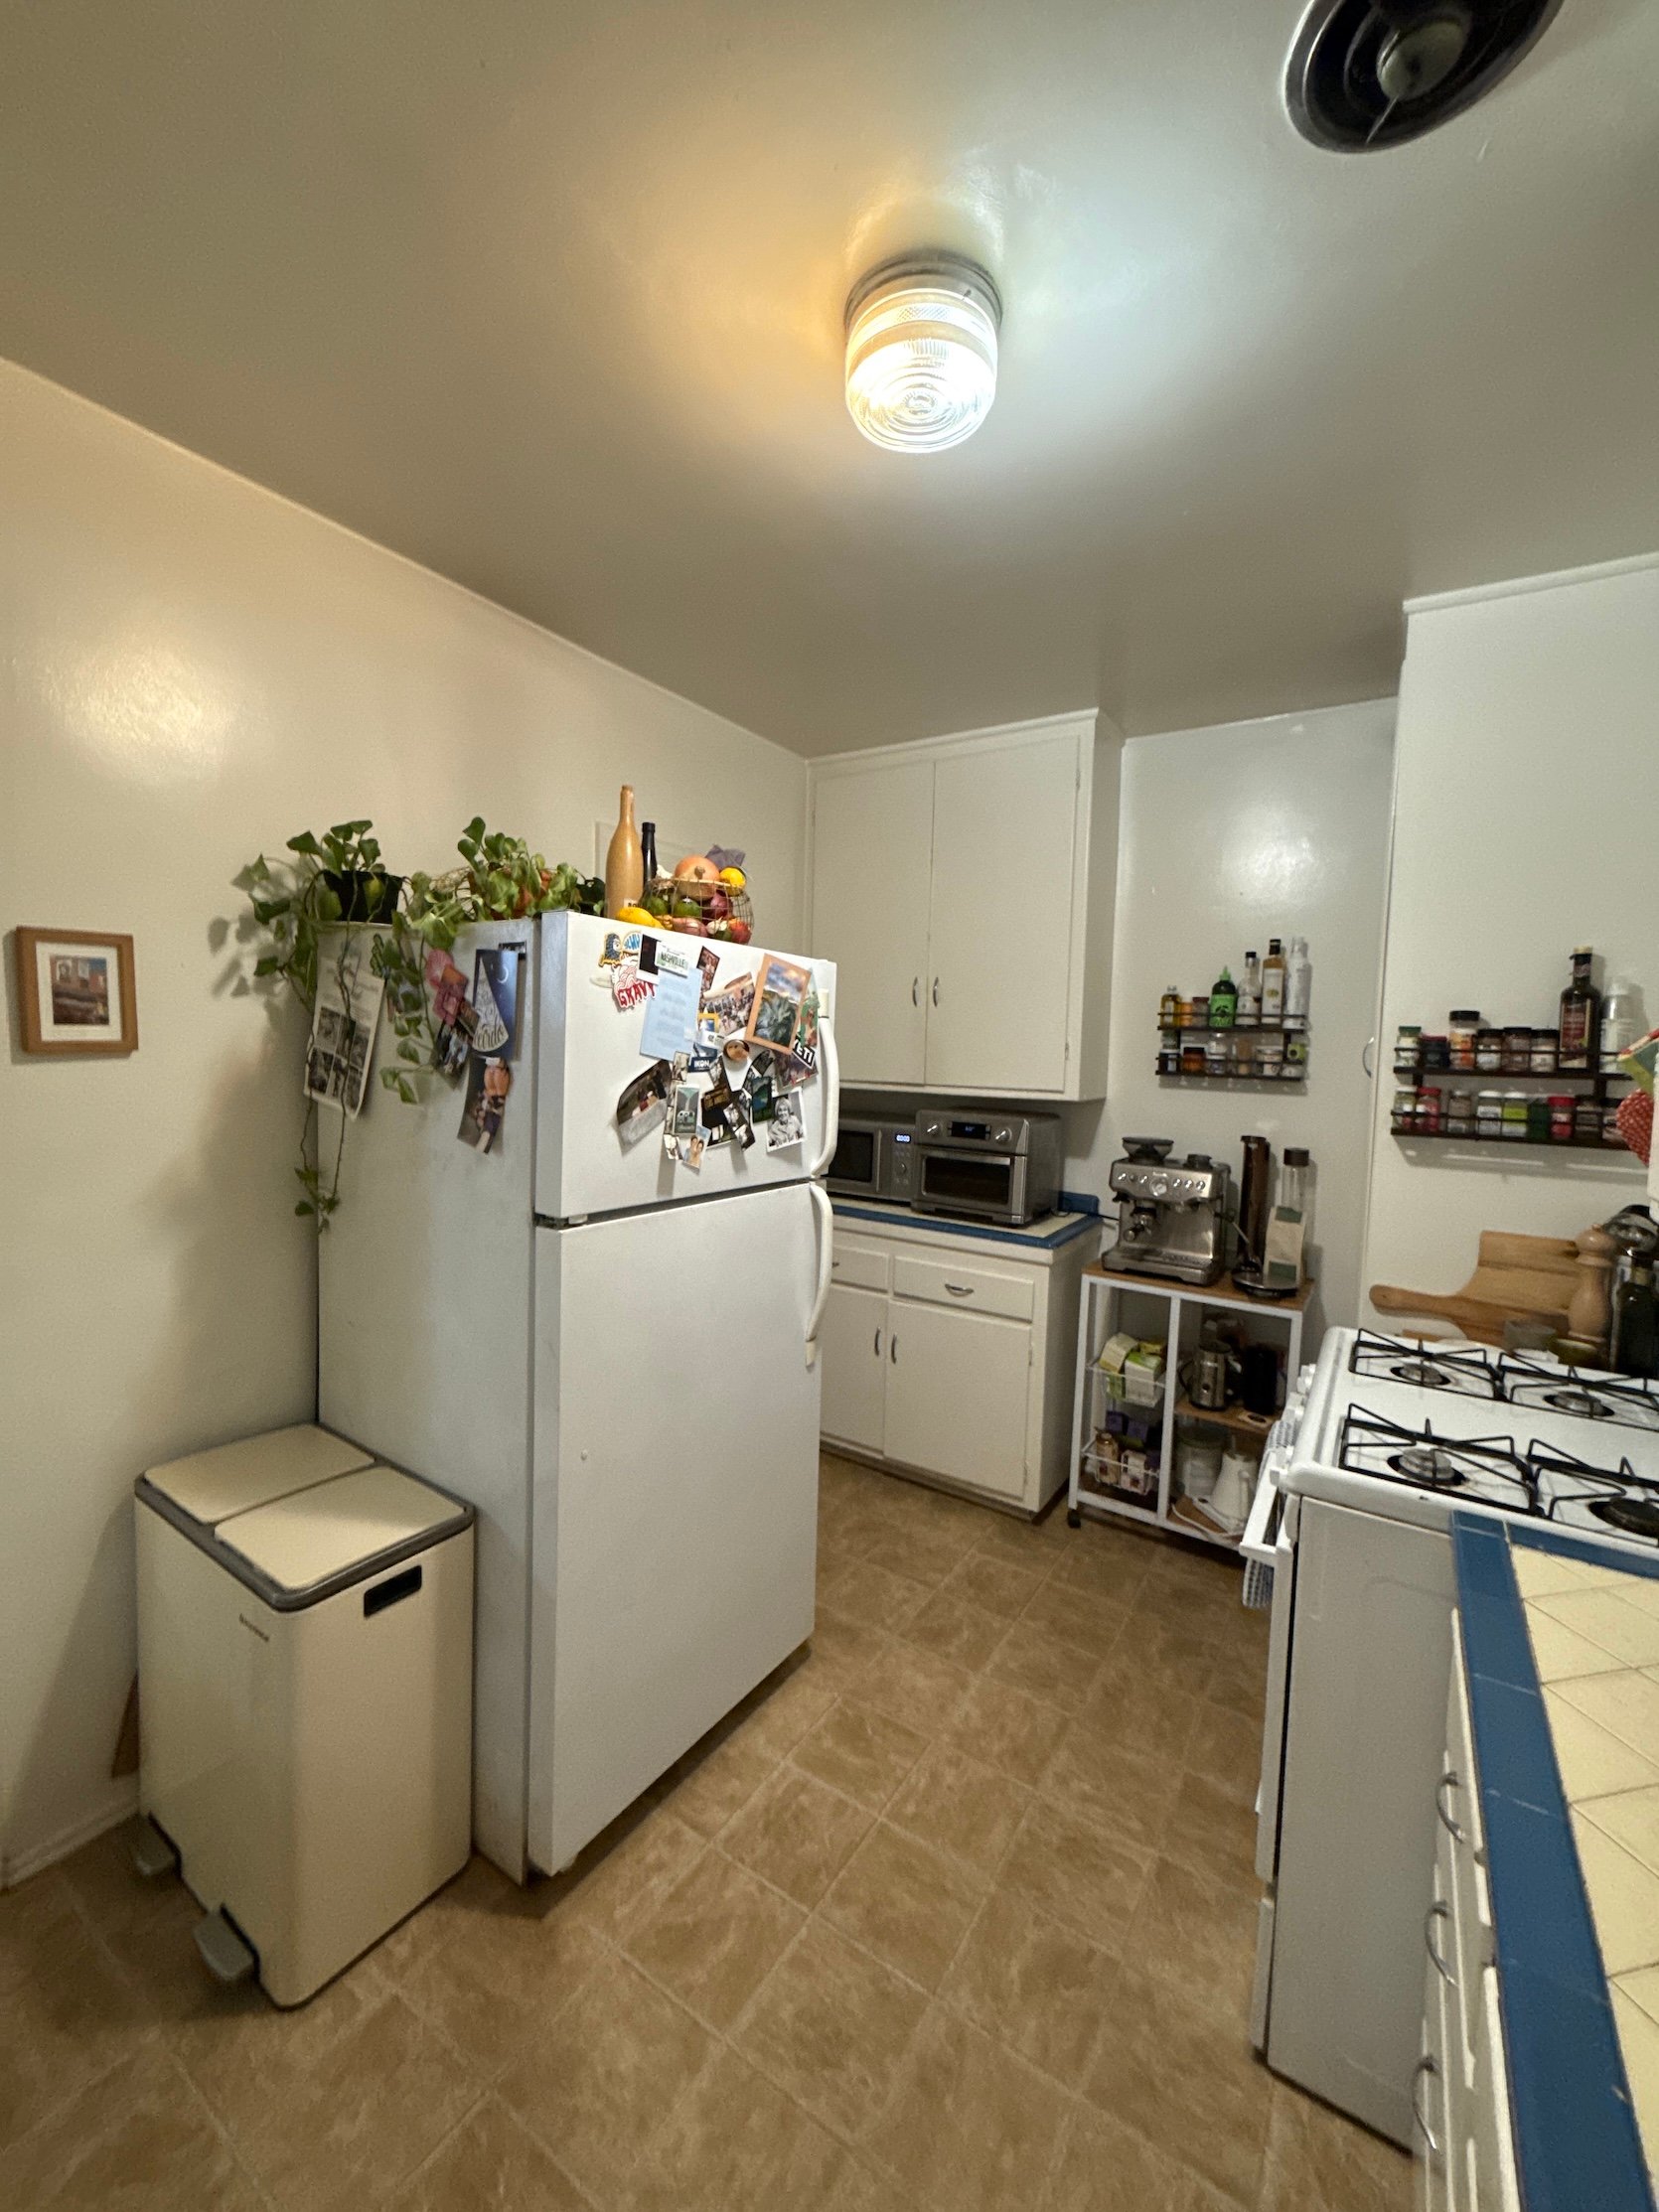
My favorite fact about this kitchen was that it didn’t come with a fridge (which was perfect timing considering CA just passed a law that landlords are now required to provide fridges to tenants after I moved in…cheers!). So this fridge you’re seeing in these “before” photos was an old one that our friend’s boss was trying to get rid of. It wasn’t a looker, and it leaked out puddles and puddles of water daily, which was a bit alarming, but it was mainly the size and placement of this fridge that was the biggest problem. It was much too big for the space, so it made the room feel even smaller, especially when you were cooking on the stovetop and needed to grab something out of the fridge; when the door was open, you could hardly even fit one person in here.
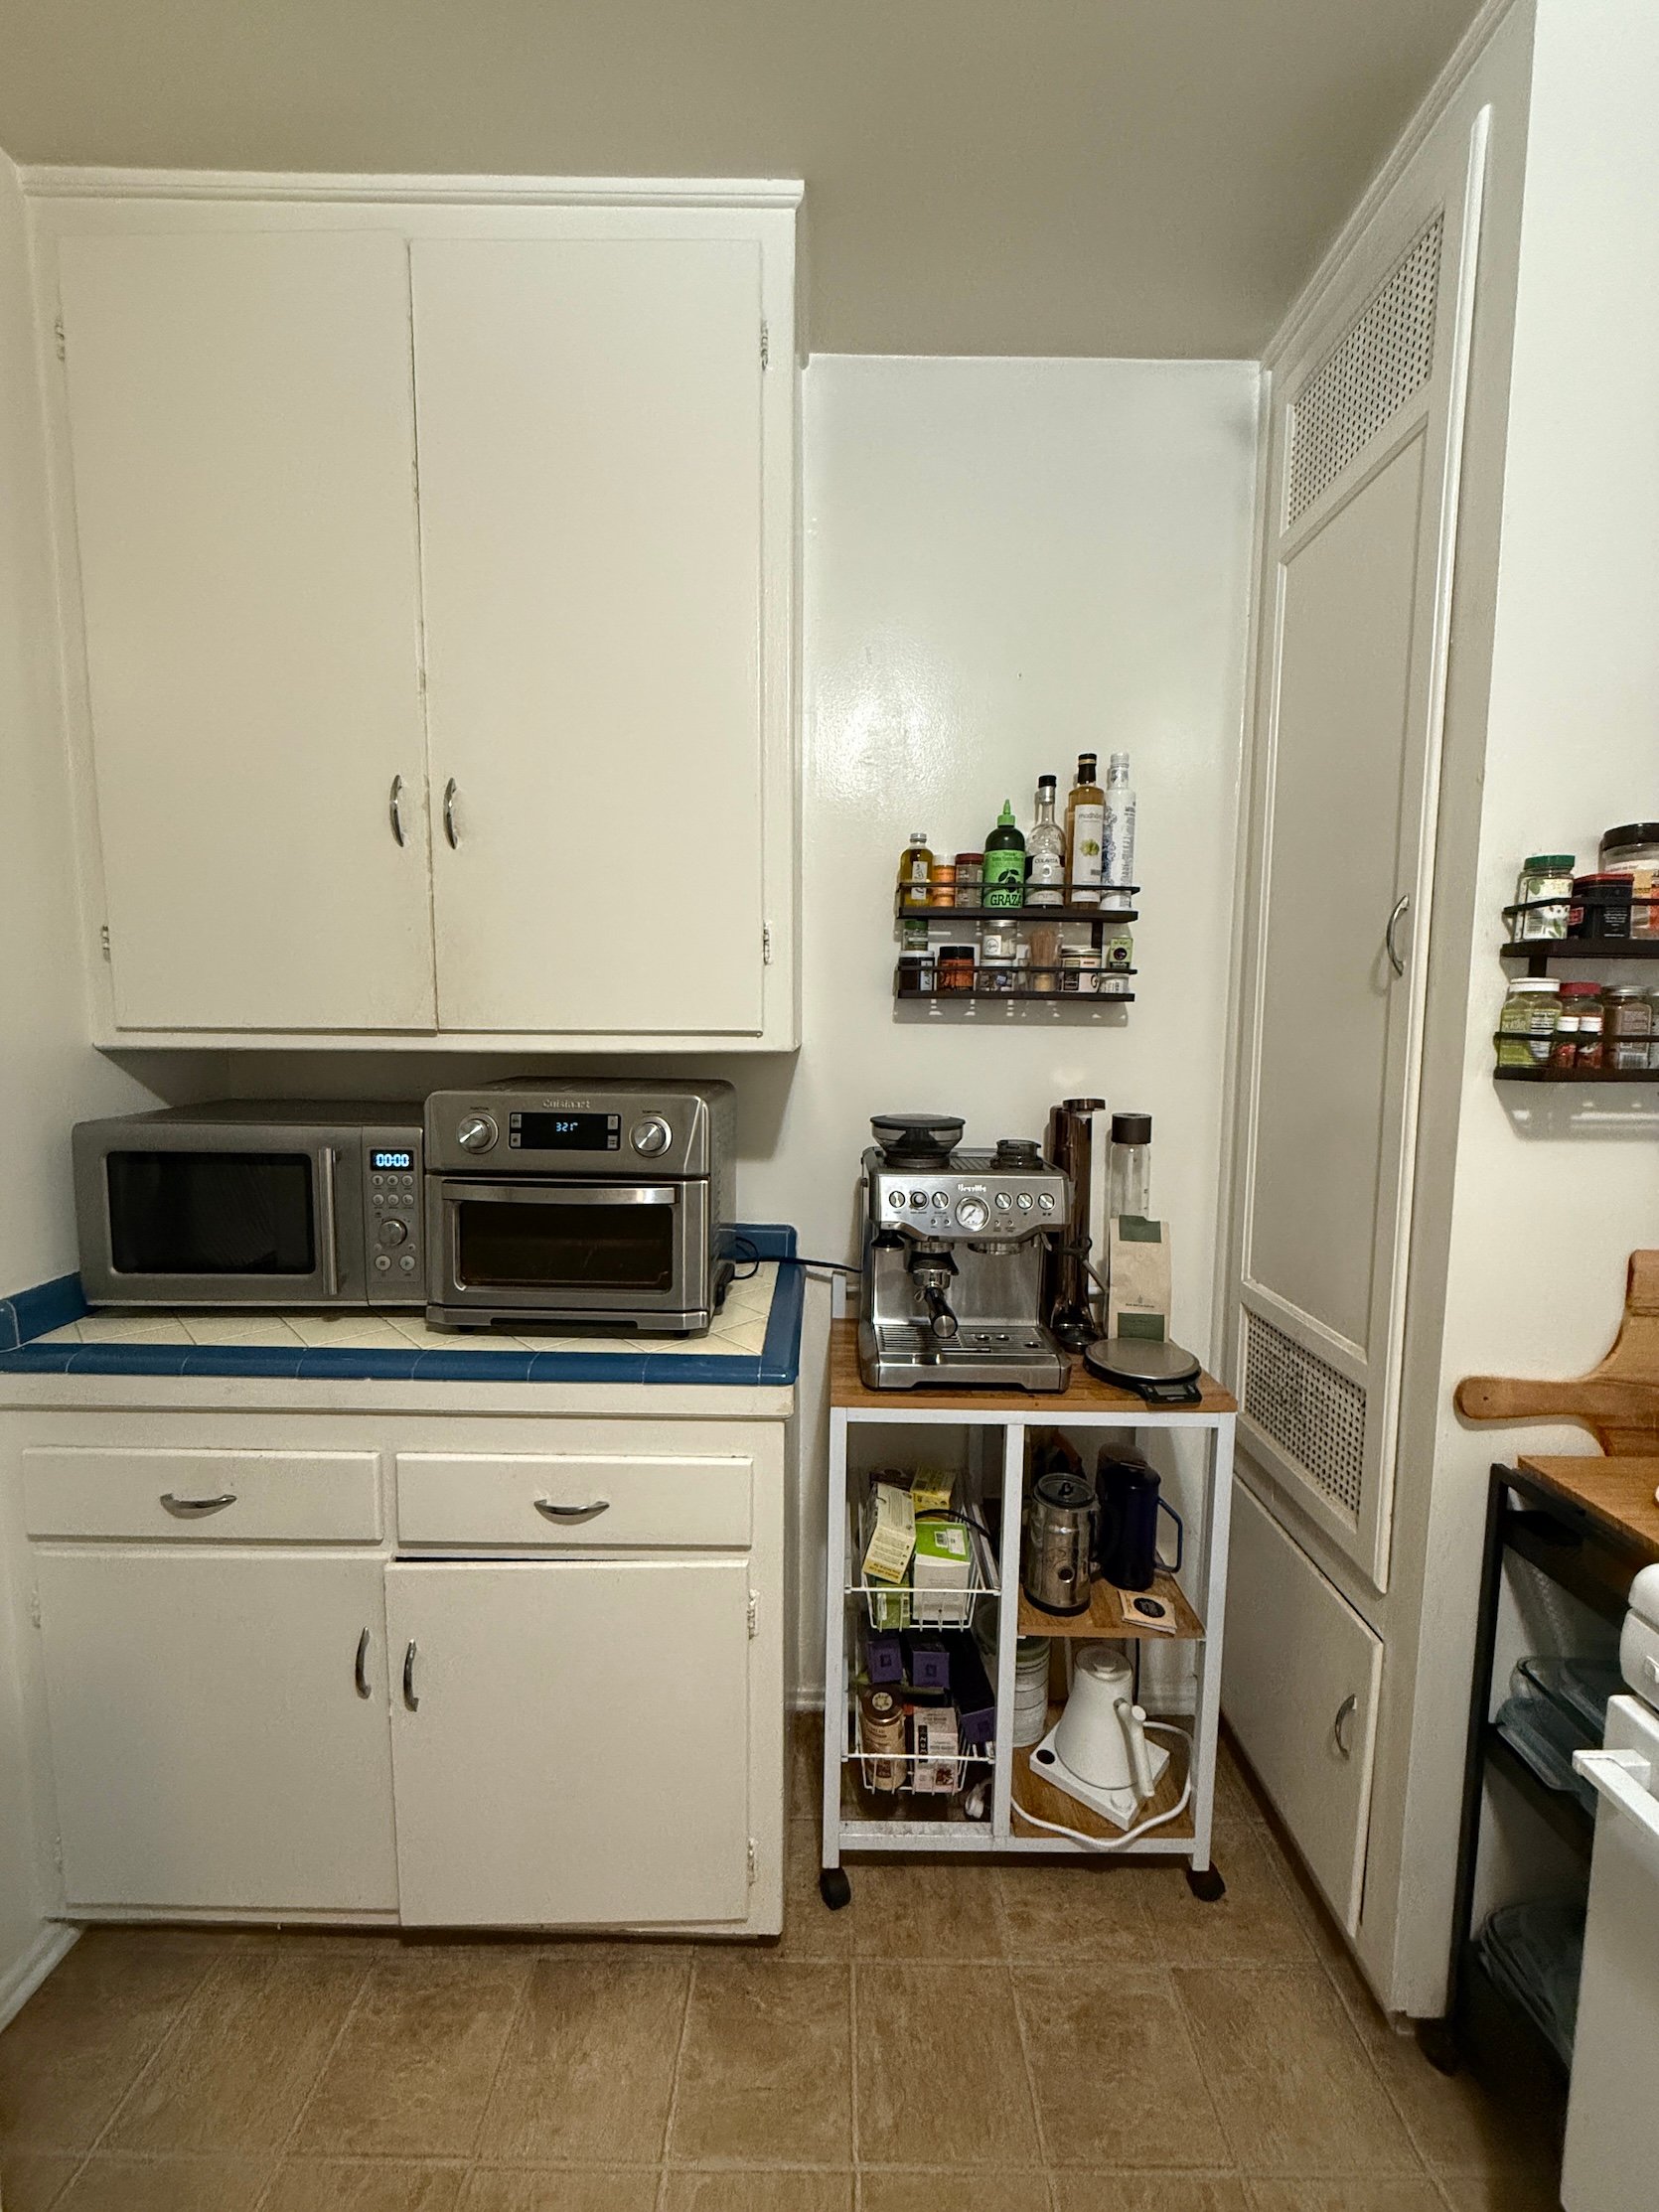
This was the first wall I wanted to tackle because I knew if I just moved a few things around over here, I could make the space function way better for us. Not only was the fridge protruding out into the middle of the room, but we were also seriously lacking counter space. The deeper countertops (the ones you’re seeing here to the right of the fridge) were housing our microwave and toaster because they had nowhere else to go. So the only usable cooking prep space was on the opposite side of the room – and those countertops are so shallow we couldn’t fit a cutting board on them. Plus, the upper cabinets are super low, which also made things a bit difficult, so with everything combined, this kitchen was my personal hell to cook dinner in (which was so sad because I love cooking).
Determined to make this space more functional (and prettier), I wheeled the leaky, broken old fridge out of the kitchen door (which fit through with less than half of an inch to spare). And you will not believe what I found…
Okay, everyone, say it with me – a fire hazard! COOL! This was actually terrifying to see, but in this moment, I immediately knew I had made the right choice to get rid of this honker. Our apartment is pretty much rent-controlled, month-to-month, and is the perfect location in Los Feliz – walkable to all the stores and restaurants. So I moved in knowing I would probably have to get a new fridge to make the kitchen really usable, but it was a cost I was willing to pay considering my monthly rent was such a good deal, and the location was perfect. Also, since this place didn’t come with a fridge, I could invest in one I have always wanted, since I can take it with me into my future homes. And the one I have always wanted?! A cream Smeg OF COURSE!
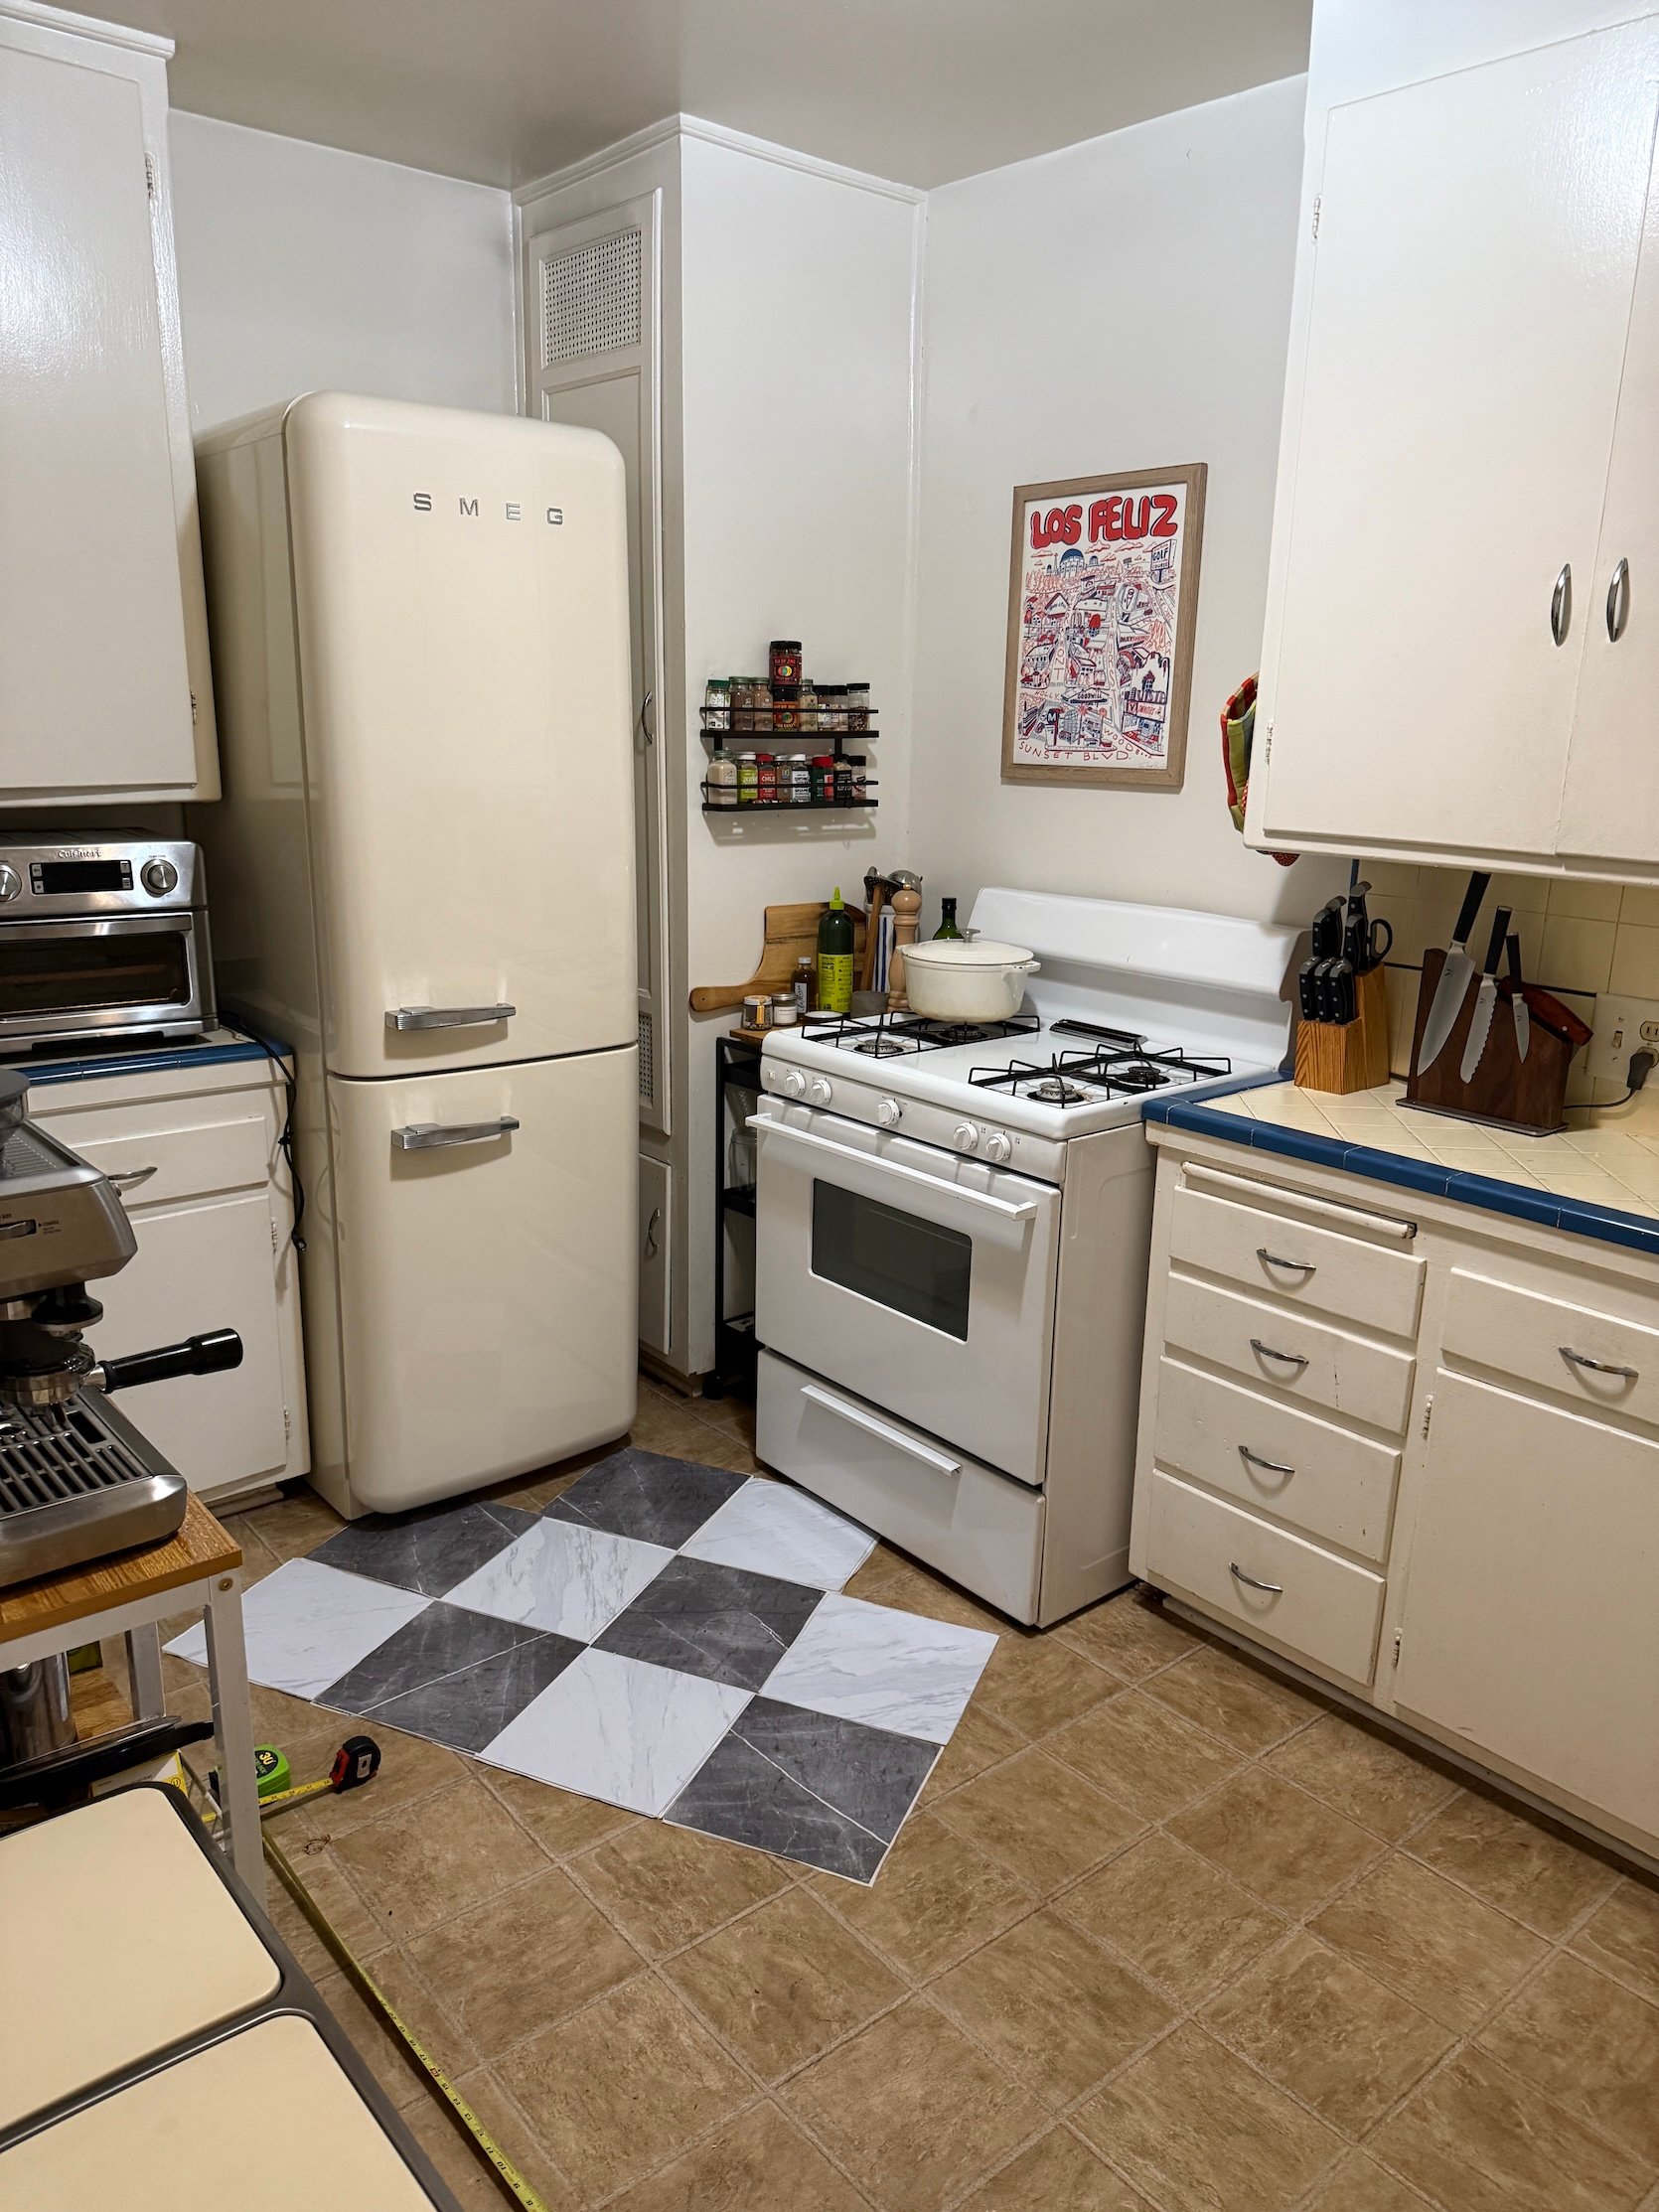
And the fridge fit perfectly over in this corner, which freed up the space SO MUCH. OH, and if you’re wondering what that cabinet is next to the fridge – it’s completely non-usable, so don’t worry, we aren’t wasting cabinet space (lord knows we need it). BTW, if you’re thinking about investing in a Smeg, you should CERTAINLY do what I did and use Caitlin’s Wayfair hack, which is: 1) Join Wayfair’s membership program and then B). Get $200 back in credits. The membership pays for itself, and you get a decent chunk back!! It was actually genius, and I never would’ve known about it unless she posted about that, so shoutout to our girl Cait for the tip! And nope, this was not sponsored (although that would’ve been cool lol) – it just genuinely was worth it! The Wayfair delivery team was also SO awesome and did white glove, which was an actual dream (because I have no clue what I would’ve done had I just been here alone).
As you can see from the above photo, the next thing I did was cover the horrific linoleum floor in Chris Loves Julia x Floorpops peel-and-stick tile, and I was SUPER impressed. I won’t lie – it’s a bit trial and error to get a clean, straight cut, but the weight of these tiles was shocking, and the quality was just amazing. The whole installation process took me about 3 hours from start to finish, which was very fast IMHO. I would totally do this again!!
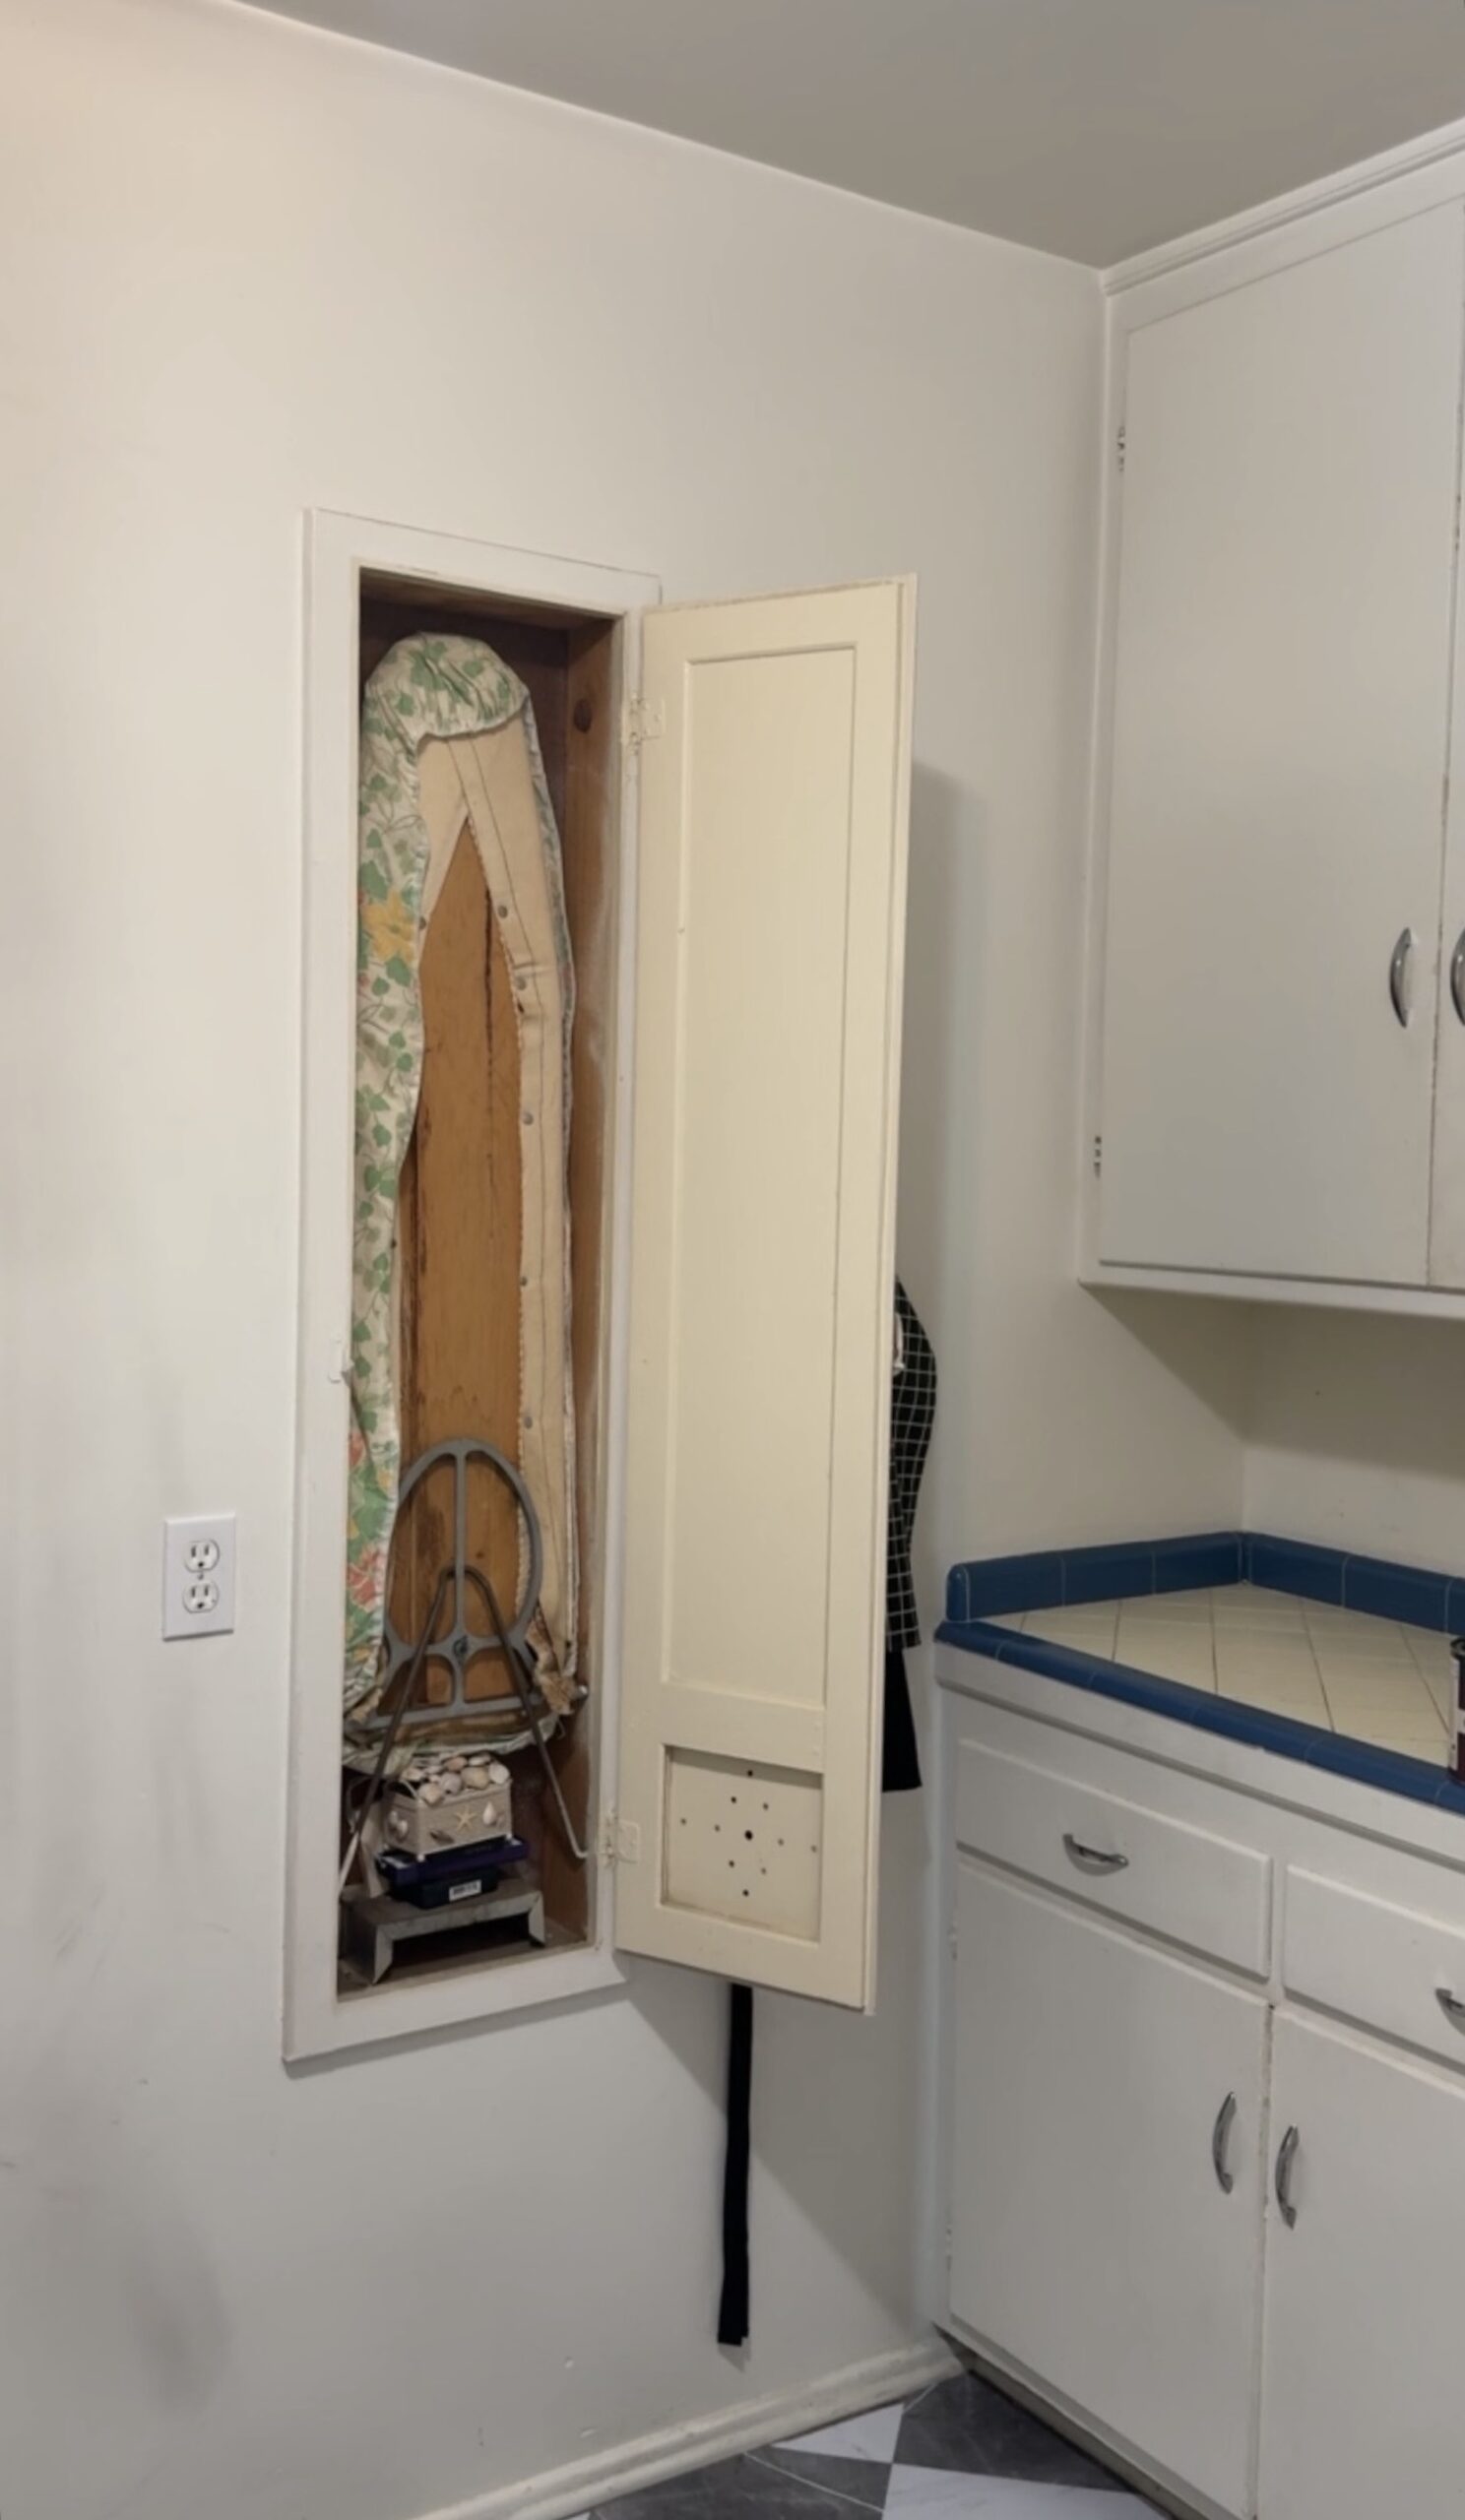
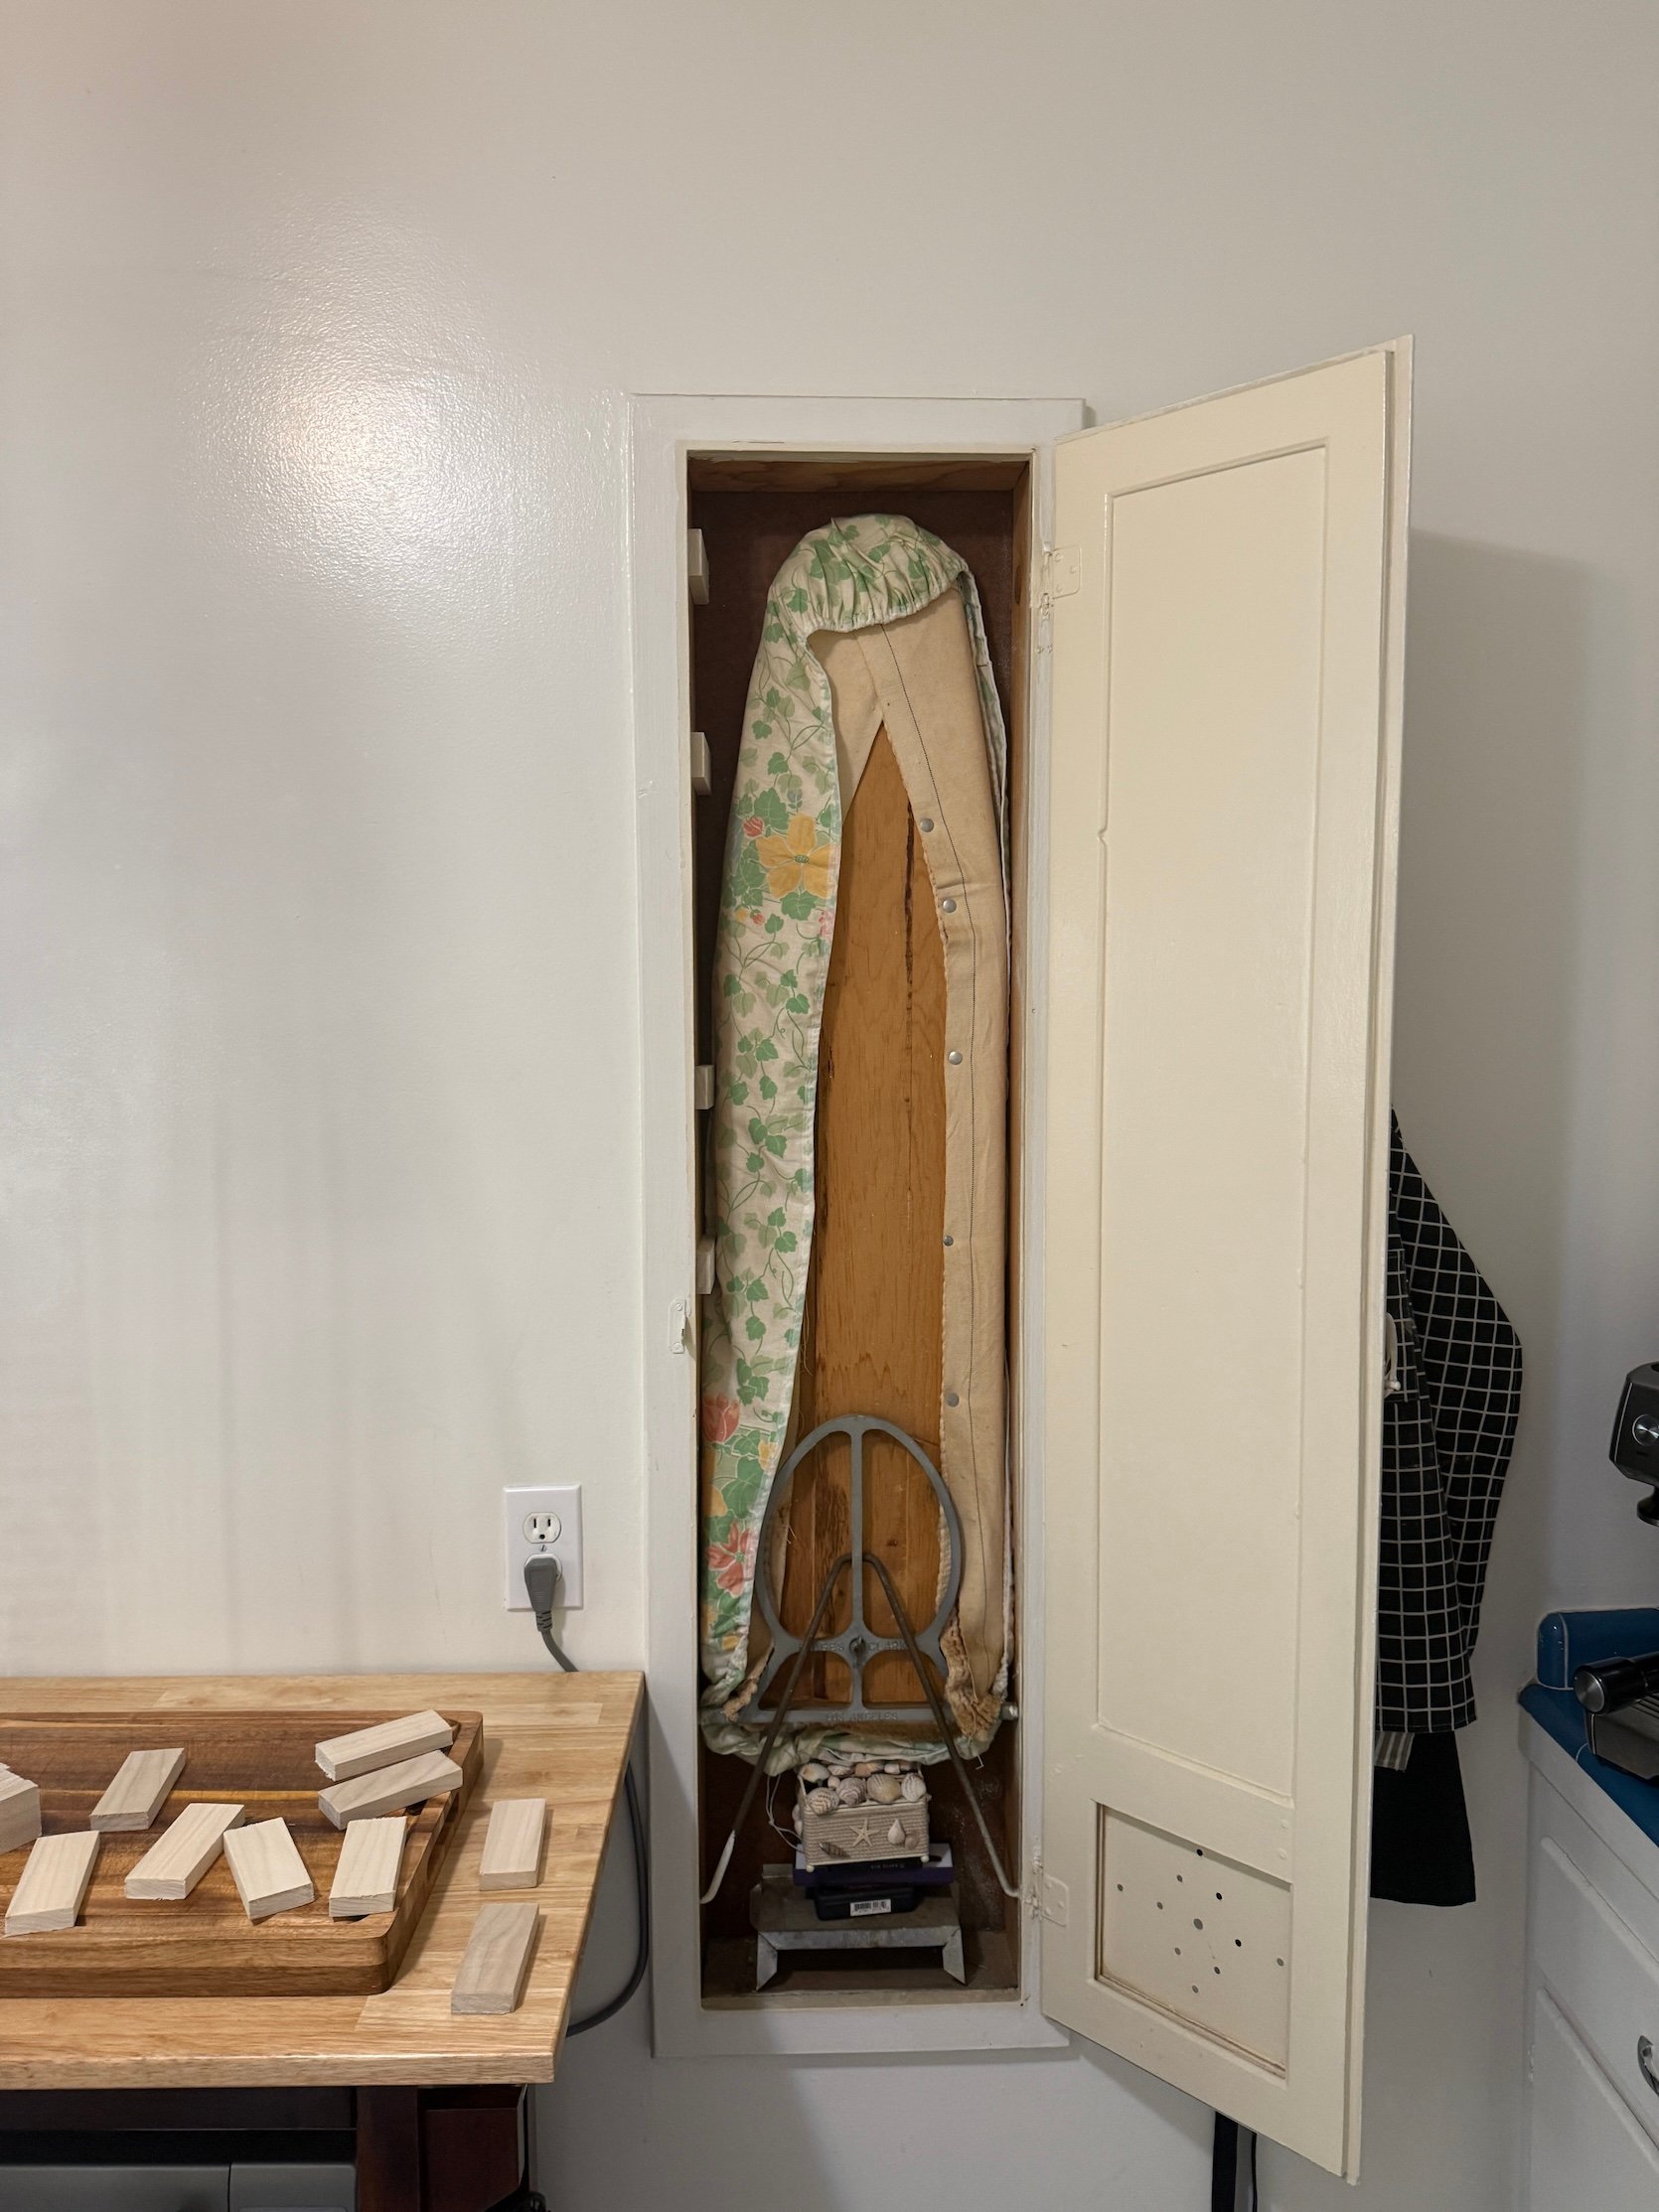
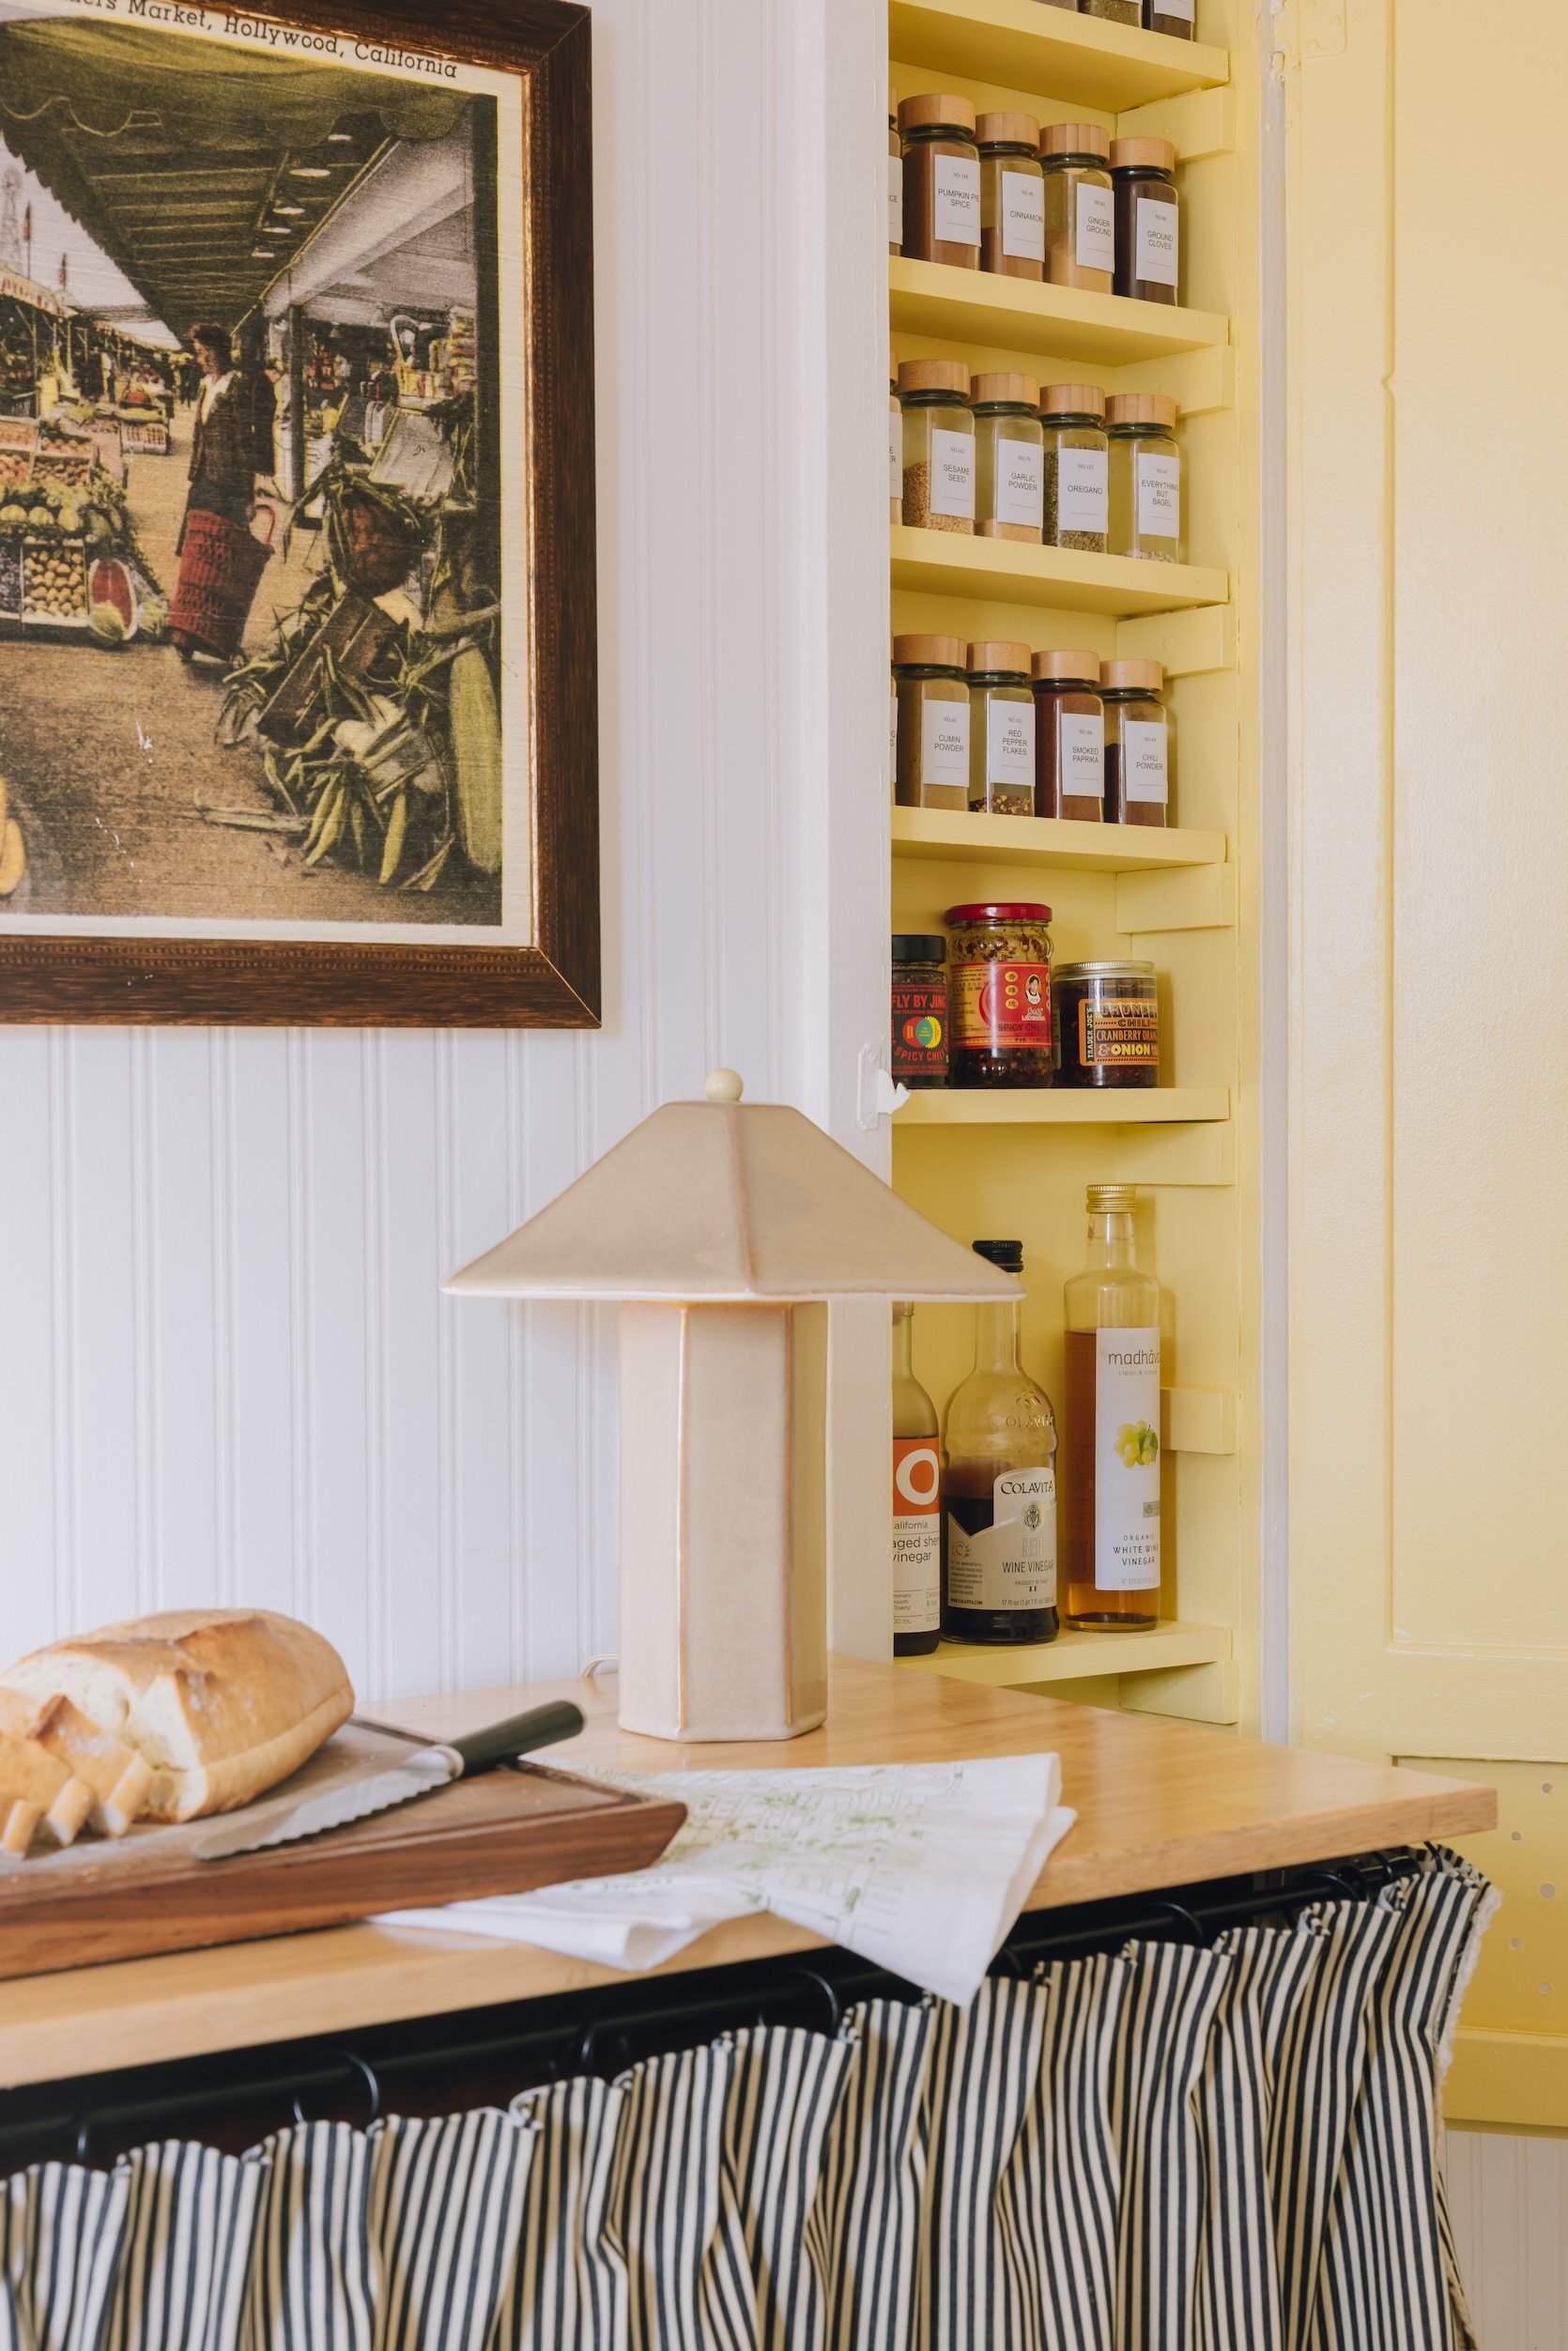
Next up, I had this vintage ironing board, which is objectively awesome, but we never used it, and the fabric was pretty nasty and old, to be frank. As a steamer enthusiast, I knew this area would be much better utilized as something else, and we were pretty desperate for more storage space, so I turned it into a fun yellow spice cabinet!!
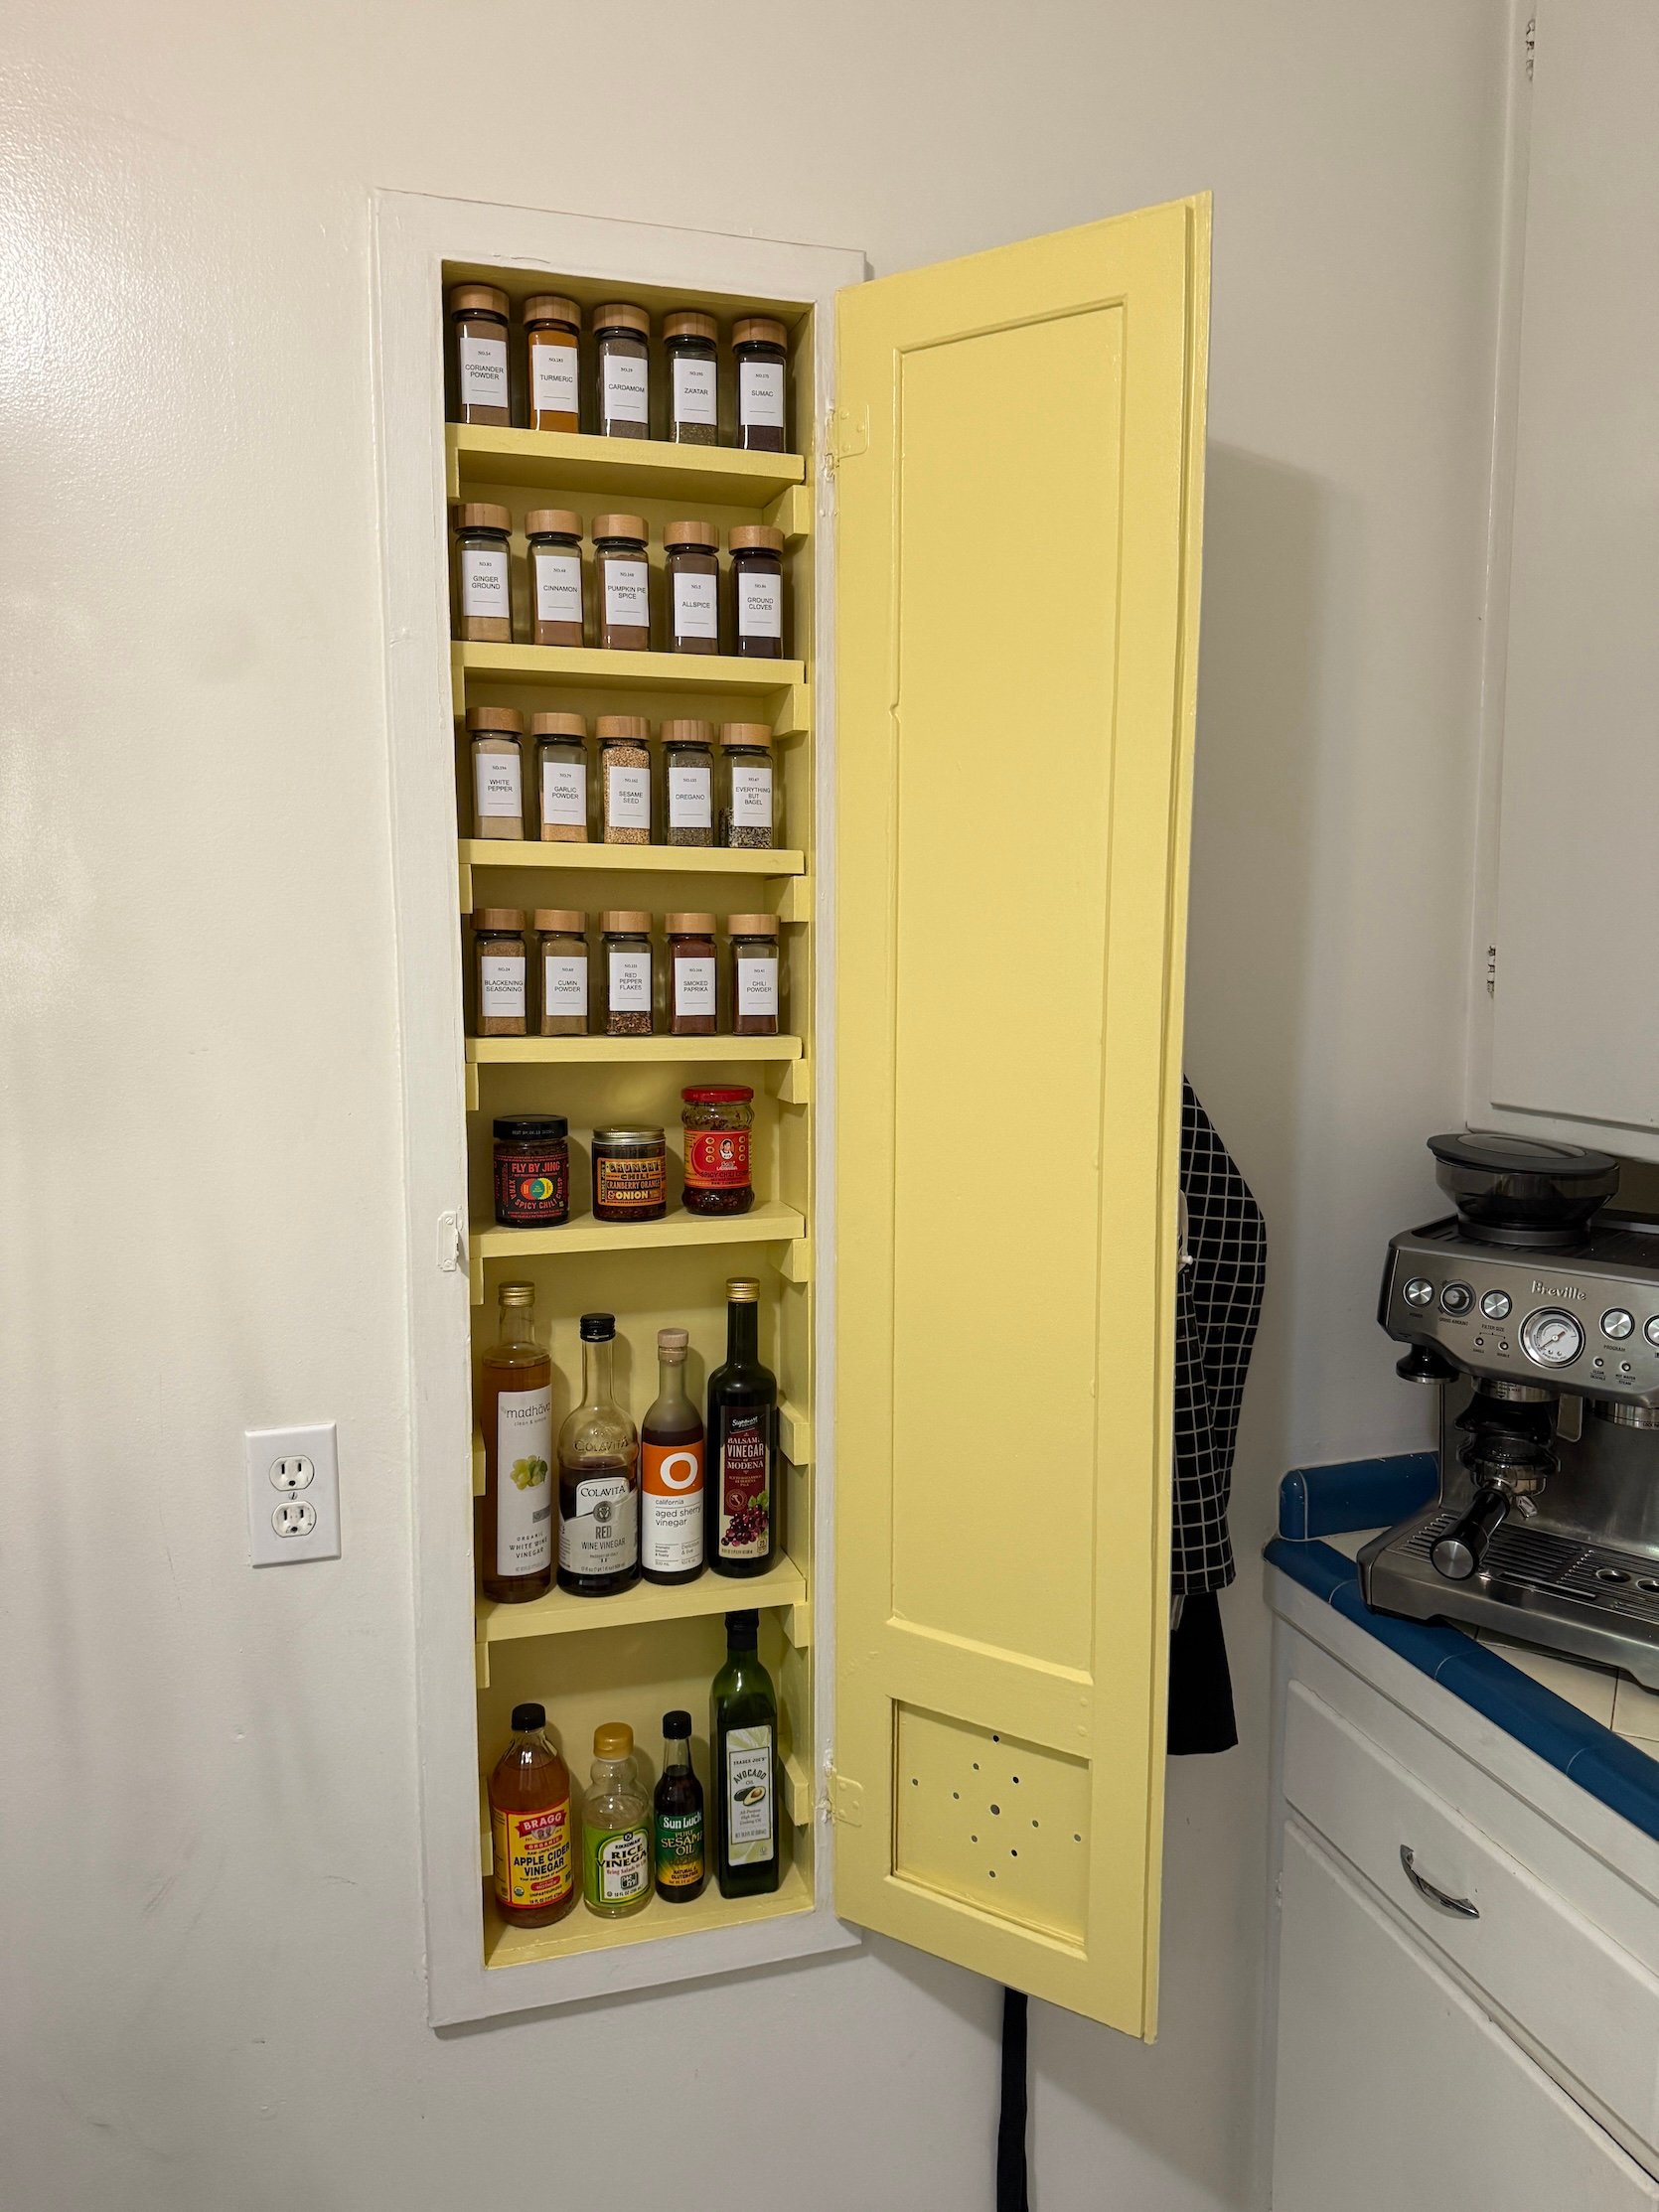
You can see how I did it step by step here and here! I absolutely loved this DIY, and it was insanely easy. Plus the pop of yellow goes with the yellow vintage tile and makes me so happy (it’s my favorite color!)
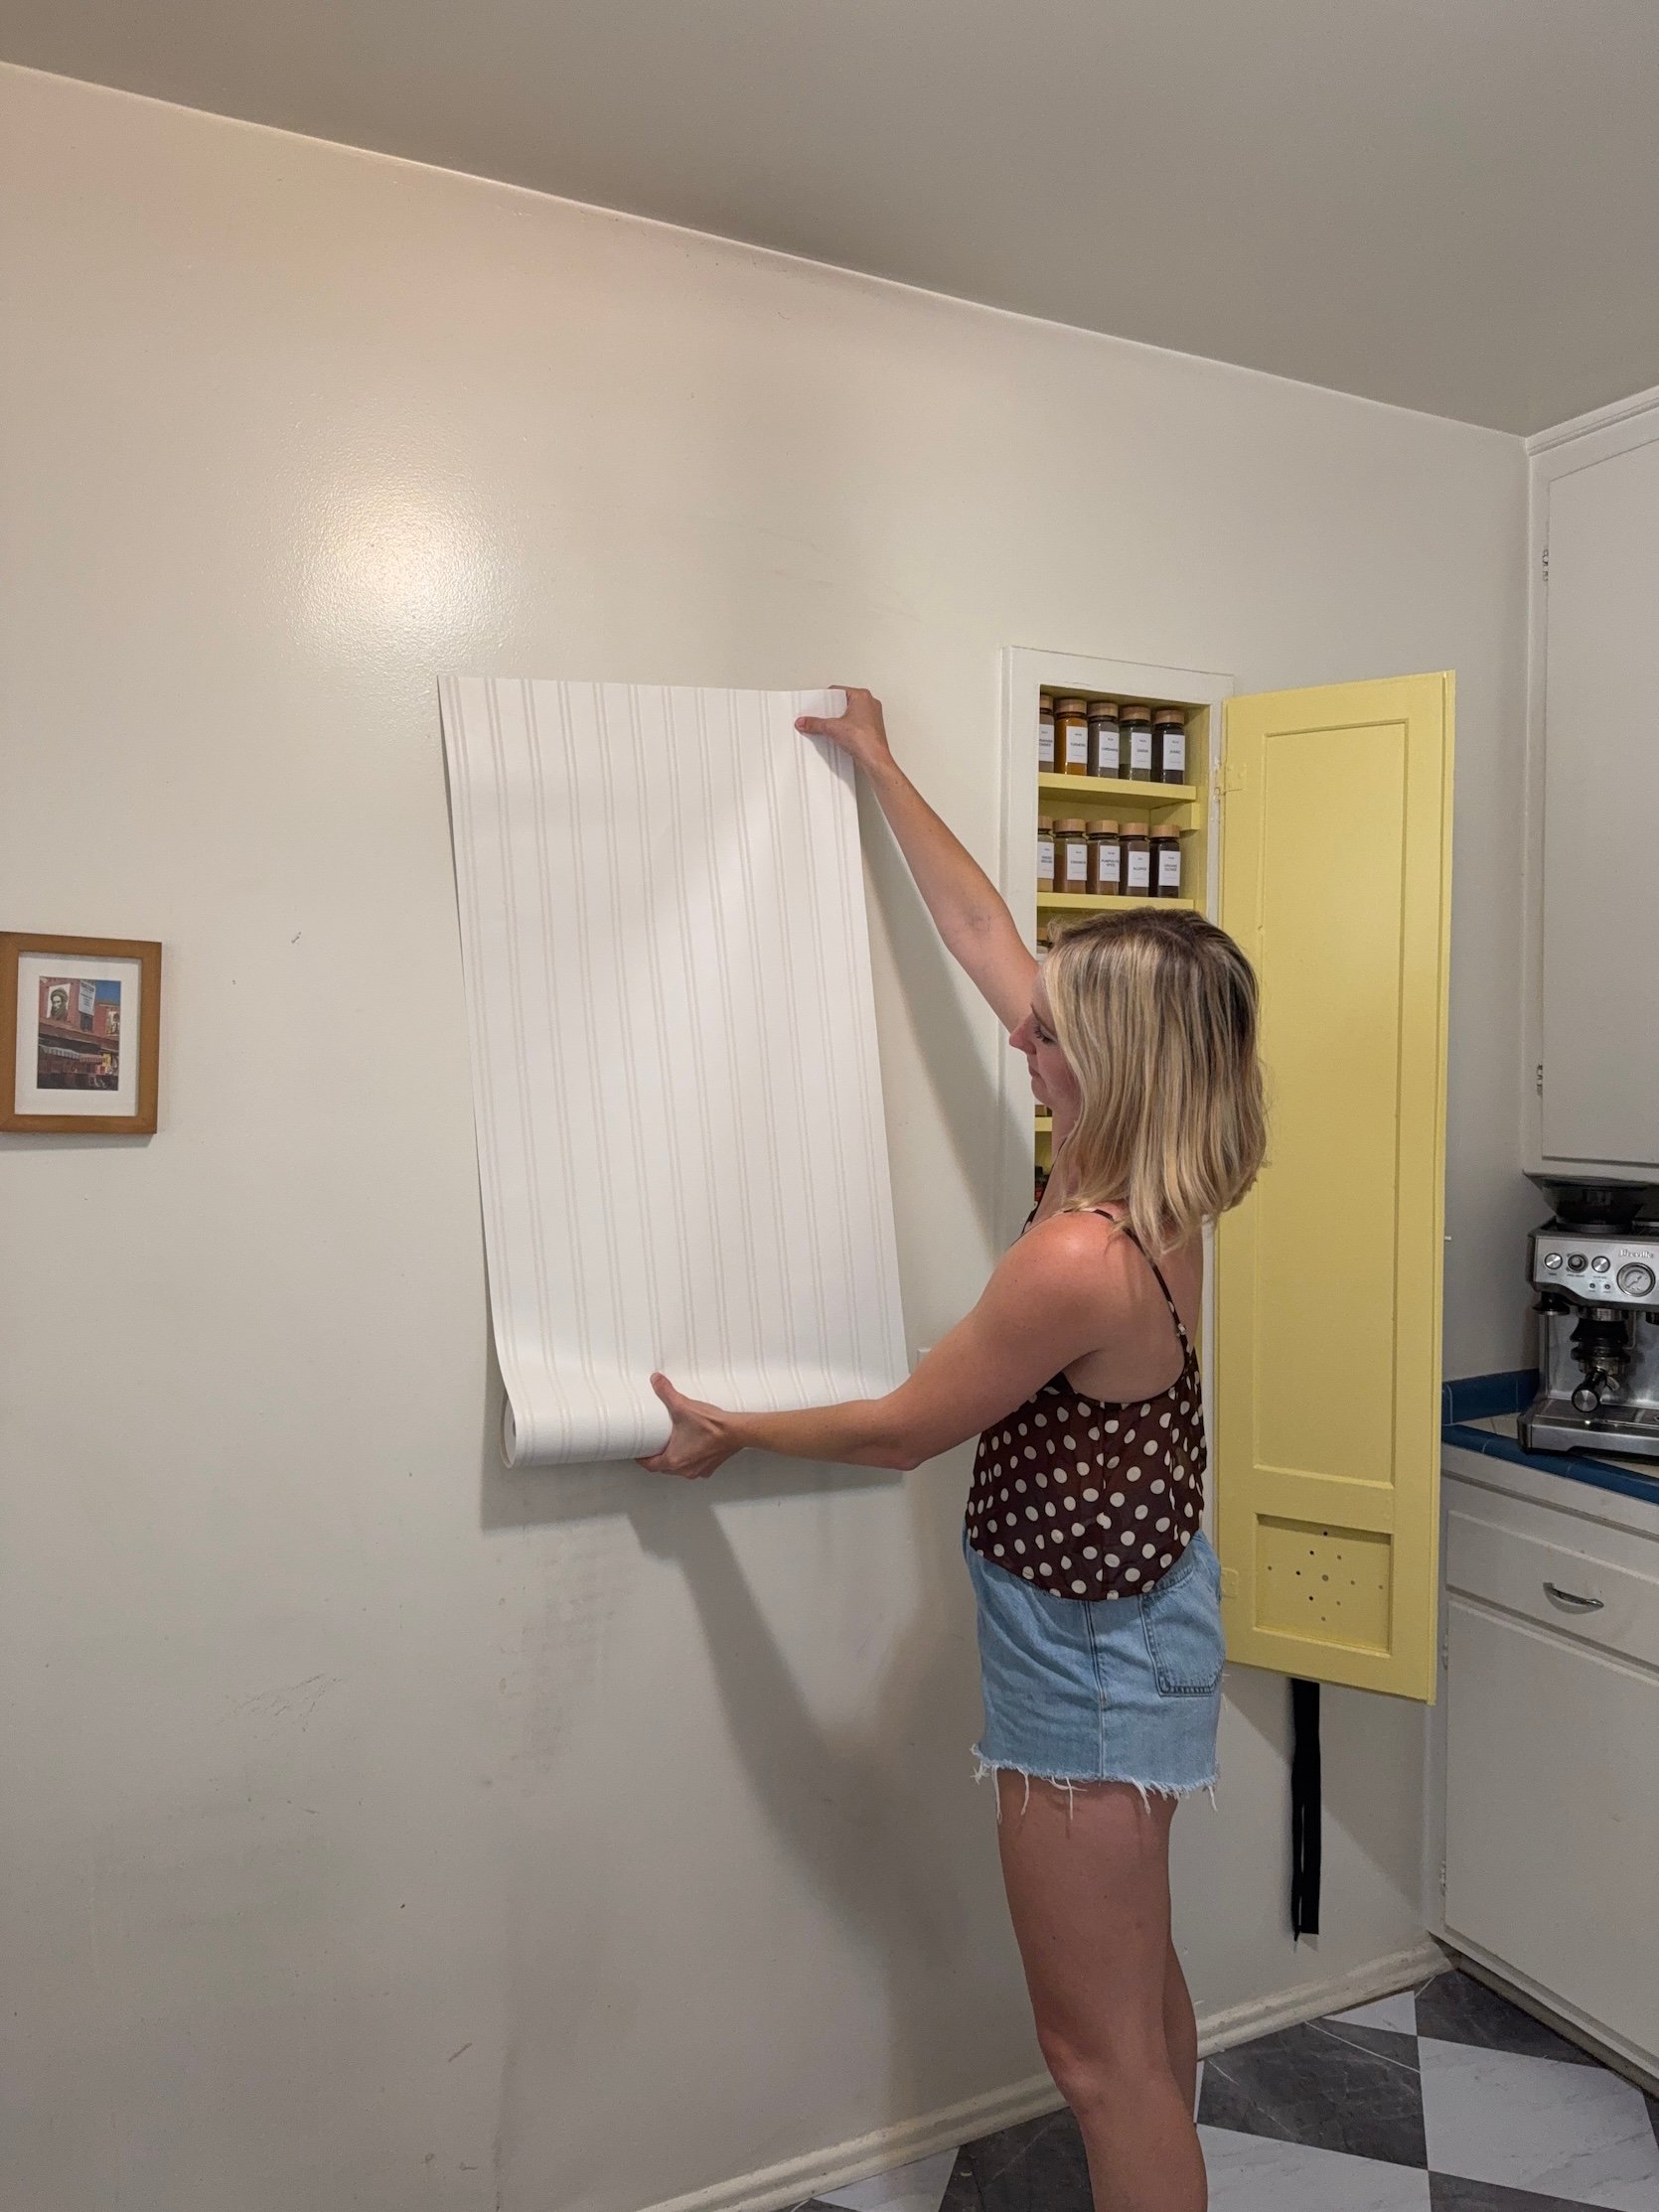
I tried again and again using a magic eraser to get that big stain on the wall with no real luck of making it fully disappear (although it did help). So my options were to paint over it or wallpaper…so beadboard wallpaper it was! I found this one for $30 a roll, which is not a bad price at all – plus it’s paintable!
Okay enough with the process pics…who wants to see some pretty reveal photos!?! Jade’s boyfriend, Lyle, is an incredible photographer, so he came over to shoot the space, and I can’t wait another second to share these photos!! MOVE THAT BUS!
Wallpaper | Sconce | Paint Color | Floor Tiles | Cookbook Stand | Bowl | Candle | Tea Towel
So to give you a sense of where we are in the space, the entrance to the kitchen is at the back of my dining room – which you can see in full here in case you missed it!

Floor Tiles | Smeg Fridge | Tea Towel | Dutch Oven | Pot Rail | Pepper Grinder | Wooden Bowls
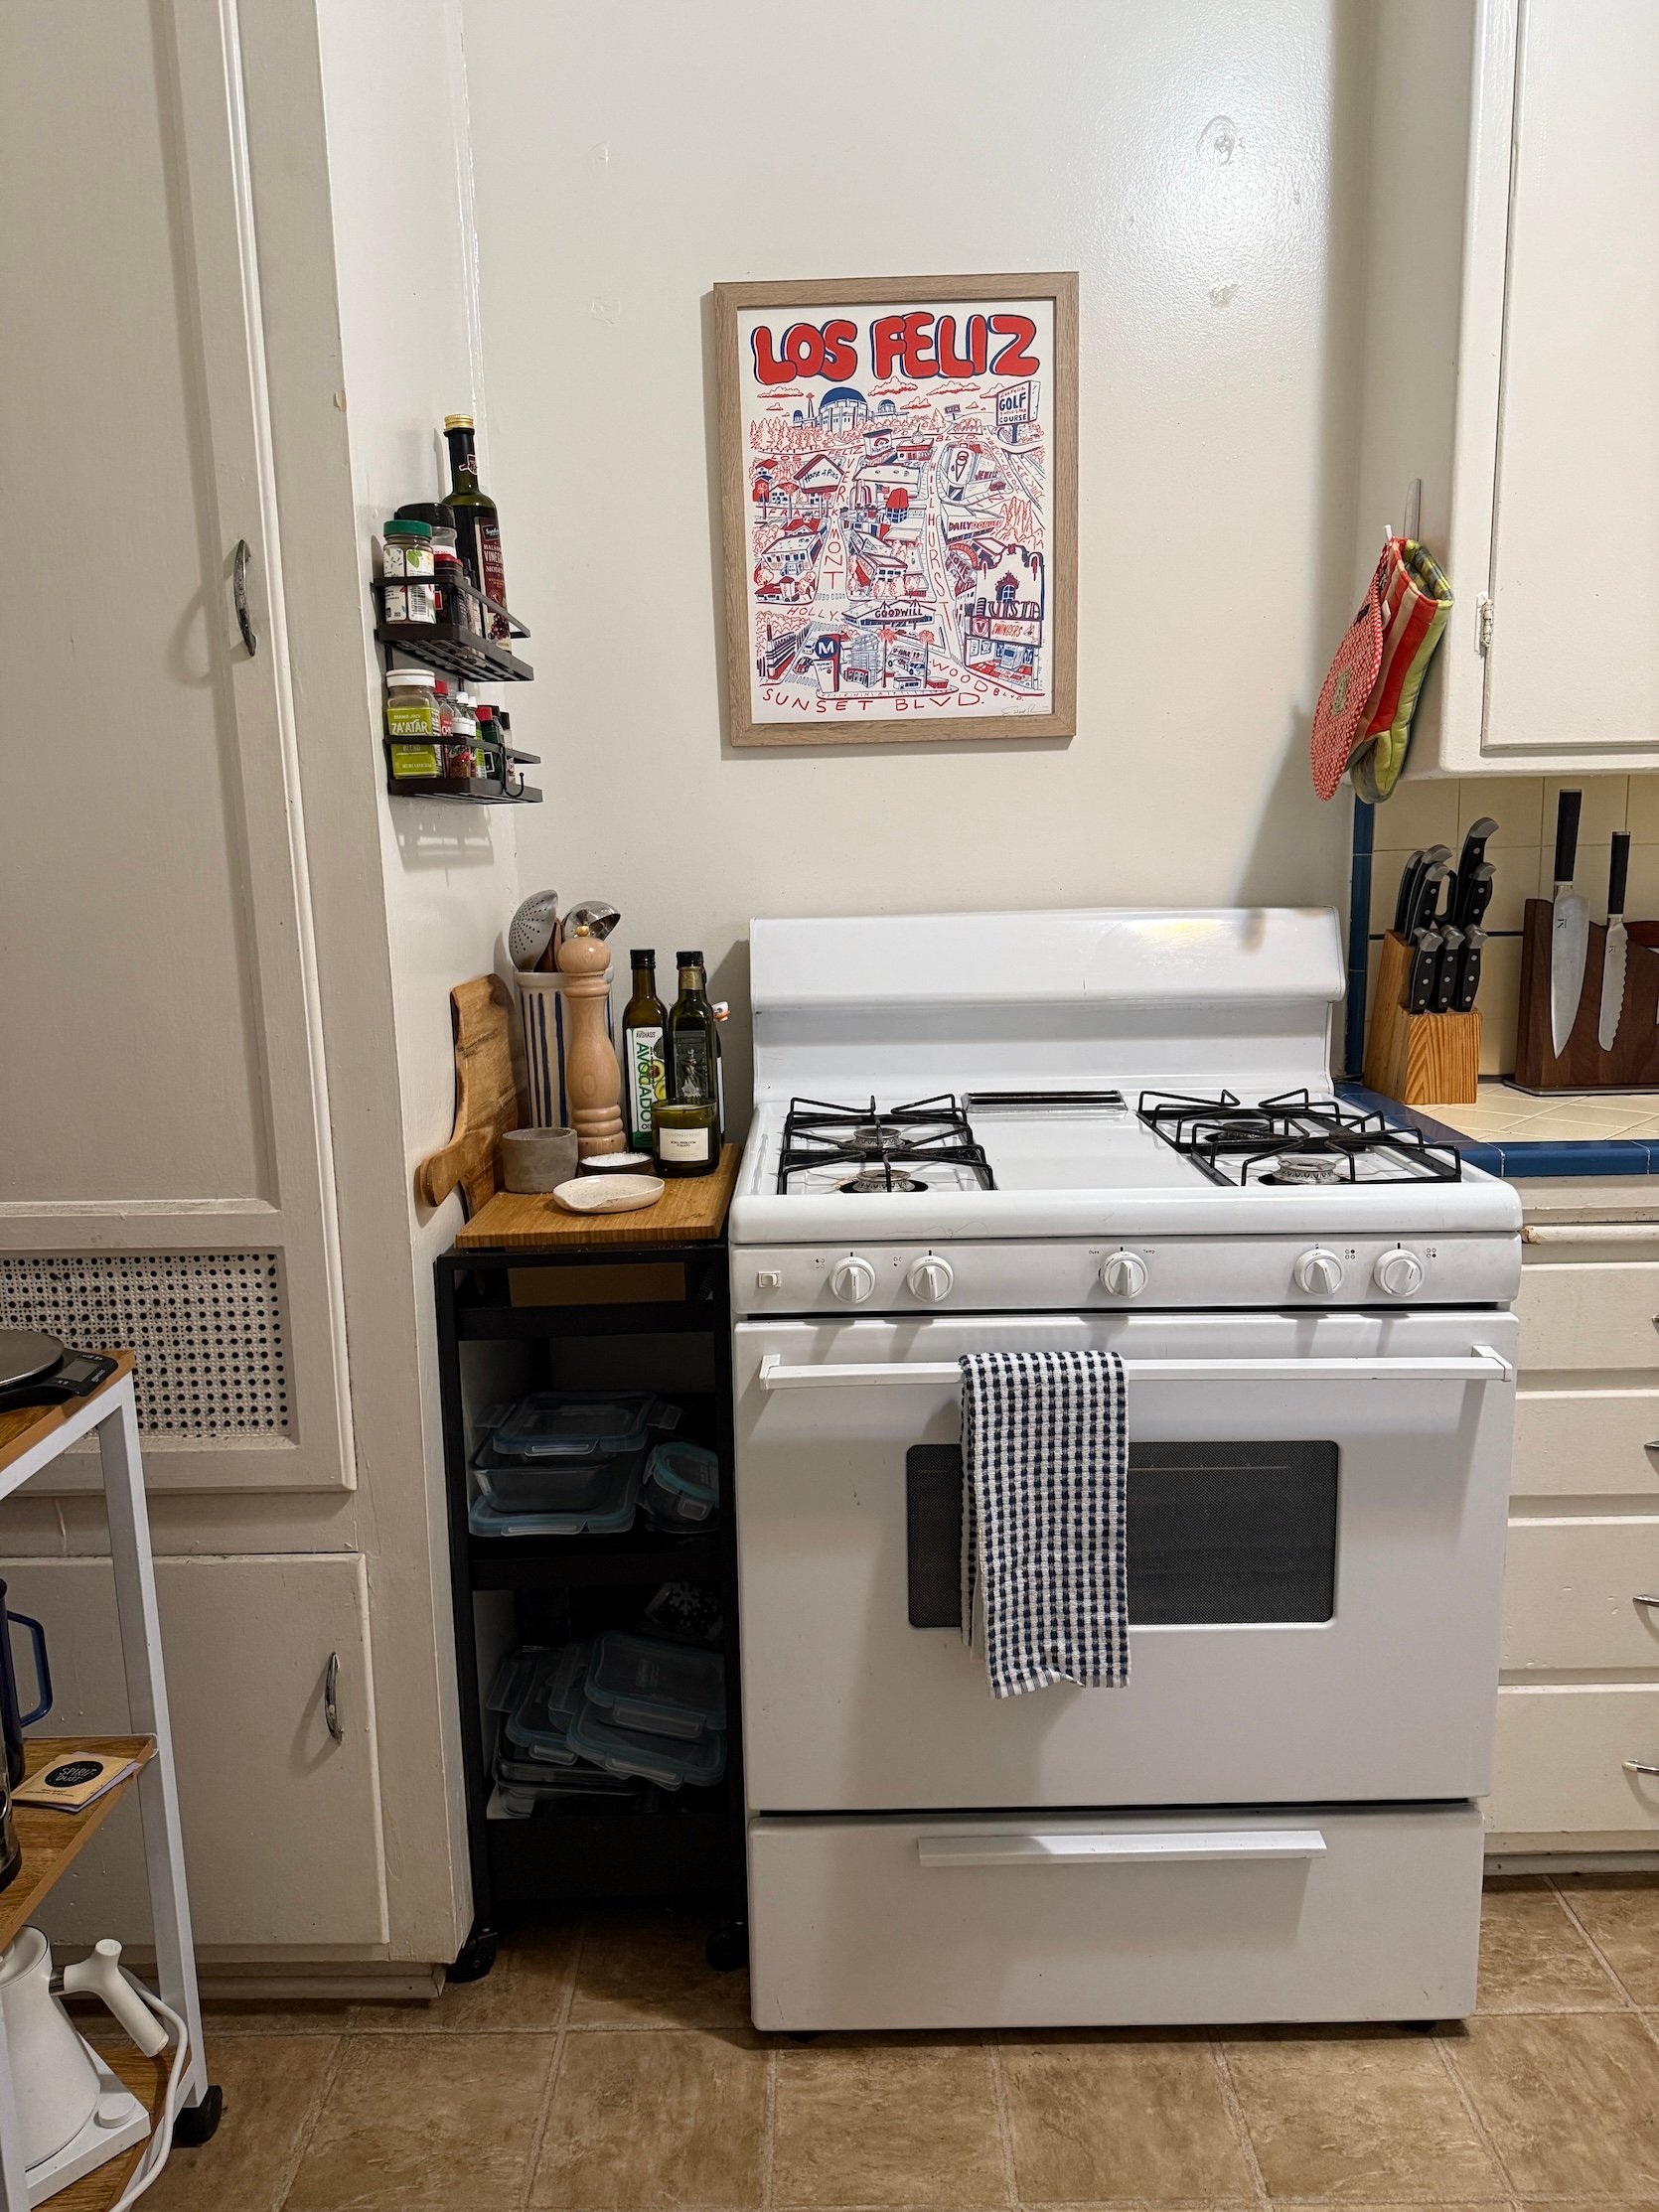
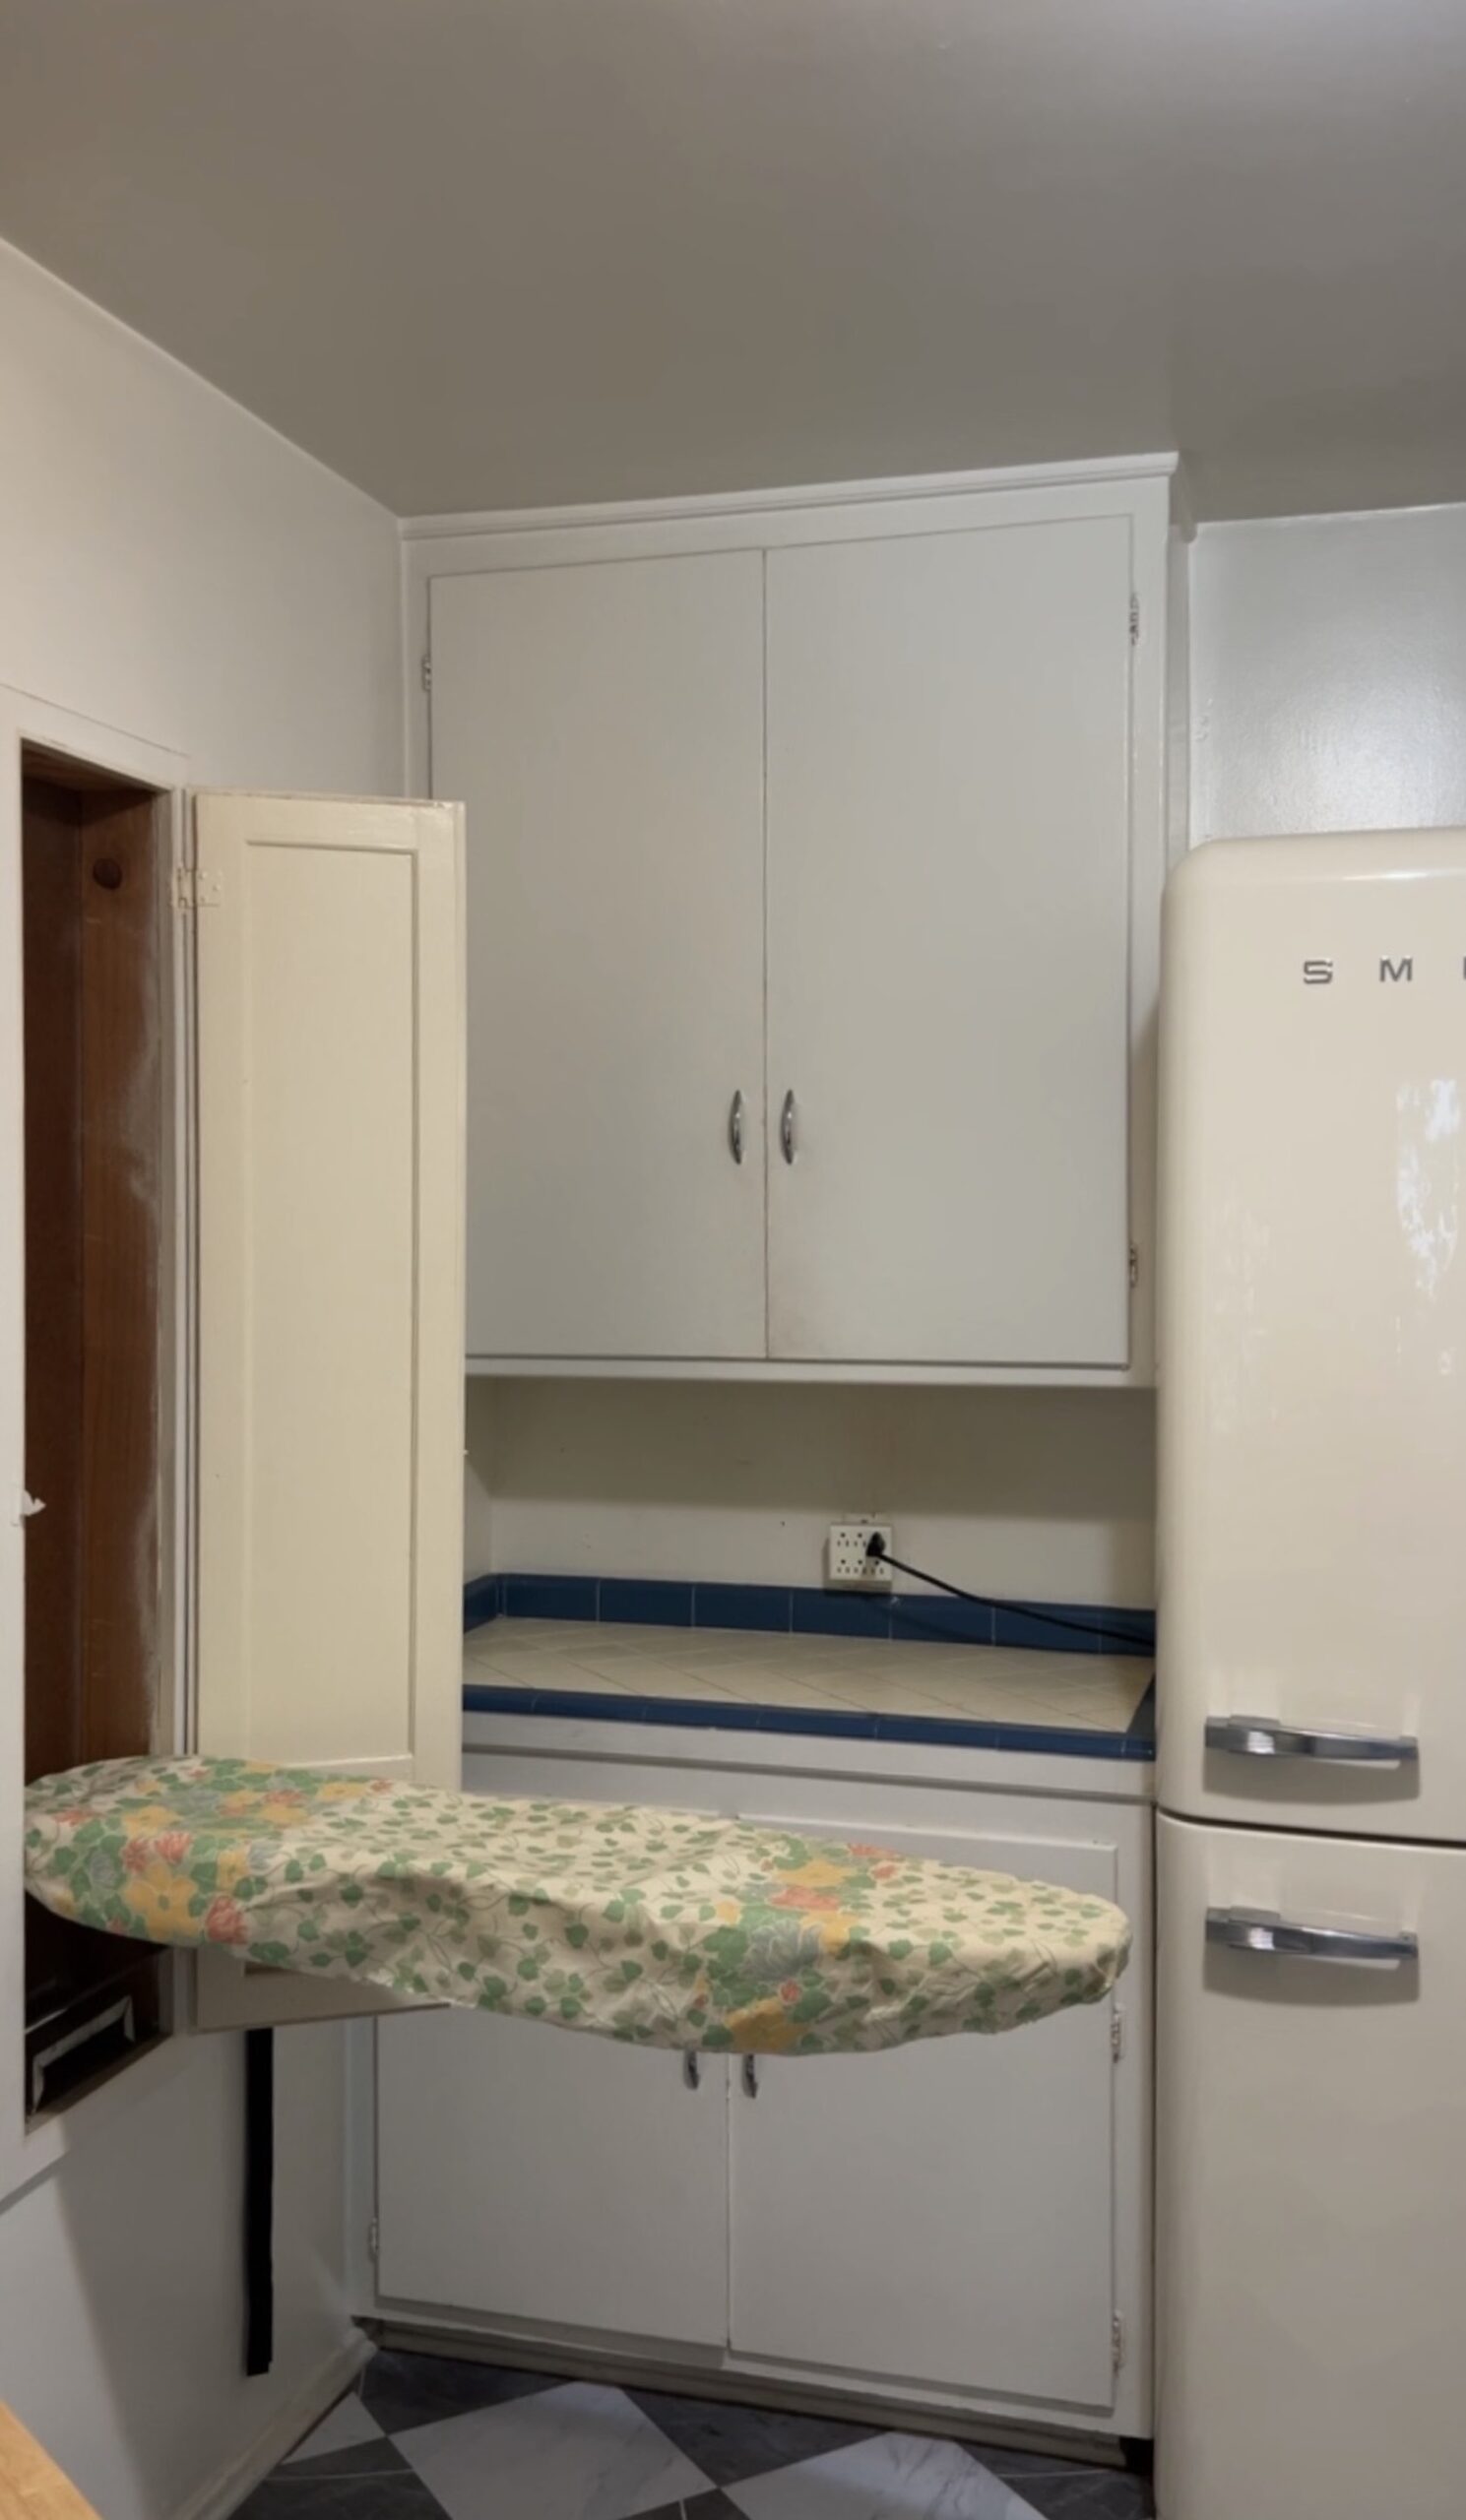
Here’s my finished kitchen!! That fridge nightmare ended up being SO worth it, and I can’t wait to take it with me to my next place and beyond. And see that little peep of a prep table?! HOUSTON WE HAVE COUNTER SPACE! I didn’t end up changing the hardware or painting the cabinetry like I initially thought I would (at some point in a rental, you gotta know when it’s no longer worth it to spend the time and money) – every DIY I did in here was so high impact and so worth it and I actually love how light and bright the space is. It went from hell to cook in to a heavenly place to cook in!
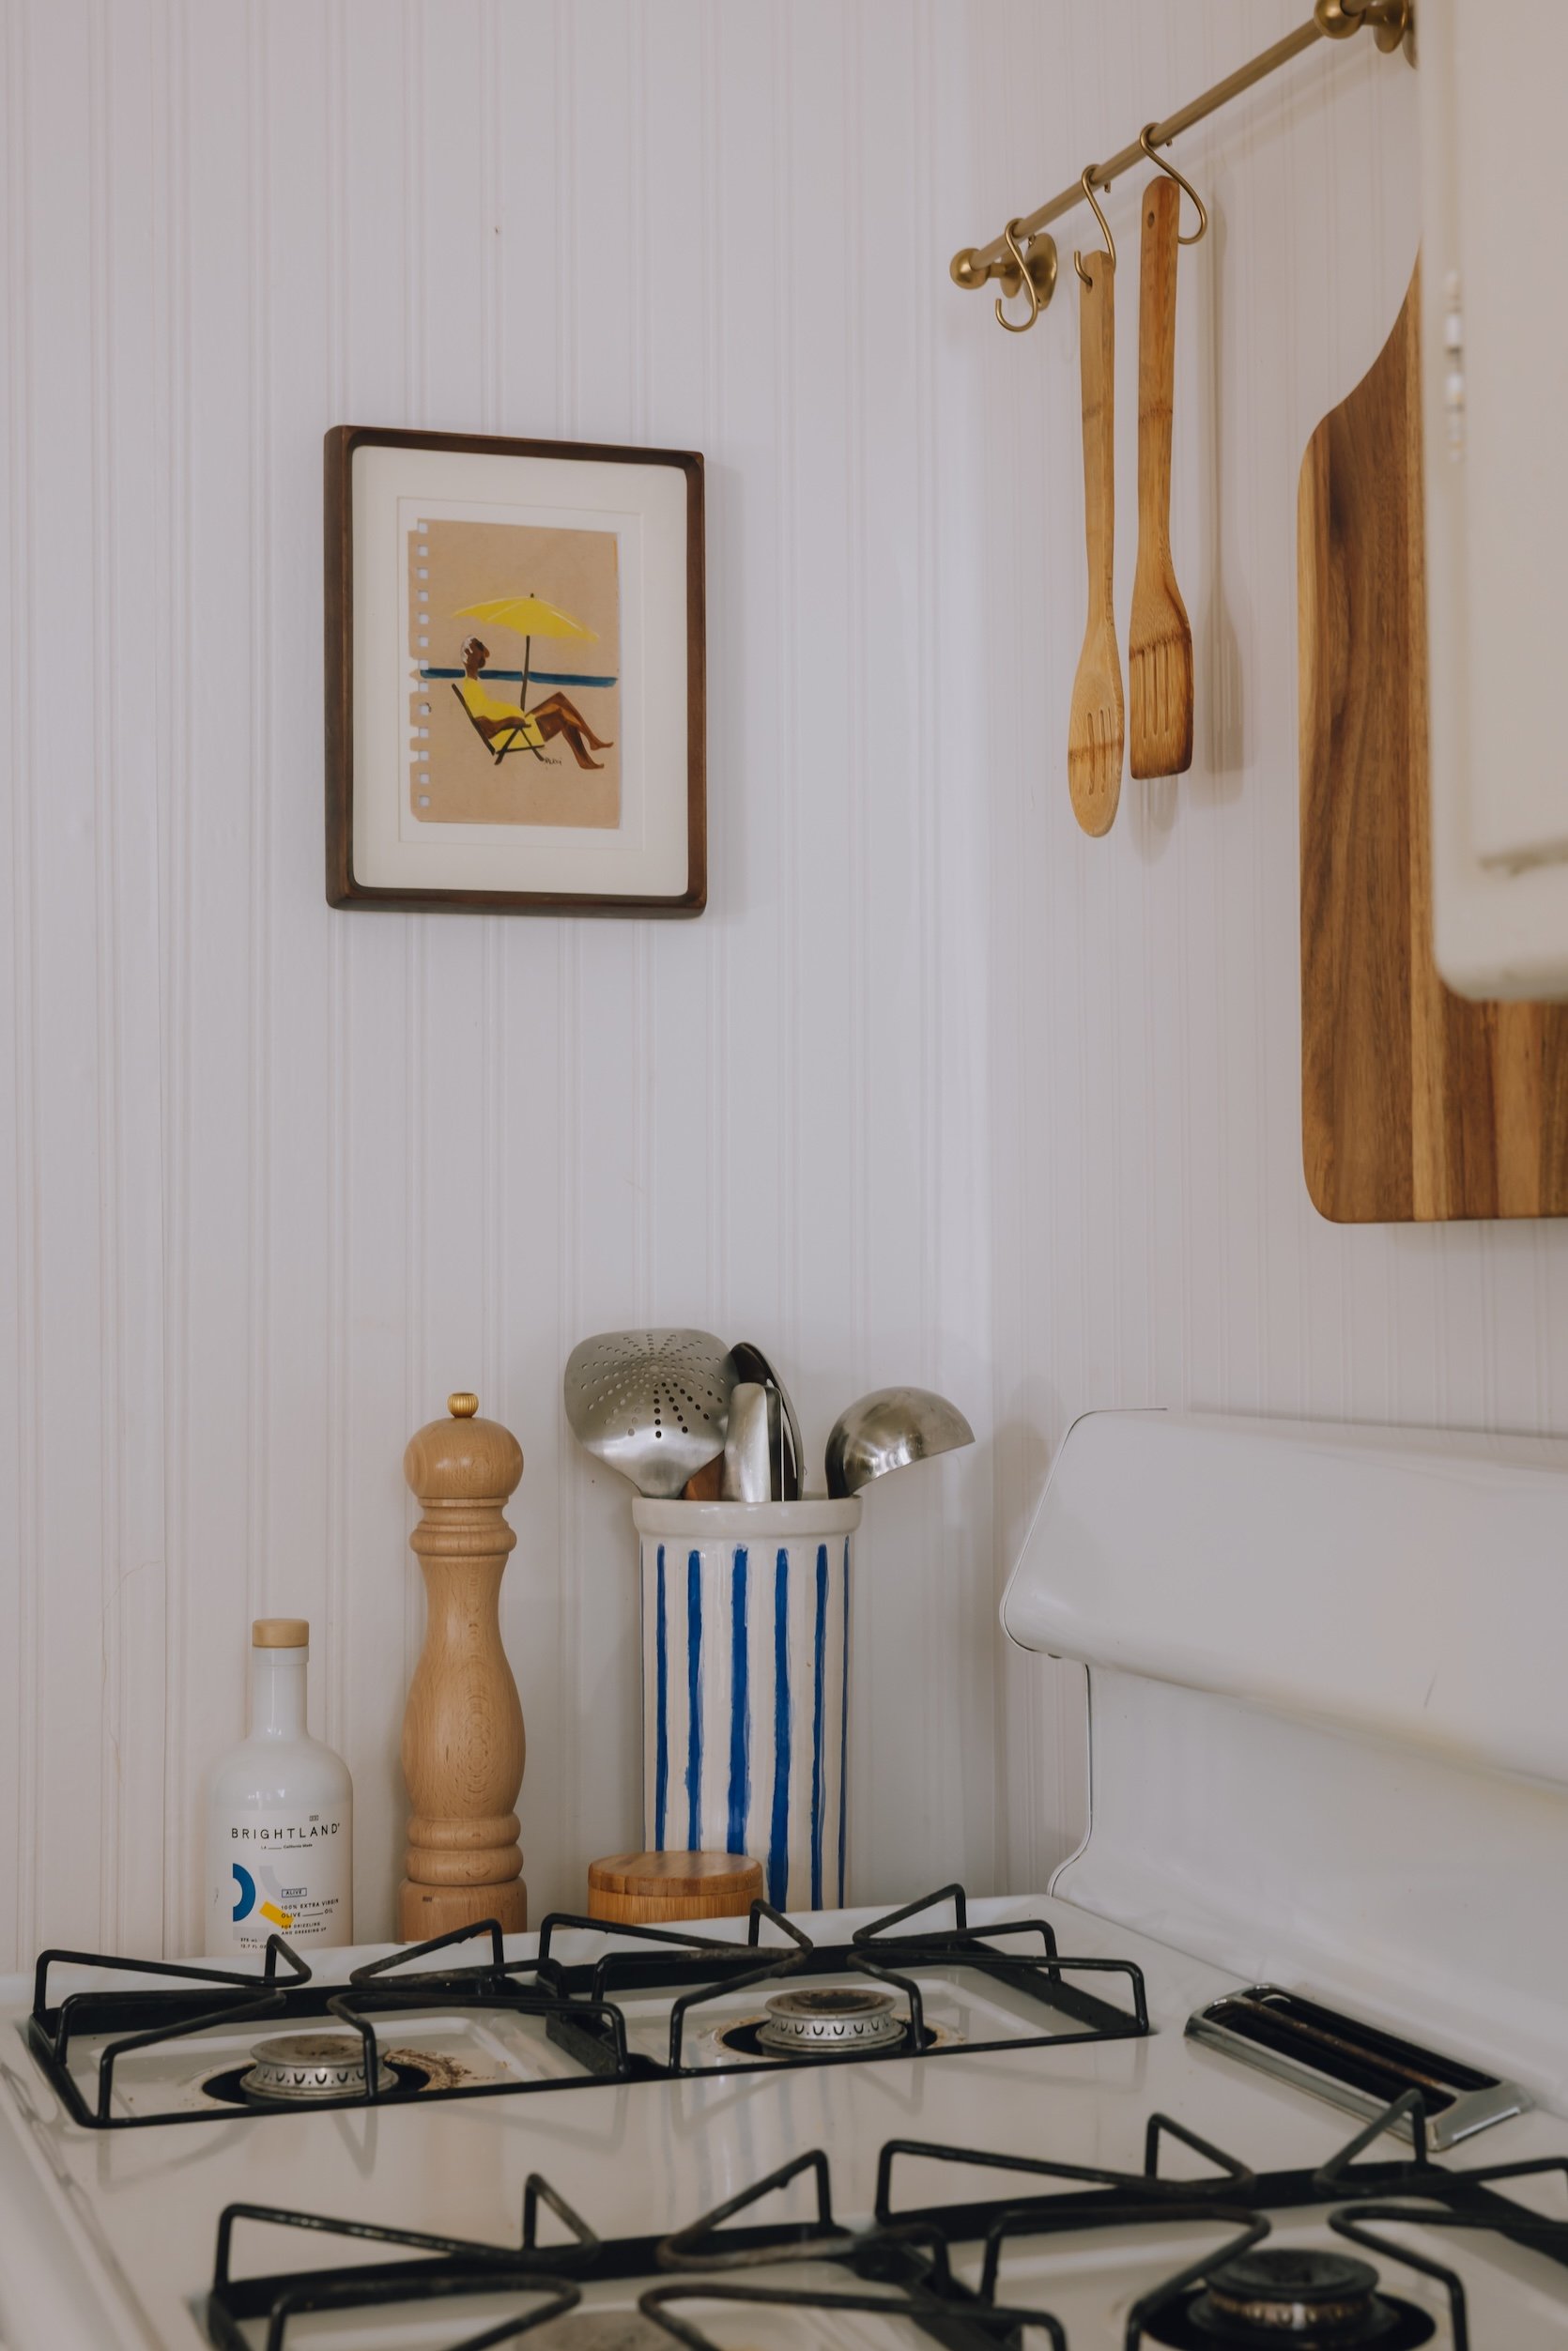
Here’s a better look at the beadboard wallpaper – it added SO much charm to the space, it was crazy!! And since it was pre-pasted, I just had to spray some water on the back, so it was super easy to install. Now let’s all focus our attention on my favorite art piece, shall we?? You might know this already, but one of my favorite places to find art is the Sawdust Festival in Laguna Beach – it can be hit or miss, but last time I went, I found this amazing animator and artist who used to work for Cartoon Network named Mucci. He was selling some of his sketches and artwork from his sketchbook, and I came across this one and absolutely fell in love. It was $100 for the piece, but since it was an original and it spoke to me SO much, I knew it was worth it, and I will cherish it forever.
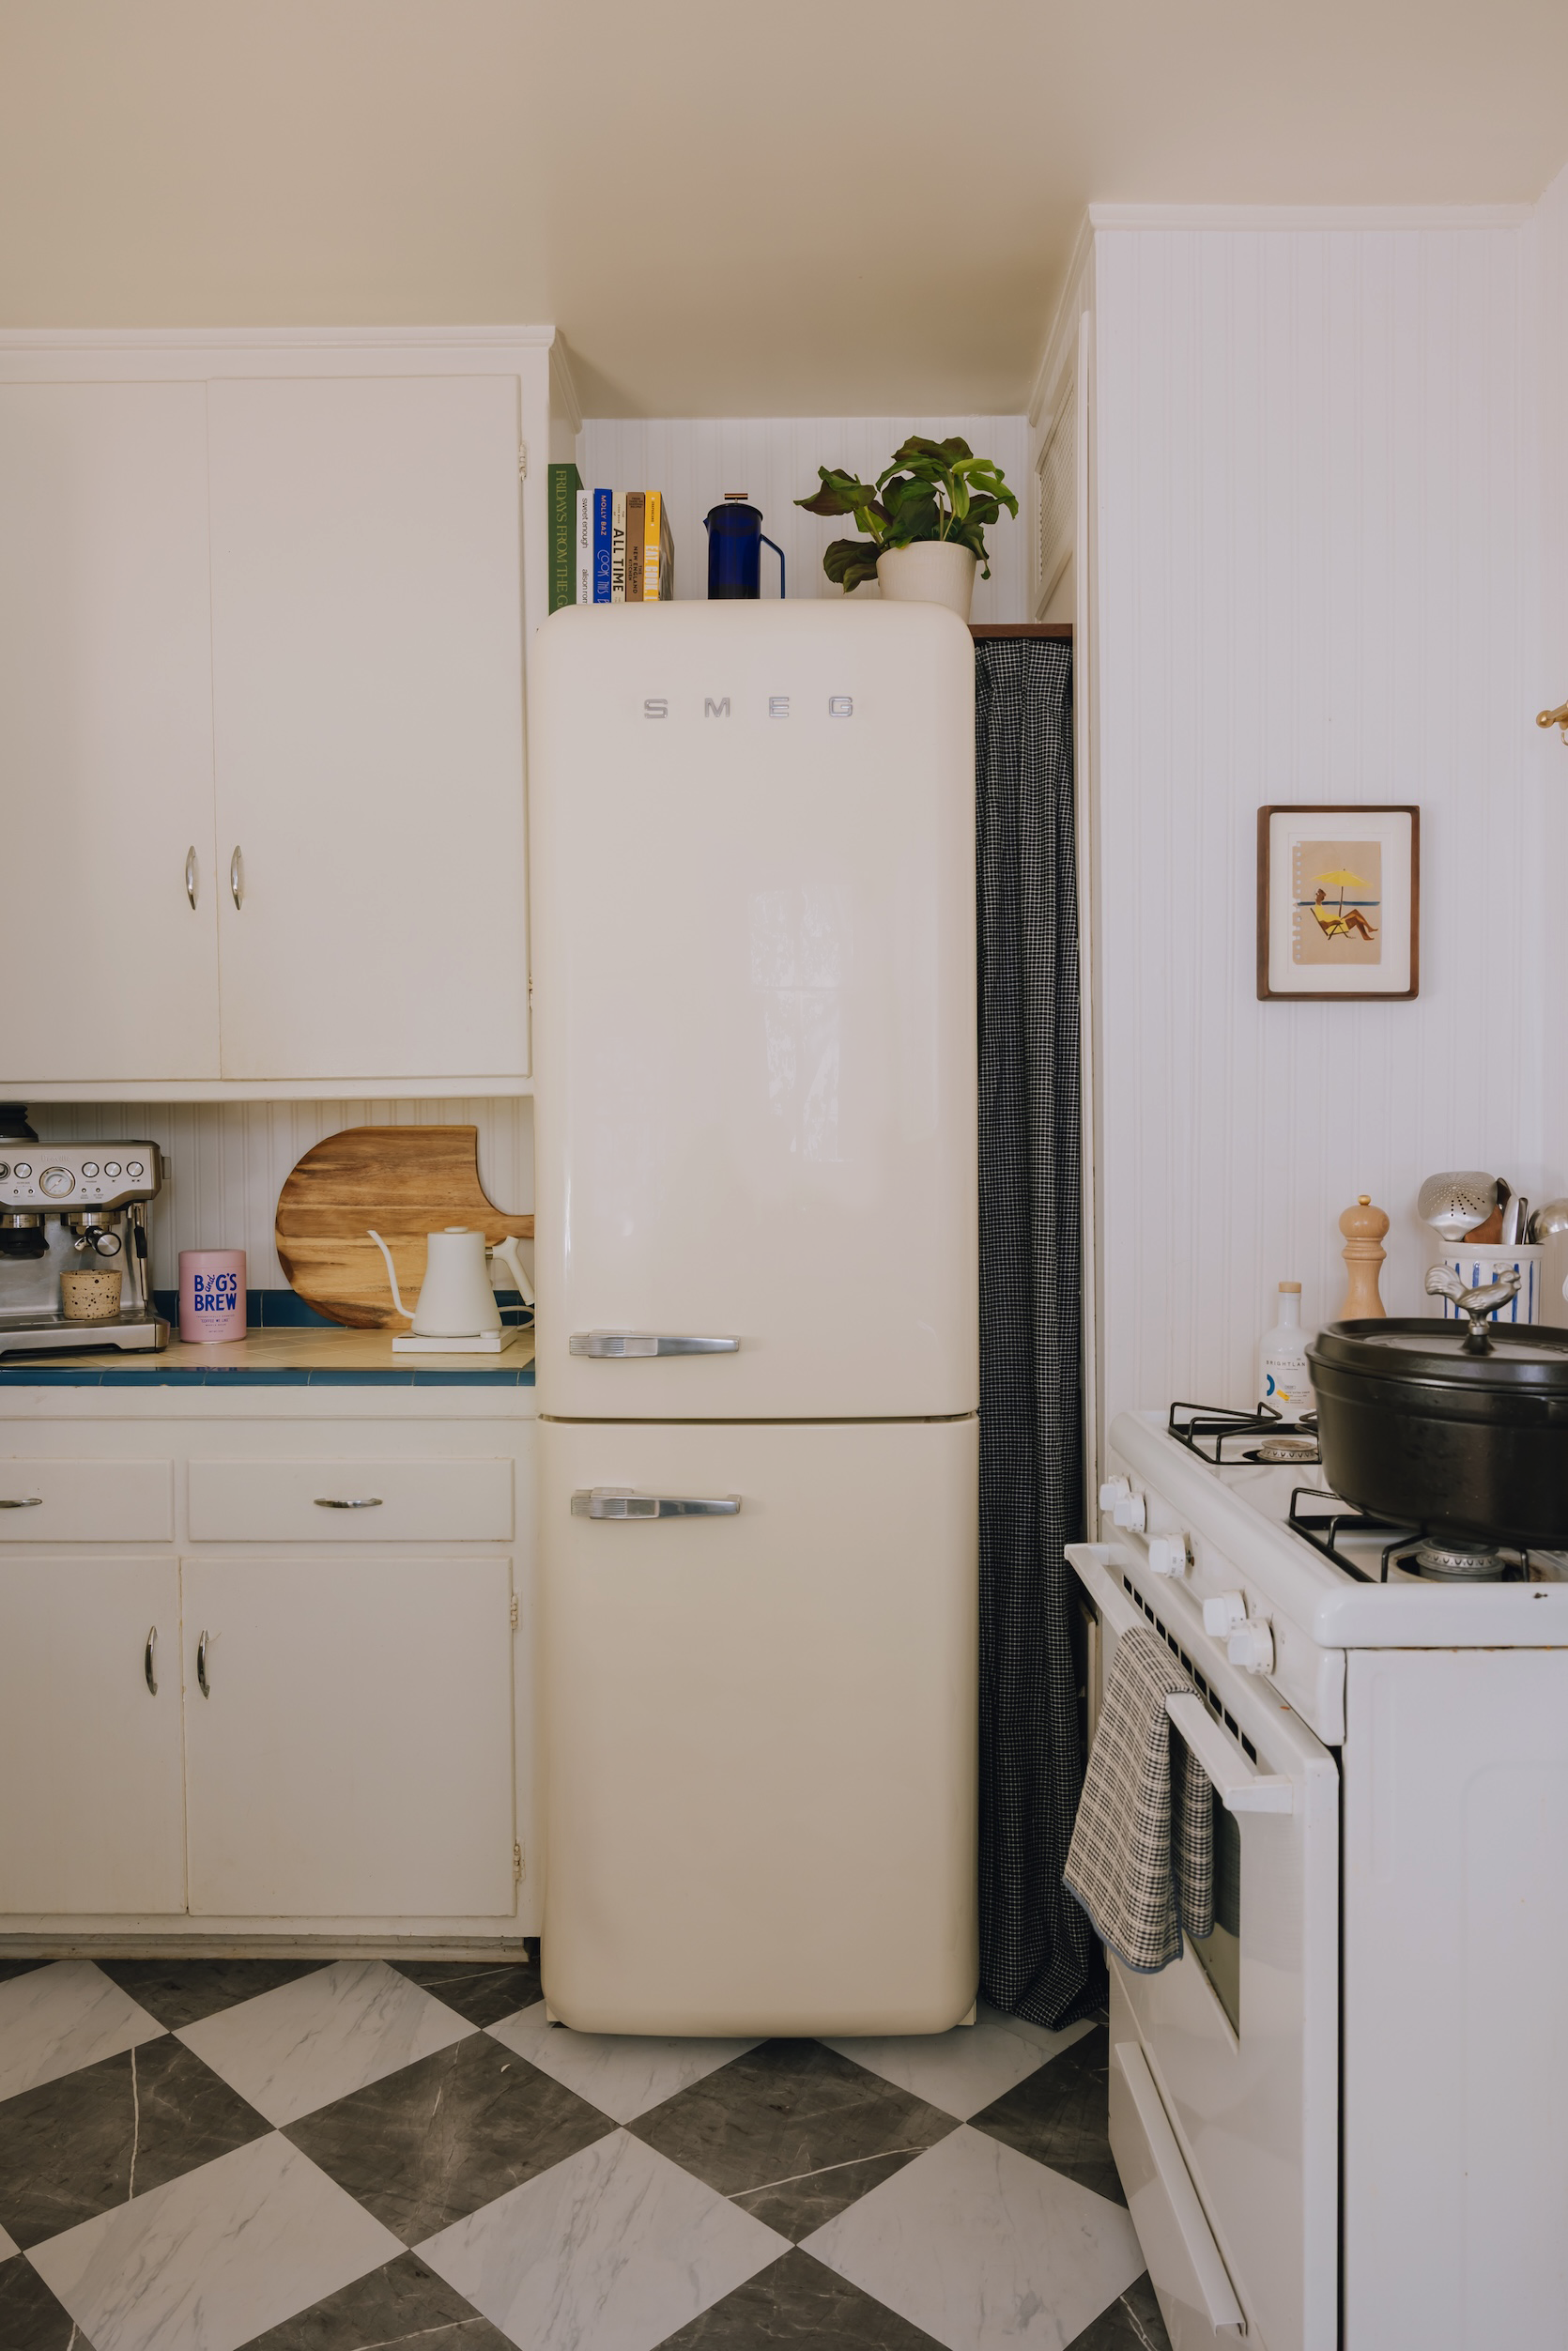
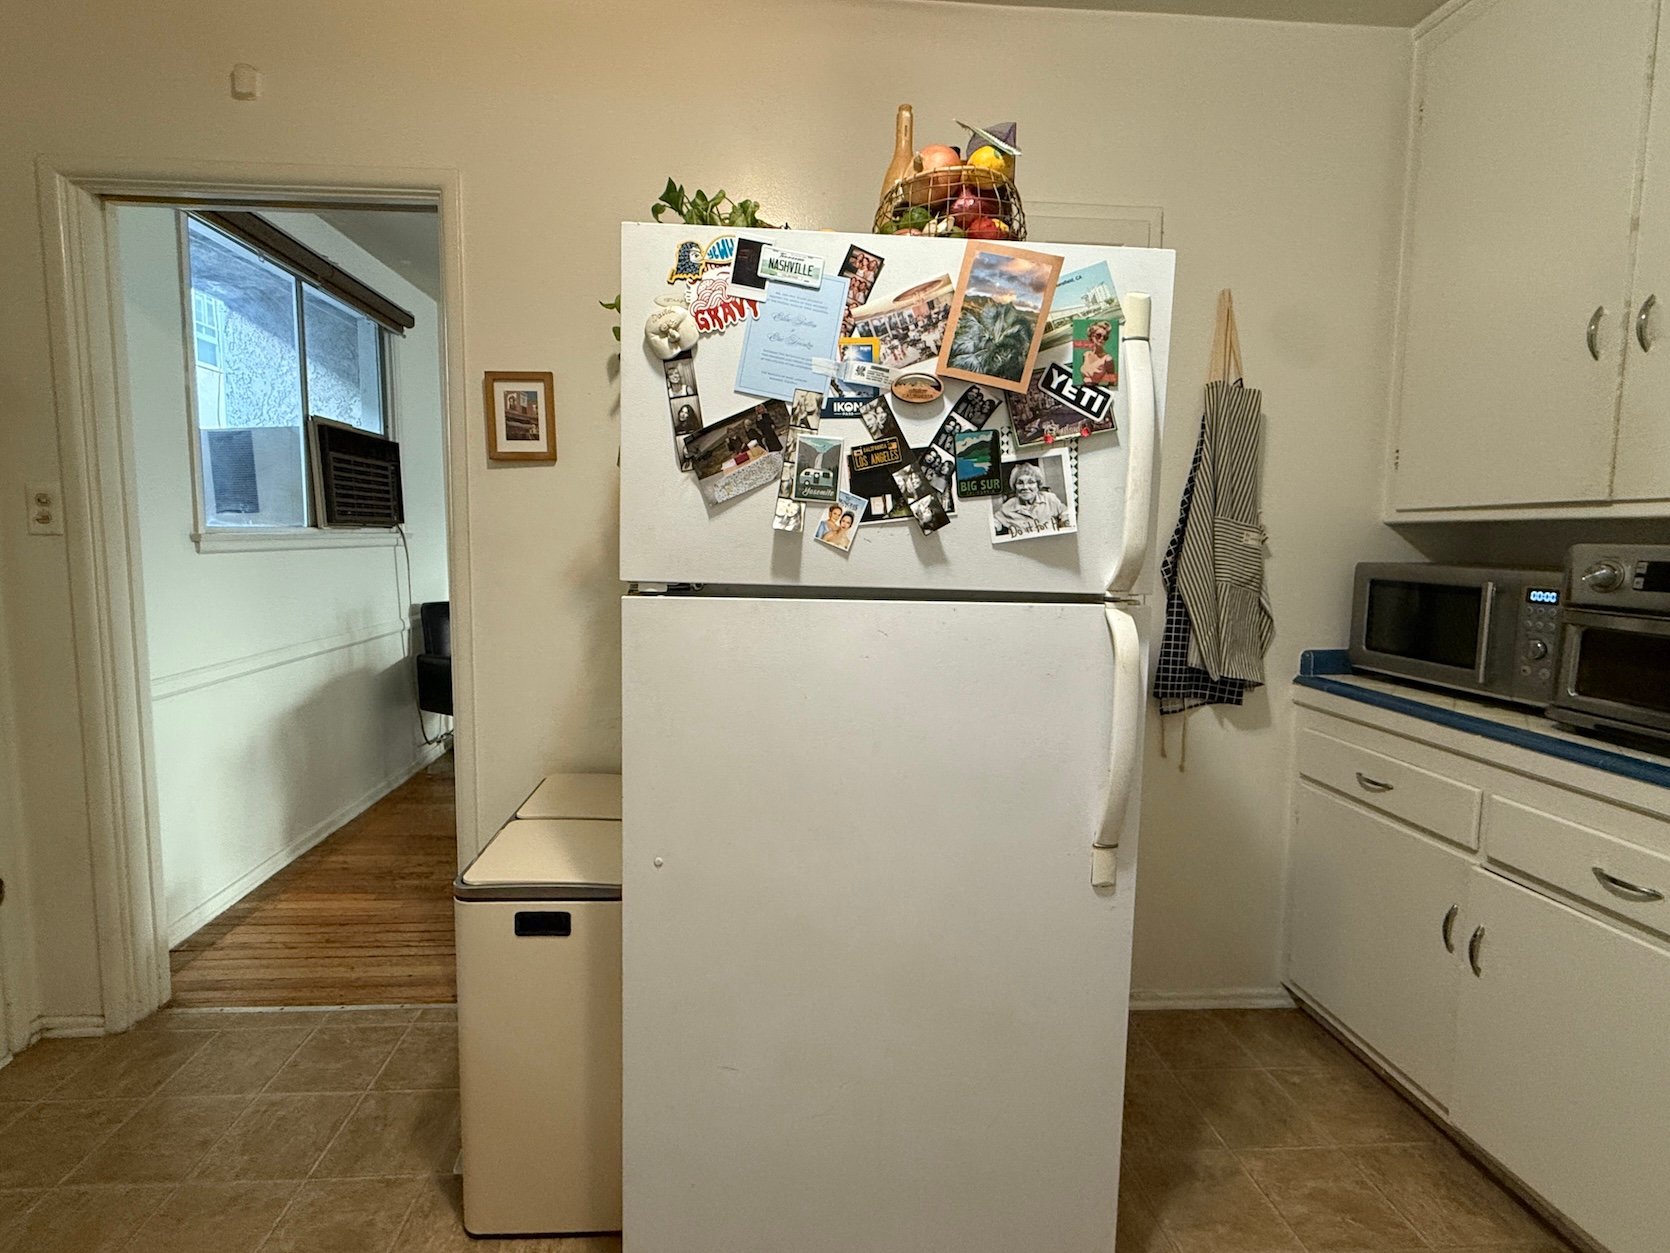
Did you notice the little curtain in the first photo?? I made a tiny makeshift broom closet, haha! I hated the gap between the fridge and the random non-usable cabinet, so I used some leftover fabric from my DIY cafe curtains (which are by the sink on the other side…I’ll give you a closer look at those in a bit!)
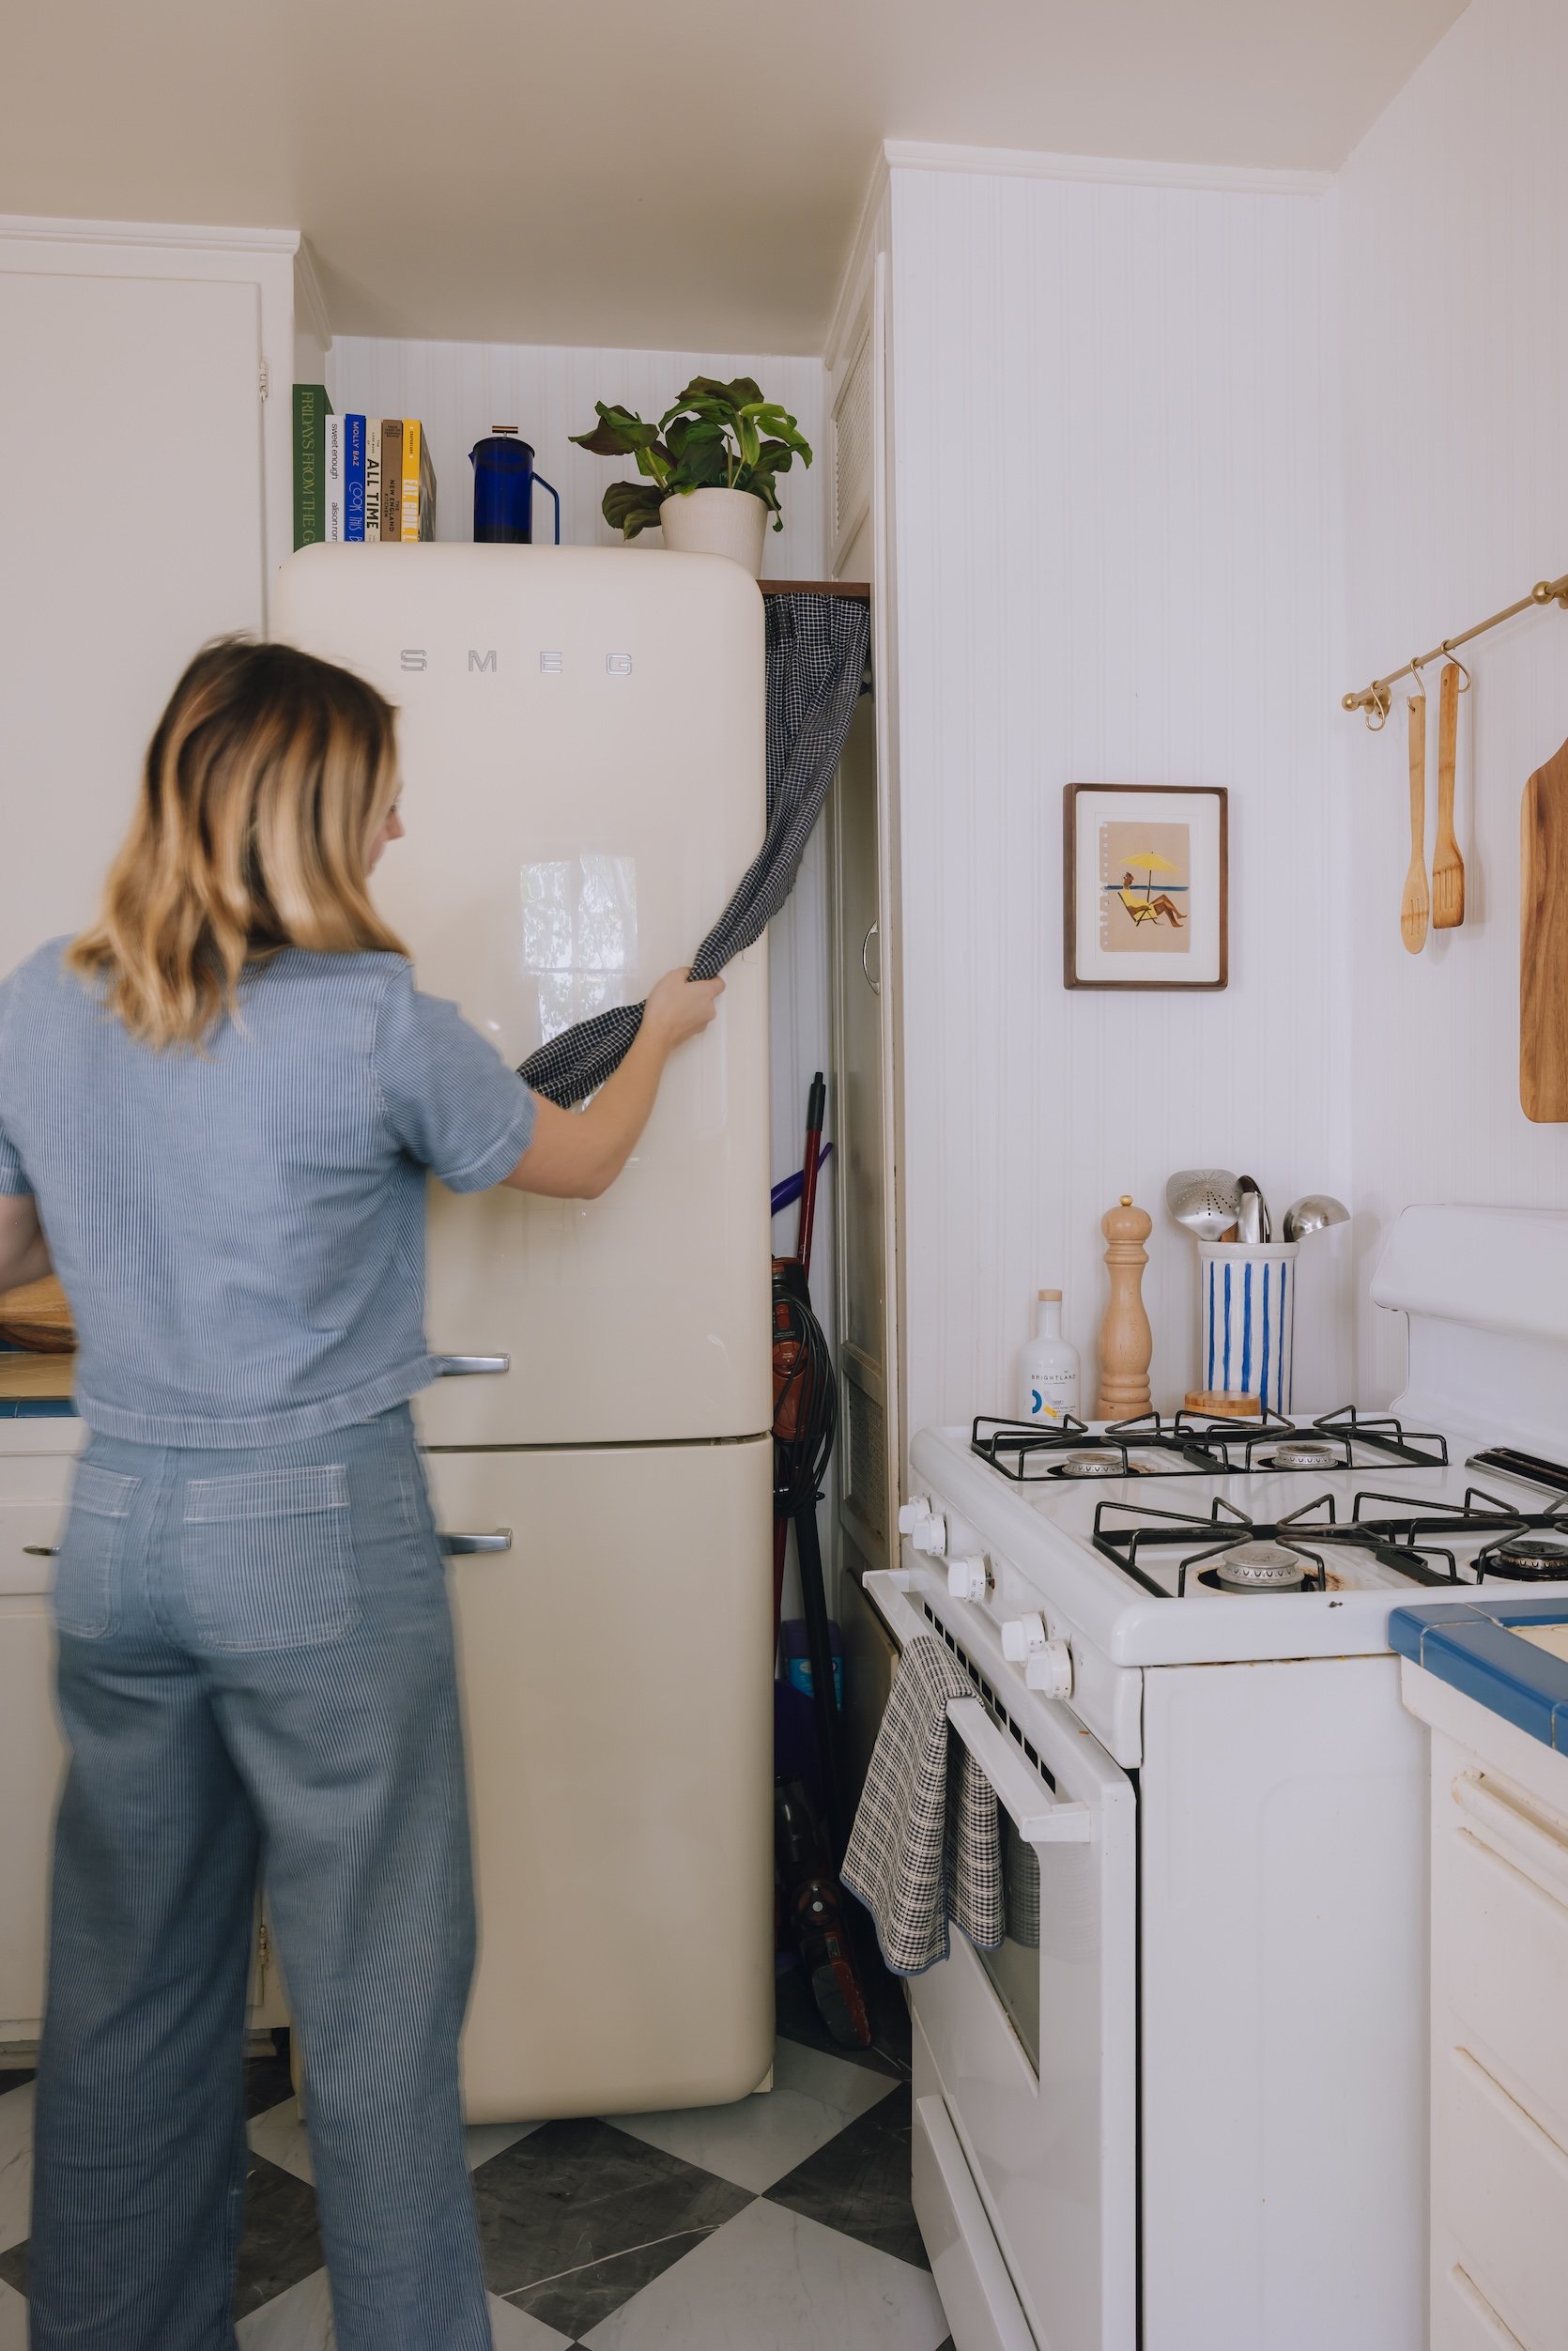
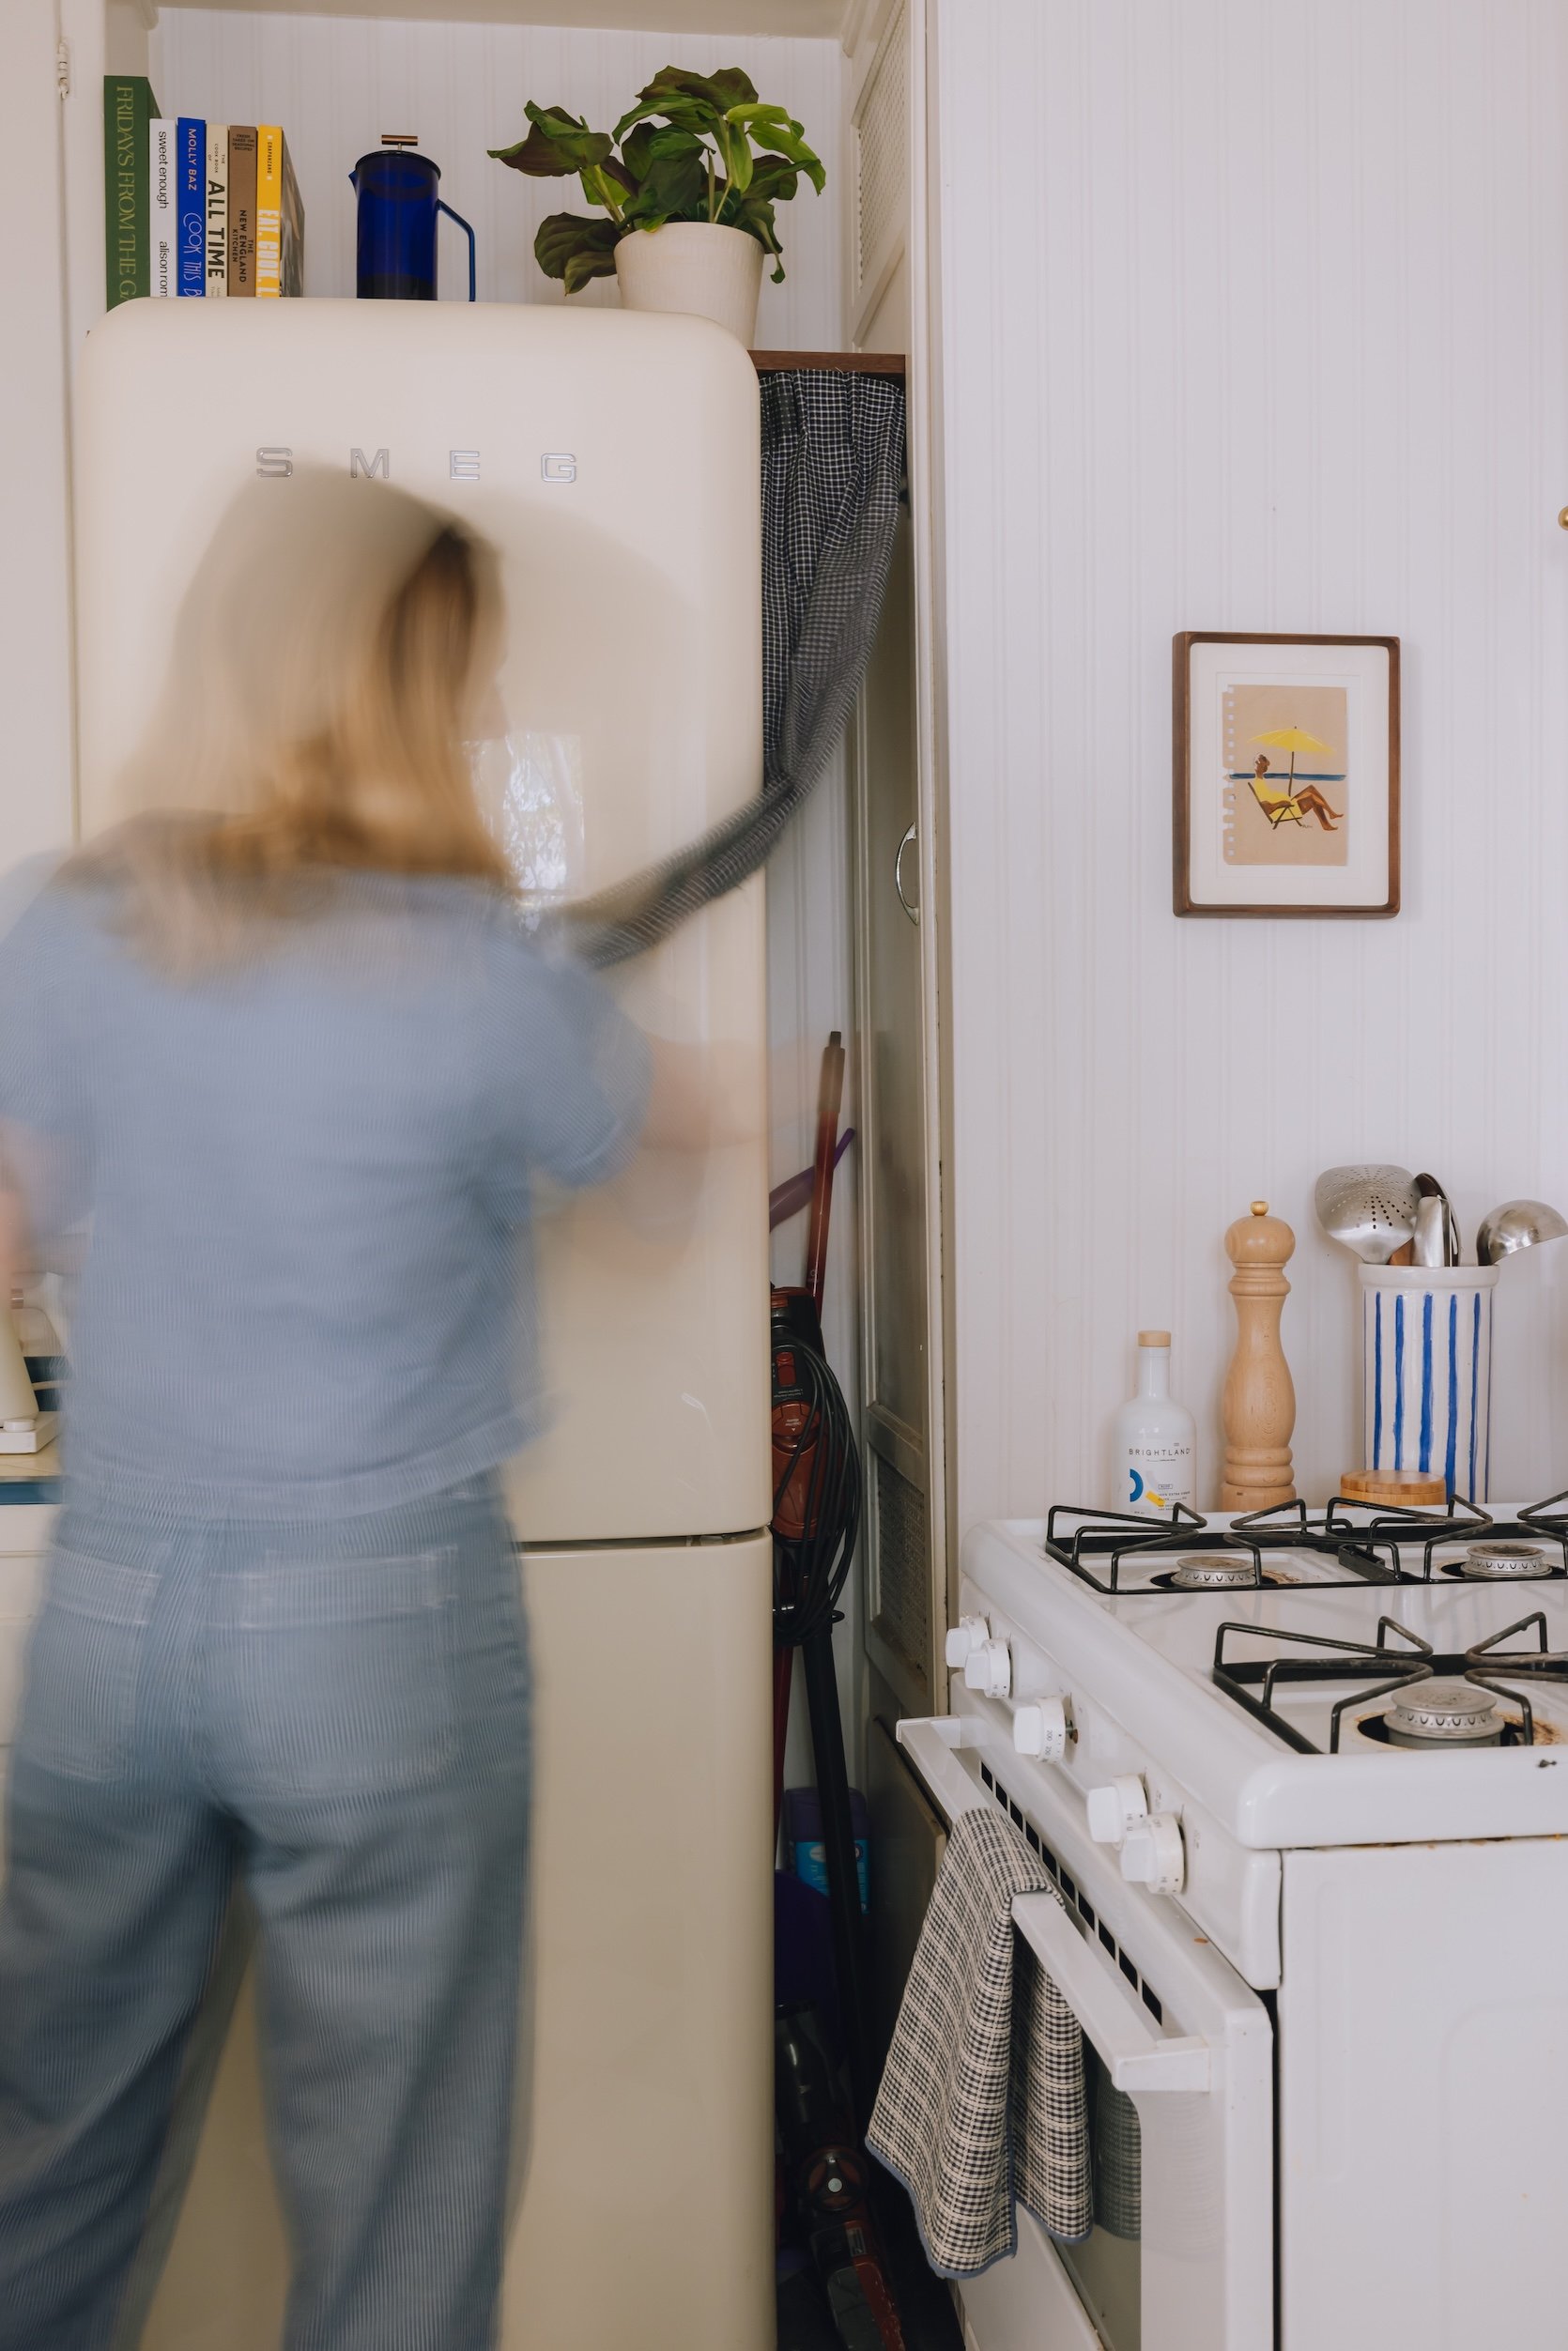
I needed a place to store my stick vacuum, broom, and mop since I, well, turned my coat/broom closet into a speakeasy (which was totally worth it, btw).
Cafe Curtain Fabric | Curtain Rod | Curtain Rings
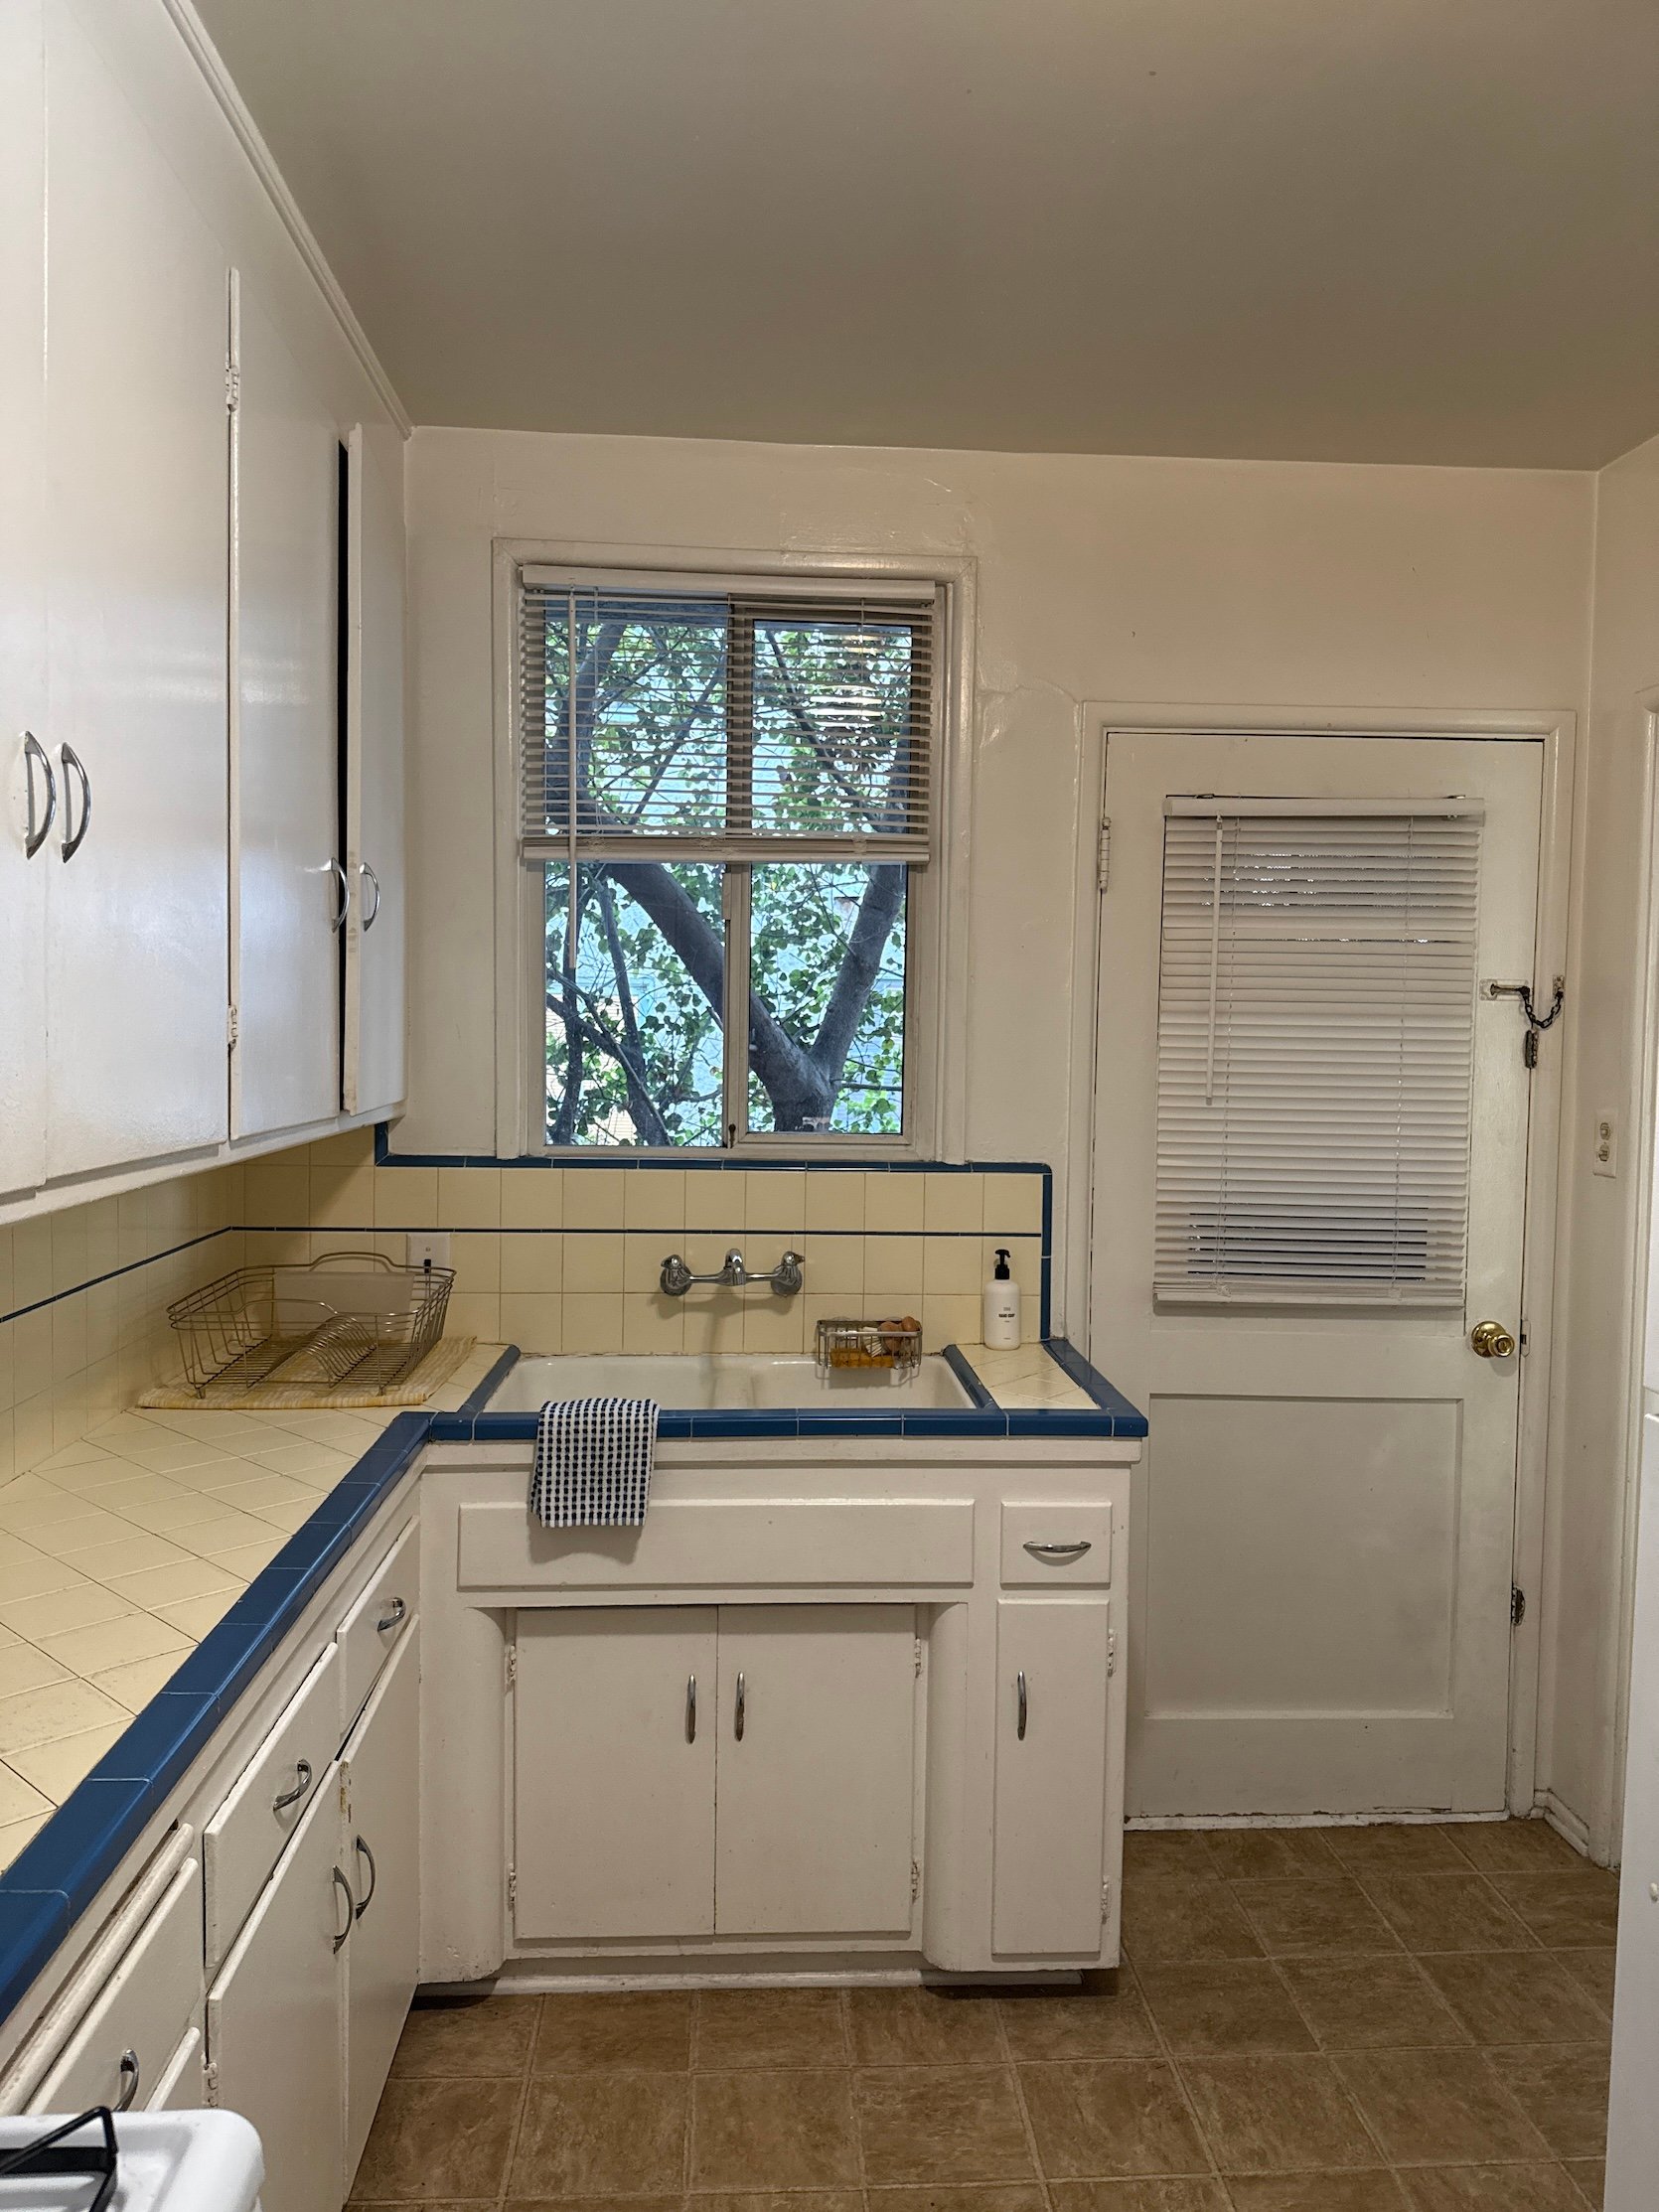
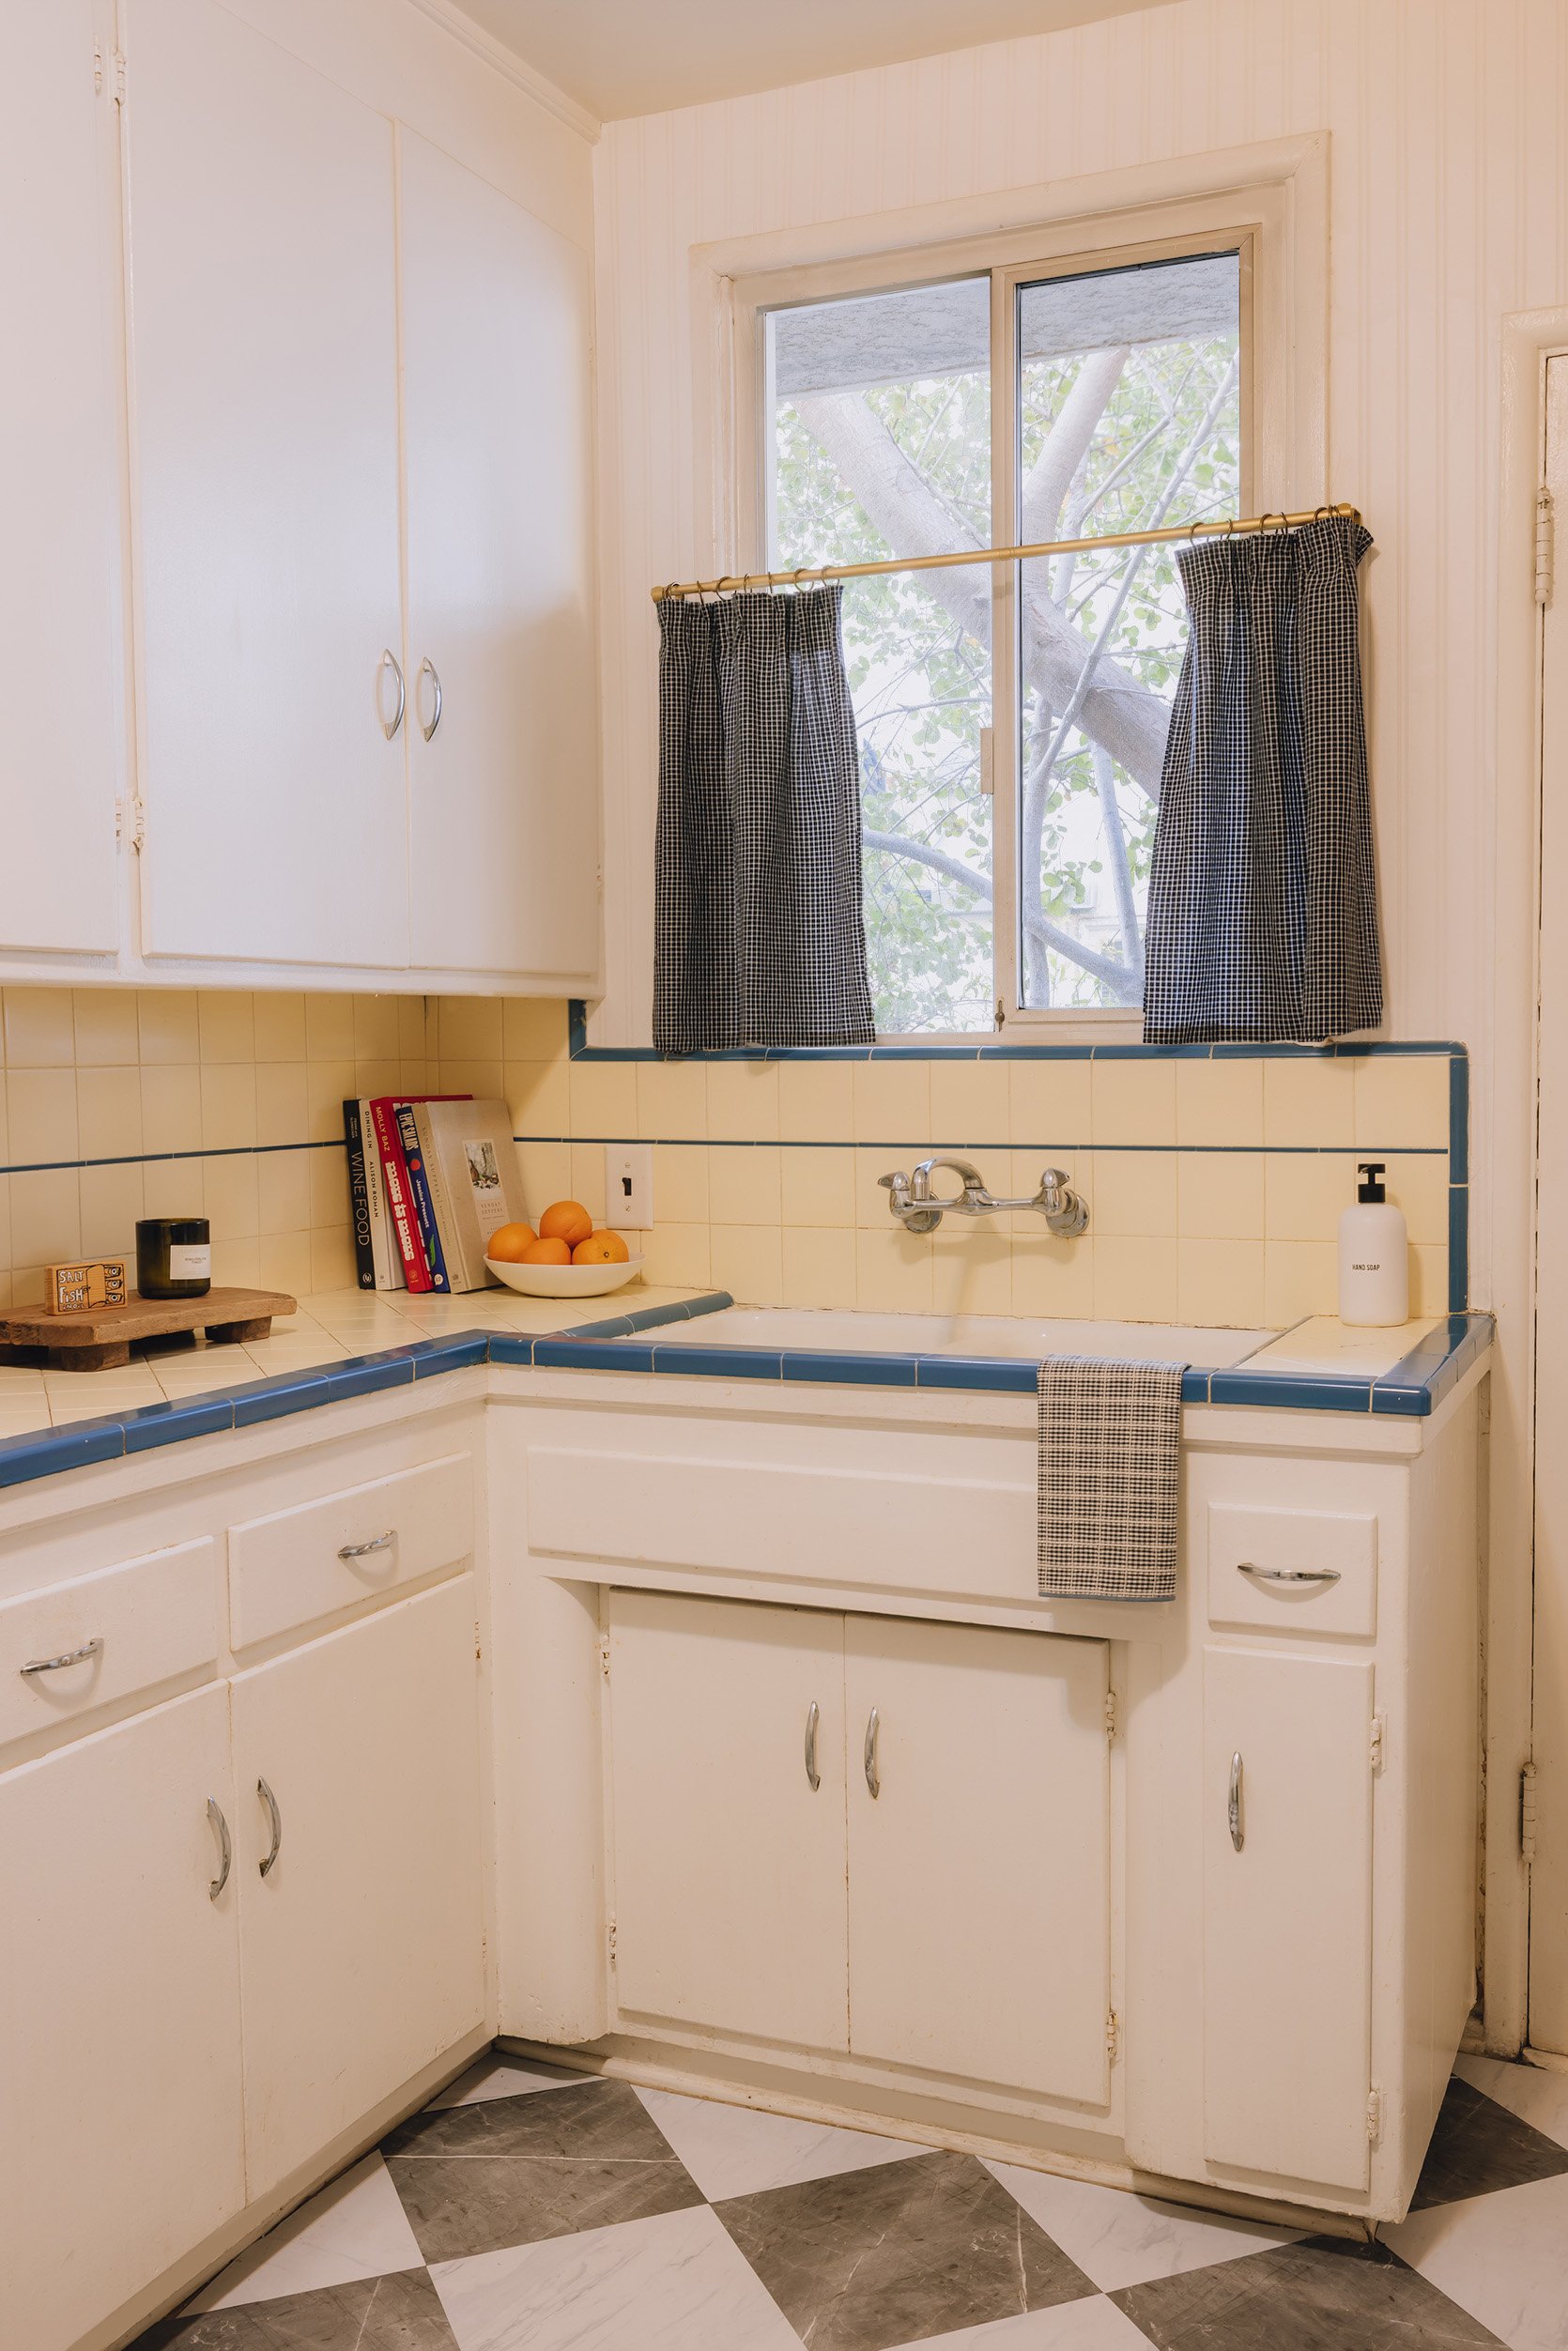
Here’s a look at those DIY cafe curtains! If you recall from the before photos, these were horrendous, sticky little vinyl blinds, and I could not have hated them more. I also swapped the ones on the door window to roman shades, which you can see here!
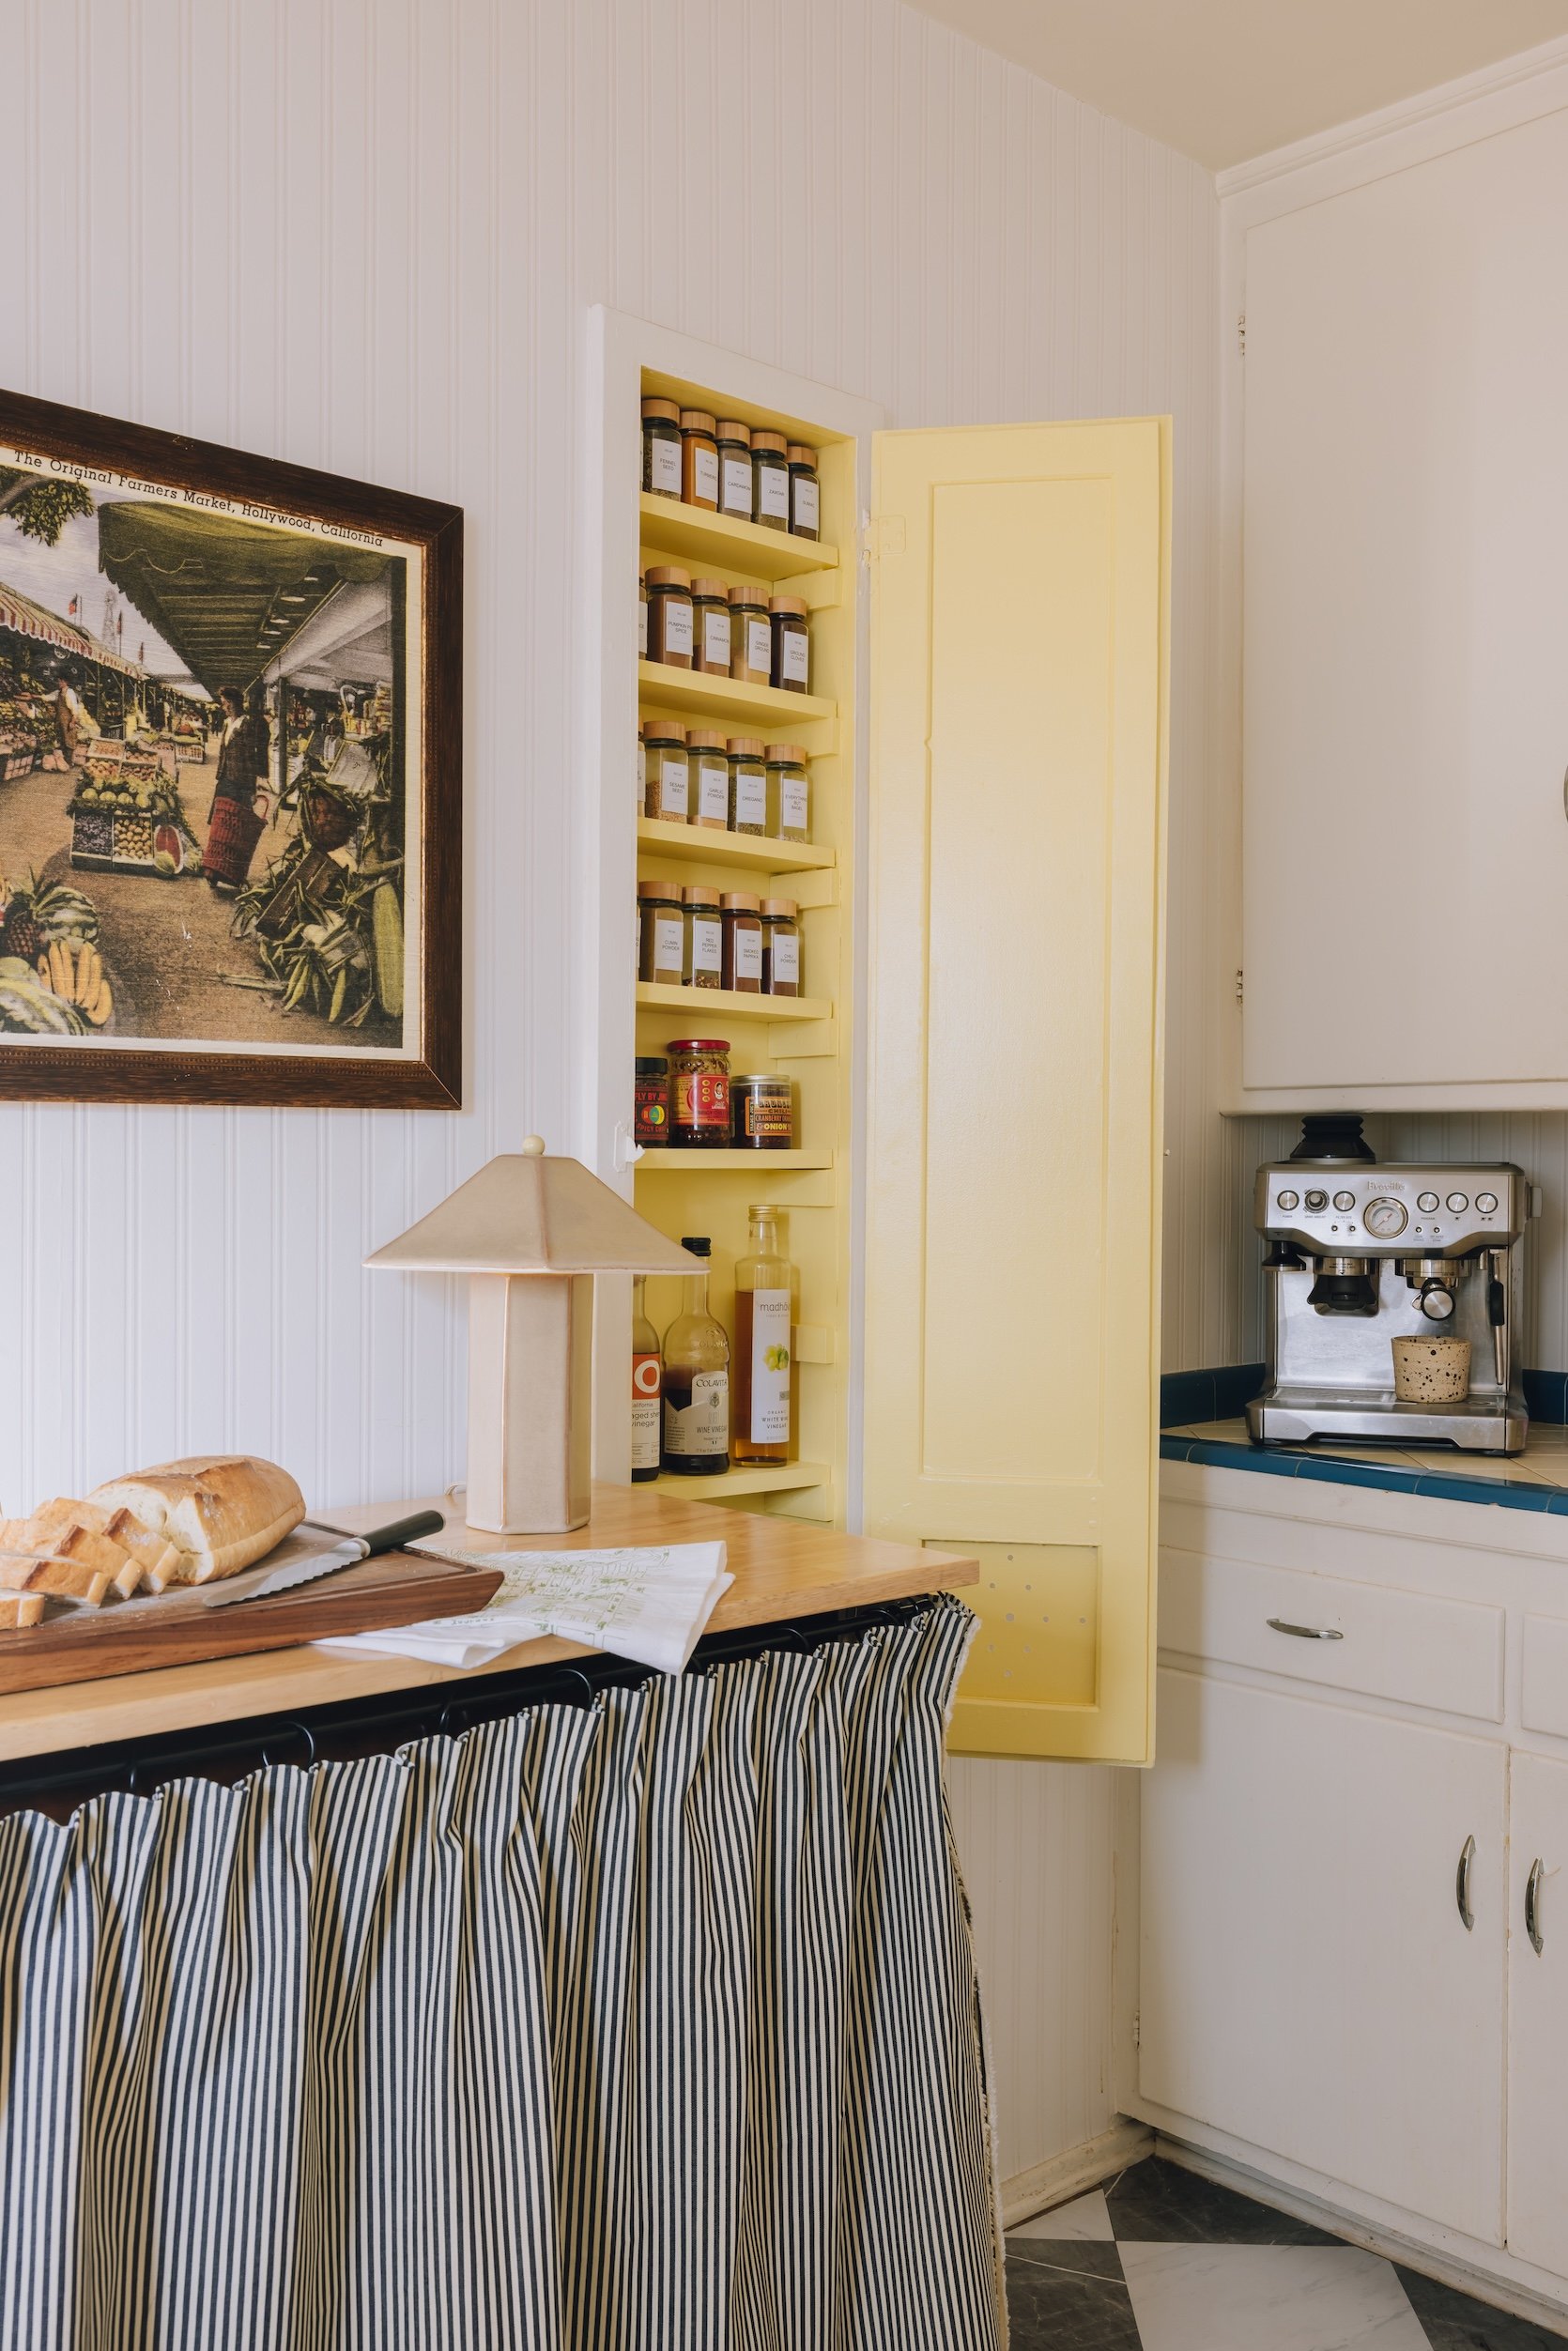
Spice Cabinet Paint Color | Spice Jars | Lamp | Cutting Board | Prep Table | Skirt Fabric | Breville | Breville Single Dose Hopper
The spice cabinet at its peak!! I absolutely love how this turned out – the pop of color makes me smile every single time I open it. I put in our beloved prep table, which gained us the counter space I was dreaming of (I’ll get more into the deets in a second), and then I put this vintage grove farmer’s market art piece above it (which I scored for $40 bucks at a vintage store!). I also love that this whole kitchen makeover made it so we can fit our Breville over here – although I did have to switch to this single-dose hopper (which is actually way better for bean freshness, I learned), but mainly I did it so it could fit under our low cabinets.
Also, that lamp is actually from Target, and it’s…so good. It comes in burgundy too, which is sold out everywhere, and people are trying to sell it for insane prices on FB marketplace, which is crazy to me. But it is cute, I’ll be honest…

Prep Table | Skirt Fabric | Fellow Coffee Maker | Pleat Tape | Curtain Rings | Tension Rod | C Hooks
I know what you’re gonna ask…”But Mallory, where did your microwave and toaster oven go!?” FEAST YER EYES! I found this super affordable prep table that was the perfect size to store our bulky appliances underneath, and then DIY’ed this skirt for it! I broke it all down here if you’re curious about how exactly I did it. Hot tip – I got glide tape to put on top of the rod, which made a huge difference in how the curtain rings slide on the adjustable rod (it’s also awesome for curtain rods that are adjustable!)

So that’s everything I did to my rental kitchen!! I hope this inspired you and proved that even the ugliest spaces in your home can be beautiful with just a little elbow grease!! (Well and the Smeg certainly helped too, haha). I’ll be revealing my bathroom soon too – which is the last space I’m going to share before I move out of here and in with my boyfriend (which is SO exciting!!) I have loved every second of living here, making this apartment a home and sharing it with all of you. Thank you so so much for reading this post, and happy 2026! I’ll see you in the comments 🙂
*Design by Mallory Wackerman
**Photography by Lyle Nelson
I clicked so fast! Well done, Mallory.
Thank you!!
Looks nice! I mostly like the cute spice cabinet! I do wonder about the cupboard, that is now blocked by the fridge: is that just an empty cupboard (and then why wasn’t it usable) or is there something like a water heater inside (because of both vents). If it’s the latter, I’d be careful with blocking the cupboard in general and blocking one of the vents…
Also pretty curious about this…
I’m also very intrigued about the empty cupboard and why it wasn’t usable
I do love the combo of the shelf and the curtain, contemplating doing something similar in my kitchen as I also use a refrigerator gap to store my brooms & mop, though its a little less visible / more tucked away so not sure if its worth it, high ROI type of project
It seems like it could have been a dumbwaiter. I had one in an apartment in NYC.
It doesn’t open!
Oh, a mysterious door, funny! I’m that case of course, it’s a well chosen place for the fridge!
So impressed!! It’s so fun to see how others solve problems without spending a lot of money. Thanks for sharing!!!
Ah I appreciate that so much! Thanks!
This is beautiful, and so much more functional too. Brava!
So beyond inspiring! I’m looking back on previous hideous apartment kitchens and wondering why I didn’t have your creativity/willingness to change things! This was so beautifully done!
This looks great! FYI the link to wallpaper shows a price of $68.97 a roll.
oh weird! must be a double roll maybe? Just updated the link in the post – it’s $34 on amazon!
Yay, thank you! It looks really good in the photos. Did you have any issues with scuffing or discoloration? That was mentioned in a bunch of the Wayfair reviews.
I didn’t have any issues with that! The scuffing can definitely happen because it’s a bit puffier than a normal wallpaper if that make sense but it’s been totally fine to live with and I haven’t personally had any issues with that!
It’s available for half that price on Amazon.
This is amazing!!!! Love what you did Mallory and love this kind of post for more budget friendly updates. More please!!!!
Can you do a step by step post about the curtain on the prep table? Please?
I didn’t take many photos during the process but I will see if I can pull something together! I basically just used fabric glue and folded the edges over to hem the fabric, then I glued on pleat tape to the back and put the pleat hooks into the pleat tape!
Thank you!
Mallory,
This is a fabulous result!
Kudos – you’ve come such a long way in your DIYand makeovers on a budget.
I absolutely love it,
Rusty 🥰
Thank you Rusty!
Adorable, Creative, Happy, Attainable ! I think the cabinet hardware and paint is perfect here without changes- Great work!
Thank you so much!
Love these junior staff make-overs! So much more relatable and useful than ones with bloated budgets and endless sponsorships! More, please!
THIS is an amazing makeover. incredibly attainable but still so inspirational!
I would not have thought the orginal could look this good or be this functional. Thanks for sharing- so inspirational.
That makes me so happy to hear thank you! Honestly I wasn’t sure either when I moved in haha!
What a great modification of this space Mallory! I love the creativity in rearranging the floor plan and the use of curtain panels to carve out your storage needs. I’m sure leaving this space is bittersweet…but I selfishly am hoping we will get to see your creativity shine in future reveals from your new apartment!
Thank you!! There’s lots more coming 🙂
Was so happy to see this post. I love your taste and enjoy your choices so much. Looking forward to the bathroom. And to seeing how you do your next place!! Great job on this apartment.
I can’t get over the tiny little curtain to create a broom closet. I love it all, but that little detail put it over the top. Amazing transformation.
it made such a huge difference!!
Totally agree. The whole thing is beautiful but that is genius. And I plan to do the same asap.
So impressive, and so charming. I’m a fan of those old tile countertops, even though they’re tough to clean. They look so cute in here with all the improvements you’ve made. You’re truly talented!
Great job! This reminds me what magical creatures women are and how we can truly take anything and make it better with a little ingenuity and creativity. I am worried the smeg will get dented smacking in to the stove though, can you put some padding on the stove??
It actually stops right before it hits the stove which is incredible!! Otherwise I would definitely put in some padding!
Absolutely fabulous!
I am absolutely obsessed. This is the most fantastic vibe, and such a smart use of space and color and texture. Incredible work!!
This is my favorite kind of content–accesible design. What a beautiful color palette, fantastic art and fabric choices, sweet little DIYs with major impact–it’s just perfection. I pinned so many of the shots. Thank you for sharing, Mallory! You have amazing taste. And congrats to you and your boyfriend!
This is one of my favorite posts of this blog in a long time — I like seeing what Emily can do with her big girl budget but this not only got the creative juices flowing but also inspired me to take a look at my own (rental) kitchen. Love it!!!
I’ve got a similar prep table / kitchen island on wheels, very tempted to take my leaning tower of pisa in the form of my microwave, toaster, hot water kettle, coffee maker, milk frother and move it to under the prep table. Way less visual clutter but that would mean my snack storage would have to go elsewhere… And I dont think there’s an outlet nearby…
This is the most relatable, helpful, and inspiring post I’ve read in ages! Thank you!! I have the same ironing board cabinet that I’ve dreamt about turning into a spice cabinet… doing it now! And I’m going to copy the curtain next to the fridge. Brilliant.
Absolutely love these affordable yet practical and cute as a button changes!
Like a few others, I have a similar gap between my fridge and wall where something like what you’ve done would be perfect to hide the ugly but necessary stepstool I keep there.
It looks like you placed a shelf on top of the fridge..? And then somehow attached the curtain under the shelf?
Would love to see an explanation of how you accomplished this little DIY!
In any case, it might just help me solve a sore point in our own kitchen, so thank you!
And congrats on your new soon-to-be roommate! 😉
it was super simple! Just some fabric (“hemmed” the sides with fabric glue) and then glue pleat tape to the back of the fabric and slide in the pleat hooks!
What an amazing change! Now that I’ve seen it, maybe I’ll be able to look at some of my spaces with new eyes. So many clever ideas. Great job.
Mal Gal!! It turned out SO GOOD!!! Who knew beadboard wallpaper existed?? And would look so good?! Well done all around <3
Fridges require space on all 4 sides for proper air circulation. It’s not just something that can be covered up. Moreover, the fridge blocks the oven door from being opened if the freezer door is also open. There’s a reason why kitchens are ideally designed in a triangle layout for appliances so that nothing gets in the way. Not everything in a home needs to look aesthetically pleasing. Some things are literally for the sake of function.
A Quick Look up of Smeg and you only need clearance for the door to open correctly and a couple inches at best for circulation.
Brooke, you are correct. But modern appliances don’t require that much room for ventilation. Per the Smeg manual: to ensure proper ventilation for your appliance allow 1 ¼” (3 cm) space on each side.
What a strange comment. Who would leave their freezer door hanging open to get something out of the oven? Or leave the oven hanging open to visit the freezer? I can’t even think of a scenario where you wouldn’t close either door immediately after using it. It’s obvious that Mal has greatly improved the function and flow of her tiny kitchen, which was actually her key concern in replacing the fridge, if you read her explanation…
Love it – it looks very British
Love. Love. Love.
ps thank you for the introduction to GLIDE TAPE! Because old Scotch tape does not do the thing.
it’s the best!
Girl, I loved your spice cabinet so much I copied it the same weekend you posted it!! Same F & B yellow, too! Love! Although, how do you deal with the espresso machine? I know you have to add water to the back of that thing!
It’s not hard to get out actually!! There’s just barely enough room haha
Absolutely brilliant! The layout, curtains, functionality and even NOT painting the cabinets. May you and your roommate have fun cooking up a storm!
I love all of these details! What a cool space. You did an amazing job transforming it. I can’t wait to see what you do with your next place!
It looks so so good! Great imagination getting each area to function well and look so nice!
Mallory, did you have to get landlord approval to use the prepasted wallpaper? Would love to do this but I’m afraid they’ll say no!
I didn’t because it’s honestly SUCH a subtle difference and our landlords are pretty chill. This is super case by case though!
Wonderful job Mallory 👏 ❤️🥳. I love every detail. However, I just wanted to point out that I’m jealous of all your top notch coffee equipment -especially the Fellow coffee maker under the prep table. Lol. ☕
Haha thank you!! I got very into coffee this year!!
Mallory, I just found out about three things that I didn’t even know existed! This is such a great post. Your ingenuity knows no bounds.
ah thank you!
Bravo!
You did an amazing job and this little piece is a GOLD MINE of info! Thank you and congratulations!!
Well done! Looks like an entirely new room! 🙂